Secure Vue Apps with Laravel 11 Middleware, Pinia & Vue Router

Building secure applications requires strong and effective authentication systems. In Laravel, middleware acts as a gatekeeper, controlling access to specific API endpoints and routes based on defined criteria. This quick tutorial teaches you how to create a custom authentication Laravel 11 middleware. We'll explore its seamless integration with a Vue.js 3 frontend, leveraging the power of Pinia for state management and Vue Router Guards.
What is a Middleware?
Middleware acts as a bridge between the client's request and the application's response in Laravel. It intercepts HTTP requests and allows developers to perform tasks such as authentication, logging, and session management before passing the request to the application's core logic.
Importance of Middleware in Application Security
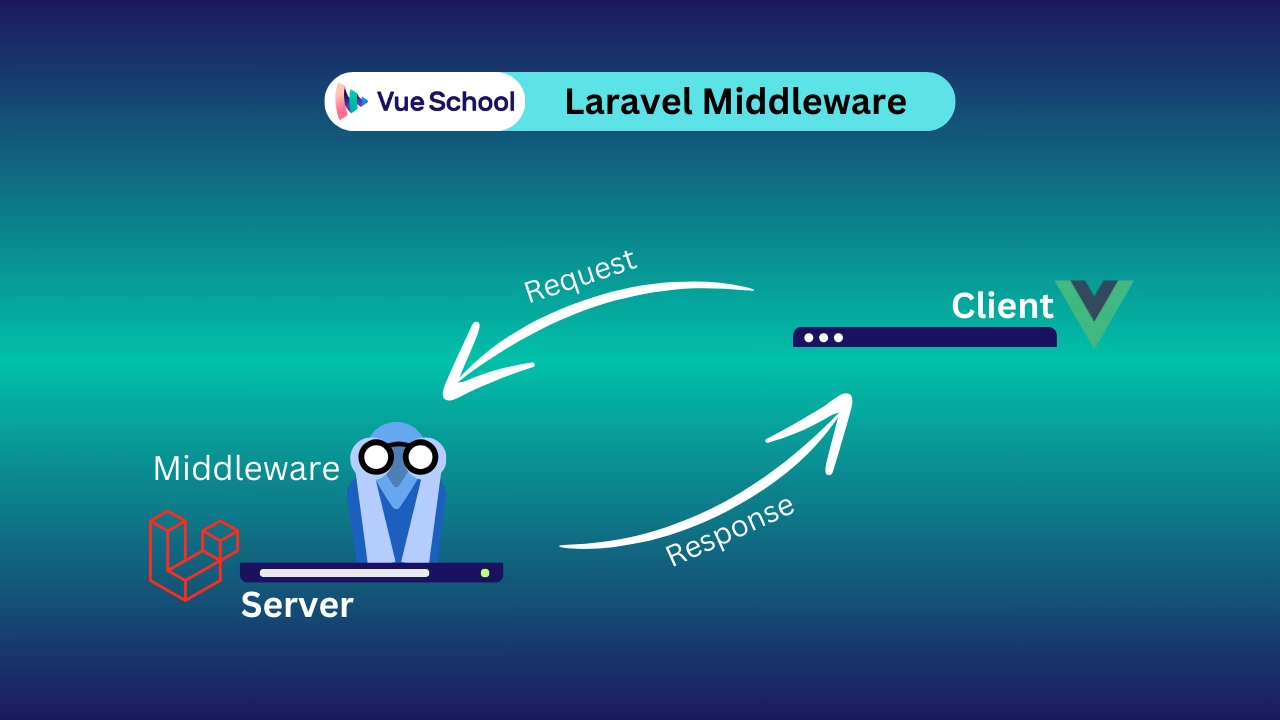
Middleware serves as a critical line of defense for web applications. When it intercepts a request, it allows for crucial security measures like user authentication, data validation, and access control enforcement. As a result, middleware helps mitigate common threats such as unauthorized access and data breaches.
Additionally, middleware promotes code reusability and simplifies maintenance by consolidating common functionalities that can be applied across various routes or controllers.
Hypothetical Project Structure
For this tutorial, we'll assume the following project structure:
- Laravel Backend (
backenddirectory): This directory contains your Laravel 11 application files. - Vue.js Frontend (
frontenddirectory): This directory contains your Vue.js 3 application files along with Pinia and Vue Router. The Vue js app communicates with the Laravel backend APIs to fetch the required data.
With the project structure in mind, let's get to the process of creating and utilizing our custom Laravel auth middleware.
Getting Started with Laravel 11 Middleware
Just like anything else in Laravel, the process of creating a new middleware is straightforward and easy. In this section, we’ll go through a step by step guide into creating a Laravel 11 Middleware.
Create a New Middleware
In our Laravel 11 app, we can create a new middleware by running the following command in the terminal:
php artisan make:middleware UserCanProceedThis command will create a new UserCanProceed.php file inside ~/app/Http/Middleware directory. The file will contain boilerplate code to help us get started:
<?php

namespace App\Http\Middleware;

use Closure;
use Illuminate\Http\Request;
use Symfony\Component\HttpFoundation\Response;

class UserCanProceed
{
    /**
     * Handle an incoming request.
     *
     * @param  \Closure(\Illuminate\Http\Request): (\Symfony\Component\HttpFoundation\Response)  $next
     */
    public function handle(Request $request, Closure $next): Response
    {
        return $next($request);
    }
}
Right now, the middleware basically does absolutely nothing. It has a handle method that takes the request, and allows the request it to continue using $next().
Let’s tweak this handle method to return a different response. Perhaps, for a bit of fun, we abort the request with an aggressive 403 error and a message saying “YOU SHALL NOT PASS!”:
class UserCanProceed
{
    public function handle(Request $request, Closure $next): void
    {
        abort(403, 'YOU SHALL NOT PASS!');
    }
}
If we then run the app, we won’t see the changes. And this is because we haven’t registered the middleware to the app yet.
Registering Laravel Global Middelware
To register a new Laravel middleware globally to the app, head to app/Http/Kernel.php and add the middleware including its namespace to the $middleware array following the below syntax:
protected $middleware = [
    \App\Http\Middleware\UserCanProceed::class,
    // ..
];
Now, as we launch the app and attempt to access any of its routes, our UserCanProceed middleware will firmly block our path.

It works as expected, but what if we wanted to register this middleware only to a specific route? This is called a Route Middleware, and it’s quite helpful.
Registering Laravel Route Middleware
A Route Middleware is when you selectively choose specific routes that this middleware should intercept their request. For example, let’s create couple of routes in our application’s ~/routes/api.php:
// api.php

Route::get('/secured', function () {
    return "<h1>Super confidential content</h1>";
});

Route::get('/guest', function () {
    return "<h1>Stranger danger!</h1>";
});
In the above code, we have two API endpoints registered to the app:
api/secured: A route for hypothetical confidential content.api/guest: A route for where guests should land if they attempt to access an un-authorized route.
Let’s get back to our Middleware, and instead of aborting, I want to implement a check to verify if the user can proceed to the request path.
// ~/app/Http/Middleware/UserCanProceed.php

public function handle(Request $request, Closure $next): Response
{
    if (auth()->user()) {
        return $next($request);
    }

    return redirect('api/guest');
}
With this code, the Laravel middleware verifies if the request is coming from an authenticated user. If it does, it proceeds with the request. However, if not, it redirects to api/guest, which will display the message 'Stranger danger!' within an <h1> tag.
However, there's a hiccup in our plan. Despite our efforts, this won't quite hit the mark. Why? Well, it all boils down to how we've globally registered the middleware. Every time the middleware points the user to /api/guest, it triggers the same series of checks and redirects. Which means, we're stuck in a loop.
To break free from this cycle, we need to refine our approach and limit the middleware registration to a single endpoint. To do so, we need to head back to app/Http/Kernel.php and remove the middleware from the $middleware array. Then, we add it to the $middlewareAliases array.
protected $middlewareAliases = [
    'UserCanProceed' => \App\Http\Middleware\UserCanProceed::class,

    // ..
];
With that in place, we can now assign a single route or endpoint to be validated by this middleware. Head to ~/routes/api.php and use the below syntax to set the middleware on a specific endpoint:
// api.php
use App\Http\Middleware\UserCanProceed;

Route::get('/secured', function () {
    return "<h1>Super confidential content</h1>";
})->middleware(UserCanProceed::class);;

Route::get('/guest', function () {
    return "<h1>Stranger danger!</h1>";
});
In the above code snippet, by simply adding ->middleware() to the API endpoint and passing the middleware class, we successfully attach the middleware to this endpoint.
Registering Laravel Group Middleware
When dealing with multiple routes requiring the same middleware, Group Middleware comes to the rescue. Instead of assigning them individually, we can group them together. No need for any changes in the Kernel.php file; simply head to ~/routes/api.php and use the syntax in the code snippet below:
Route::middleware([UserCanProceed::class])->group(function () {
    Route::get('/secured-1', function (Request $request) {
        return "<h1>Super confidential content 1</h1>";
    });

    Route::get('/secured-2', function (Request $request) {
        return "<h1>Super confidential content 2</h1>";
    });
});

Route::get('/guest', function (Request $request) {
    return "<h1>Stranger danger!</h1>";
});
Now that we know how to create and register a Laravel middleware, it’s time to hit those protected endpoints from our Vue.js app. Before doing that, it’s very unlikely that we will ever return plain HTML from an API. So let’s modify api.php and UserCanProceed.php files to return realistic responses:
// ~/routes/api.php

Route::get('/secured', function (Request $request) {
        // Return json with the user details
    return response()->json([
        'user_name' => 'John Doe',
    ]);
})->middleware(UserCanProceed::class);
// ~/app/Http/Middleware/UserCanProceed.php
public function handle(Request $request, Closure $next): Response
{
if (auth()->user()) {
return $next($request);
}
// Will abort the request with 403 error if the user is not authenticated
abort(403, 'YOU SHALL NOT PASS!');
}Consuming a Secured Laravel 11 API Endpoint with Vue.js and Pinia
Now that our API endpoints are secured with a firm Laravel middleware, we need to hit those endpoints from the Vue.js frontend.
Using Axios in Vue.js to Consume Laravel APIs
In the Vue.js app, we can consume the Laravel API endpoints from our Single-File Components using Axios (axios-http):
<template>
    <div v-if="isLoading">Loading..</div>
  <template v-else>
      <div v-if="userData">
        <h1>Hello, {{ userData.user_name }}!</h1>
        <p>You have successfully accessed the secured data.</p>
      </div>
      <div v-else>
        <p>You are not authorized to view this content.</p>
      </div>
  </template>
</template>

<script setup>
import axios from 'axios'
import { ref } from 'vue'

const userData = ref(null)
const isLoading = ref(true)

const fetchUserData = async () => {
  try {
      // Replace http://127.0.0.1:8000 with Laravel domain
    const response = await axios.get('http://127.0.0.1:8000/api/secured')
    if (response.status === 200 && response.data.user) {
      userData.value = response.data
    }
  } catch (error) {
    // Handle errors appropriately (e.g., display an error message)
    console.error(error)
  }
  isLoading.value = false
}

await fetchUserData()
</script>
Here’s a breakdown to what is happening in the above code snippet:
- This component utilizes the composition API with script setup syntax.
- We import axios for performing HTTP requests.
- The
fetchUserDatafunction leveragesaxios.getto fetch data from the/api/securedendpoint. - The
userDataref holds the fetched data (if successful). - The
isLoadingref is updated to false once thefetchUserDatafunction is completed. - Conditional rendering displays fetched data (if
userDatahas a value) or an unauthorized message. - Error handling is included to handle potential issues during the request.
Utilizing Pinia to Store Laravel API Retrieved Data
We can take it a step further by utilizing Pinia to store and preserve userData throughout the entirety of our Vue.js application.
Pinia is a state management library designed specifically for Vue.js, offering a simple yet powerful solution for managing application state. With Pinia, we can organize our application's data into stores, making it easy to access and manipulate across Vue js components.
By centralizing our state management with Pinia, we ensure consistency and efficiency in our Vue.js application, streamlining development and enhancing user experience.
Assuming we have Pinia installed in the Vue.js app, and we have a simple authStore store located at @/stores/authStore. The store should look like this:
// ~/src/stores/authStore.js

import { defineStore } from 'pinia'
import { ref } from 'vue'

export const useAuthStore = defineStore('authStore', () => {
  // A variable ref to store the user data
  const userData = ref(null)

  // A function acts as a setter to set the incoming user data
  const setUserData = (newUserData) => {
    userData.value = newUserData
  }

  return { userData, setUserData }
})
here's how we can store the data retrieved from Laravel API endpoint to that Pinia store:
import axios from 'axios'
import { ref } from 'vue'

import { useAuthStore } from '@/stores/authStore';

const isLoading = ref(true)

// Initialize the store
const authStore = useAuthStore()

const fetchUserData = async () => {
  try {
        // Hit the Laravel API using Axios
    const response = await axios.get('http://127.0.0.1:8000/api/secured')
    if (response.status === 200 && response.data?.user_name) {
        // Update Pinia store with user data
      authStore.setUserData(response.data)
    }
  } catch (error) {
    // Handle errors appropriately (e.g., display an error message)
    console.error(error)
  }
  isLoading.value = false
}

await fetchUserData()
Feel free to configure Axios Base URL for better developer experience if you like. Then, inside the template of the Vue SFC, we can use the stored values to conditionally display the secured content:
<template>
    <div v-if="isLoading">Loading..</div>
  <template v-else>
      <div v-if="authStore.userData">
        <h1>Hello, {{ authStore.userData.user_name }}!</h1>
        <p>You have successfully accessed the secured data.</p>
      </div>
      <div v-else>
        <p>You are not authorized to view this content.</p>
      </div>
  </template>
</template>
Protect Routes With Vue Router's Navigation Guards
Vue Router is the official router for Vue.js apps. With Vue Router's navigation guards, we can restrict access to protected routes based on the user's authentication status. By intercepting route navigation, Vue Router can redirect unauthenticated users to the login page or display appropriate error messages.
So, inside our ~/src/router/index.js where we initiate Vue Router, we can use the Global Before Guards like so:
import { createRouter, createWebHistory } from 'vue-router'
import { useAuthStore } from '@/stores/authStore'

const router = createRouter({
  history: createWebHistory(),
  routes: [
  // ..
  ]
})

// Global Navigation Guard for Authentication Checks
router.beforeEach((to, from) => {
  const authStore = useAuthStore()

    // Redirect the user to the login page if the user is not authenticated
    // And not already attempting to visit the login or register pages
  if (!authStore.userData && to.path !== '/login' && to.path !== '/register') {
    return {
      name: '/login'
    }
  }
})

export default router
In the above code snippet, we’re defining a navigation guard using router.beforeEach. This guard gets called before every navigation attempt within our Vue.js application:
toandfromArguments: The guard receives two arguments:torepresents the route the user is trying to navigate to, andfromrepresents the route they are currently on.useAuthStore: We calluseAuthStoreto access the Pinia store and retrieve the user's authentication state (stored inuserDataproperty).- Authentication Check: The main logic resides within the
ifstatement. It checks two conditions:!authStore.userData: This checks ifuserDatais falsy (meaning the user is not authenticated.!(to.path === '/login' || to.path === '/register'): This checks if the user is trying to access the login or register routes. It ensures the guard allows navigation to these specific routes.
- Unauthenticated Redirection: If both conditions in the
ifstatement are true (user not authenticated and not accessing login/register), the guard returns an object with anameproperty set to"login". This instructs Vue Router to redirect the user to the route named"login"(presumably your login page).
Want to unlock advanced Vue.js features and build even more dynamic applications? The Vue.js 2024 Masterclass dives into state management, file-based routing with Vue Router, and more!
Implementing a Real Laravel 11 Authentication System
When it comes to implementing a real authentication system for Laravel APIs and routers, developers have several techniques at their disposal. These techniques vary in complexity and customization options, depending on each project requirements and developer preferences.
Custom Authentication
Laravel's flexibility shines when it comes to crafting custom authentication mechanisms. These custom approaches provide great control over the authentication process, meant for projects with specific requirements that goes beyond the scope of pre-built solutions. Here's a breakdown of some commonly used custom authentication techniques:
- Session-based and Cookie-based Authentication: For web applications requiring traditional server-side session-based authentication, Laravel's built-in session management features can be leveraged.
- Laravel Sanctum and Fortify Authentication: Laravel Sanctum provides a lightweight package for API authentication using Laravel's built-in session authentication services, while Laravel Fortify offers robust authentication features for web applications. When used together, Sanctum and Fortify provides the perfect solution for securing both APIs and web routes for a Vue.js SPA. VueSchool has an amazing tutorial to guide you into using Laravel Sactum and Fortify to create Auth for Vue.js SPA.
- OAuth2 Authentication: OAuth2 is an industry-standard protocol for authorization, enabling secure authentication between applications. Laravel supports OAuth2 authentication via laravel/passport, facilitating token-based authentication and authorization workflows.
- JWT Authentication: JSON Web Tokens (JWT) have gained popularity for their stateless nature and ability to securely transmit information between parties. The Laravel community offers seamless integration with JWT through packages like tymon/jwt-auth, providing robust authentication mechanisms for APIs.
Laravel Starter Kits: Breeze and Jetstream
In addition to custom authentication implementations, Laravel offers two starter kits, Breeze and Jetstream, to streamline the authentication process. These starter kits provide pre-built authentication scaffolding with Vue.js and Inertia.js support out of the box.
- Laravel Breeze: Breeze offers a minimalistic approach to authentication, providing simple authentication scaffolding without unnecessary dependencies. It includes features such as user registration, login, and email verification, making it ideal for lightweight applications or projects requiring basic authentication functionality.
- Laravel Jetstream: Jetstream offers a more feature-rich solution with support for team management, API token authentication, and two-factor authentication.
By choosing between Breeze and Jetstream based on project needs, developers can skip the authentication implementation process and focus on building core application functionality.
Laravel Reverb and Authentication
Laravel Reverb is a real-time communication server designed for Laravel applications. Imagine users receiving instant notifications or chat messages without refreshing the page. Reverb, coupled with Laravel's authentication and Vue.js, improves the user experience by allowing you to control which real-time events reach specific users.
Building on authentication, Laravel's broadcasting system, in conjunction with Reverb, empowers you to create private channels. These channels restrict access to authorized users, establishing secure communication within specific groups or teams. Think of it as a secure chat room accessible only to authenticated users with the necessary permissions. This integration unlocks possibilities for real-time collaboration tools or dynamic dashboards, fostering a more engaging user experience.
Imagine this: a user logs in and is authenticated using any of the authentication methods we mentioned earlier. Laravel remembers them. Now, when an event relevant to that user occurs (e.g., a new message arrives), Laravel Broadcasting leverages user information to broadcast the event only to authorized channels. For example, it would look like this:
Broadcast::channel('message.{id}', function ($user, $id) {
    return (int) $user->id === $id;
});
Laravel Reverb then pushes this event instantly to the user's connected client. This smooth integration between Laravel's authentication, broadcasting, and Reverb fosters a more dynamic and personalized user experience.
If you want to learn more about using Laravel Reverb with Vue.js, checkout the Real-Time Data with Laravel Reverb and Vue.js course on Vue School. In this course, you’ll learn how to pair a Vue.js front-end with Laravel Reverb for real-time data support.
Conclusion
Incorporating Laravel's powerful backend and Vue.js's intuitive frontend framework empowers developers to craft secure, high-performance authentication systems with a great user experience. Whether you choose custom middleware or leverage Laravel's out-of-the-box solutions, building a strong authentication system is both achievable and rewarding.
For those seeking a simplified backend integration solution, consider learning Nuxt.js. The Laravel Backends for Vue.js 3 course dives into using Nuxt.js with Laravel, providing a complete guide to this powerful combination.
Start learning Vue.js for free

Comments
Latest Vue School Articles

Just Released: Nuxt Hub Multi-Vendor and First-Class DB


Vue.js – 2025 In Review and a Peek into 2026
Our goal is to be the number one source of Vue.js knowledge for all skill levels. We offer the knowledge of our industry leaders through awesome video courses for a ridiculously low price.
More than 200.000 users have already joined us. You are welcome too!
© All rights reserved. Made with ❤️ by BitterBrains, Inc.