
The Ultimate Guide for Using Vue.js with Laravel

When you combine Vue.js and Laravel, you unlock a dynamic full-stack partnership, unleashing the full potential of JavaScript and PHP. This dynamic duo empowers developers to build lightning-fast, interactive single-page applications (SPAs), all while leveraging the advantages of server-side rendering. However, as these technologies evolve, so do the ways they work together.
This article is your guide to navigating the exciting world of Vue-Laravel integration. We'll delve into different approaches, exploring their strengths and weaknesses to help you choose the perfect match for your project.
But before we get into the specifics of integrating the two powerhouses, let's take a moment to understand the compelling benefits this partnership brings to the table.
Benefits of Using Vue.js with Laravel
The collaboration between Vue and Laravel goes beyond a simple convenience; it's a strategic alliance forged in the fire of modern web development needs. Let’s go through some of these advantages:
- Single-Page Application: Vue.js adds dynamism into Laravel's robust backend through reactivity and virtual DOM manipulation, creating SPAs that feel native and lightning-fast. The collaboration eliminates clunky page refreshes and sluggish interactions, delivering enhanced user engagement, reduced server load, and an overall smoother experience.
- Hot Reloading Magic: Both Vue and Laravel support Vite, offering the Hot Module Replacement (HMR) feature. This feature instantly reflects code changes in the browser without requiring page refreshes, saving developers valuable time and effort.
- Server-Side Rendering: Vue.js and Laravel strategically manage SEO challenges through a coordinated approach. Laravel's server-side rendering pre-renders HTML content for search engines, ensuring optimal SEO. Simultaneously, Vue.js handles client-side interactivity, creating a best-of-both-worlds approach that harmonizes SEO priorities with dynamic user experiences.
- State Management Serenity: Managing application client-side state can be chaotic, but tools like Pinia make it smooth. Alternatively, if server-side state management is your preference, Inertia.js efficiently takes the reins.
- Community Chorus: Embrace the community power! Vue.js and Laravel feature vibrant communities with unmatched support, extensive documentation, and a continuous flow of innovative libraries and packages. This collaborative environment empowers developers to conquer challenges, share knowledge, and explore new possibilities.
- Future-Proof Foundations: With both Vue.js and Laravel constantly evolving to embrace the latest web technologies and trends, your applications remain relevant and adaptable. This forward-thinking approach ensures your skills remain valuable, and your projects stand the test of time.
These are a few benefits of combining Vue.js and Laravel. Using their powers together, developers can make fast, easy-to-manage web apps that captivate users and outshine the competition.
However, echoing the wise words of Uncle Ben to Spiderman, "With great power comes great responsibility". When working with a client-side JavaScript framework like Vue alongside a server-side PHP framework like Laravel, certain responsibilities require careful consideration.
Rendering Modes
To make a well-informed decision about integrating Vue.js with Laravel for your specific use case, it's crucial to grasp the differences between various rendering modes.
Client-Side Rendering
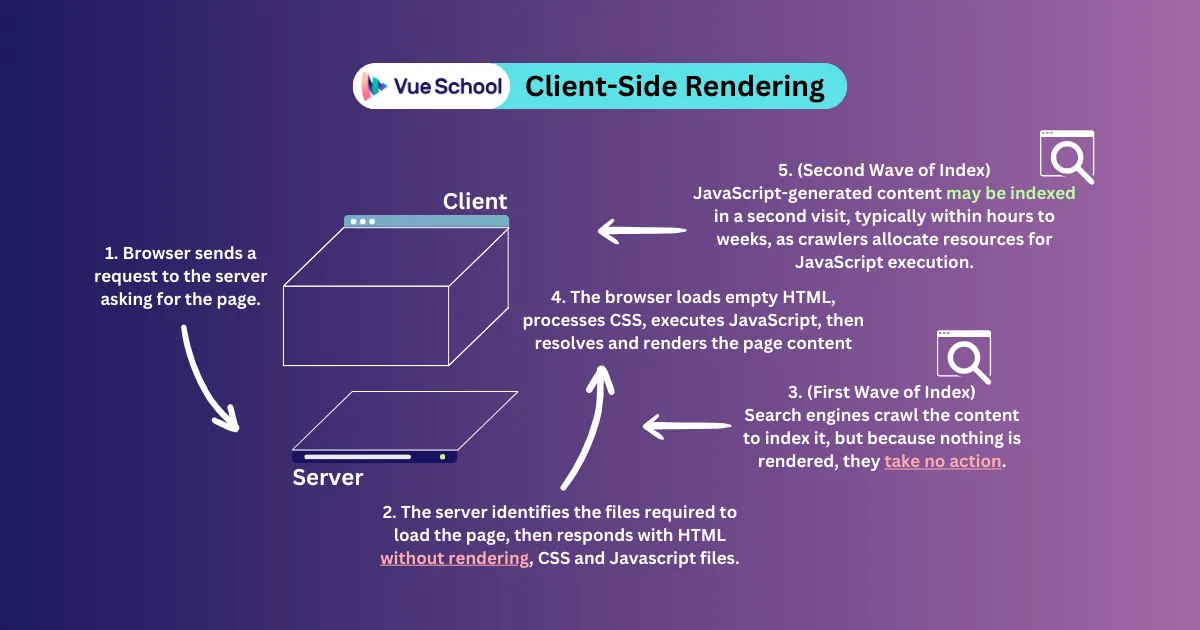
When building a client-side rendered application (CSR), the server's primary role is to act as a file provider. It delivers empty HTML without rendering along with the essential CSS, and JavaScript assets to the browser.
Upon the server’s response, search engine crawlers intercept the response to read and index the content. However, when they find an empty HTML, some of them are able schedule a second visit, once they have the available resources to execute JavaScript. This may result in indexing delays ranging from hours to weeks.
Finally, once the browser is equipped with the required files, it takes center stage, processing and parsing the HTML, applying the CSS styling, and executing JavaScript code.
From this point forward, JavaScript performs a series of tasks, including populating the page with data, crafting interactive elements, managing authentication processes, and, in the case of single-page applications (SPAs), handling client-side navigation without full page reloads.
Server-Side Rendering
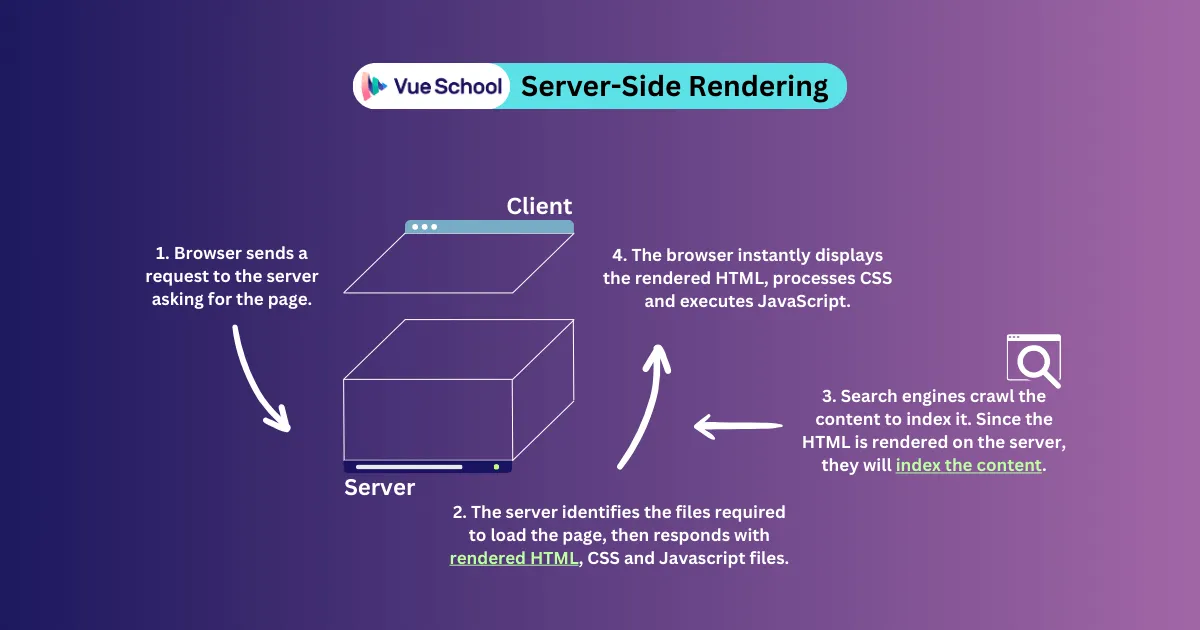
In server-side rendered applications (SSR), the server crafts a fully rendered HTML page before sending it to the browser. This means the server takes on the initial tasks of fetching data and populating the content. The result is a complete web page, ready to be displayed immediately upon arrival in the browser.
This approach ensures that search engine crawlers can effortlessly consume and index the content without delays or the need for second visits.
While the browser still receives and executes JavaScript in SSR, its role shifts to primarily enhancing interactivity and managing dynamic updates that occur after the initial page load. This includes handling user interactions, loading additional content, or managing client-side routing in SPAs.
By offloading the initial rendering work to the server, SSR can often lead to optimized performance and improved SEO.
The Vue.js and Laravel partnership enables developers to build both CSR and SSR apps. However, it’s not a one-size-fits-all affair. Instead, it unfolds a range of integration methods, each with its own set of benefits and challenges. The integration method you choose will play a crucial role in determining your app's rendering technique and whether it adopts the SPA or MPA model.
Method 1: Single Blade Hosting a Vue.js App
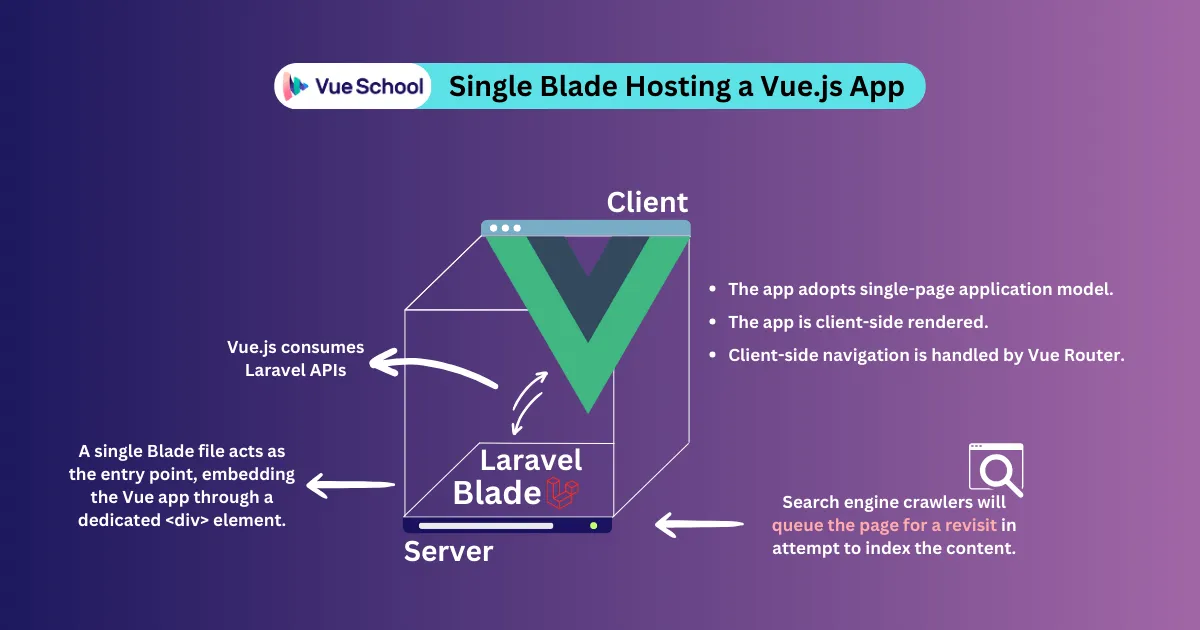
In this API-driven integration method, a single Laravel blade file acts as the host for the entire Vue.js application. Both frameworks coexist harmoniously within the same project directory, facilitated by the power of Vite’s official plugin for Vue.
Despite sharing the same project directory and the same domain, this approach still adopts separation of concerns principle, allowing Vue.js to function as a client-side rendered application while consuming Laravel APIs.
Moreover, Vue Router, the official routing solution for Vue, will seamlessly manage client-side navigation, simplifying the process of creating SPAs. If you're eager to become a Vue Router pro, consider exploring our dedicated course at VueSchool. It's designed to equip you with the skills to master Vue Router effortlessly.
Integration Guide
The first step is to craft a new Laravel project. I will use composer for this one.
composer create-project laravel/laravel example-appThe previous command installed the latest version of Laravel (currently v10.10). Next, we install Laravel related npm dependencies.
npm installNow, we’re ready to invite Vue to the party.
npm install vue@next vue-router@4 @vitejs/plugin-vueThe previous command installed the latest version of Vue, Vue Router and Vite’s official plugin for Vue 3.
// package.json
"dependencies": {
    "@vitejs/plugin-vue": "^6.0.1",
    "vue": "^3.5.18",
    "vue-router": "^4.5.1"
}
To start using Vue in Laravel, we should add Vite’s plugin for Vue to the plugins array inside vite.config.js file. The final code will look like this:
import { defineConfig } from "vite";
import laravel from "laravel-vite-plugin";
import vue from "@vitejs/plugin-vue";

export default defineConfig({
    plugins: [
        vue(),
        laravel({
            input: ["resources/css/app.css", "resources/js/app.js"],
            refresh: true,
        }),
    ],
    resolve: {
        alias: {
            vue: "vue/dist/vue.esm-bundler.js",
        },
    },
});
Head to ./resources/js and create a new file App.vue . This file will serve as an entry point for our Vue.js application.
<template>
    <h2>
        VueSchool Rules!
    </h2>
</template>
Time to create a new Vue app instance in our Laravel project. To do so, we’ll need to modify ./resources/js/app.js file and add the following
import "./bootstrap";
import { createApp } from "vue";

import App from "./App.vue";

createApp(App).mount("#app");
This will mount our Vue app inside an element with the id of “app”. Let’s create that <div> within the <body> of ./resources/views/welcome.blade.php file. This Blade file containing our Vue app, is the only Laravel file that will be exposed to the browser.
<body>
    <div id="app"></div>
</body>
We also have to import our ./resources/js/app.js file using the @vite() Blade directive.
<head>
    @vite(['resources/js/app.js'])
</head>

<body>
    <div id="app"></div>
</body>
With just that, we got Vue working with Laravel ? We can test it by running npm run dev and php artisan serve

We still need to make it a dynamic single-page application. To achieve this, we will use Vue Router. Let’s create a new file ./resources/js/router.js to define the router :
import { createRouter, createWebHistory } from "vue-router";

const routes = [];

export default createRouter({
    history: createWebHistory(),
    routes,
});
Next step, integrate the router we just created with our Vue instance inside ./resources/js/app.js file
import "./bootstrap";
import router from "./router/router";
import { createApp } from "vue";

import App from "./App.vue";

createApp(App).use(router).mount("#app");
So, now we need a ./resources/js/Pages/ directory that will contain our route components. We first create ./resources/js/Pages/HomeRoute.vue with a router-link to test internal navigation when we’re done:
<template>
    <div>
        <h2>HOME</h2>
        <router-link to="/test"> Take me to Test page </router-link>
    </div>
</template>
Then we create ./resources/js/Pages/TestRoute.vue
<template>
    <p>I'm here to test!</p>
</template>
Next, Lazy load the new route components in the router’s file ./resources/js/router.js
import { createRouter, createWebHistory } from "vue-router";

const routes = [
    {
        path: "/",
        component: () => import("./Pages/HomeRoute.vue"),
    },
    {
        path: "/test",
        component: () => import("./Pages/TestRoute.vue"),
    },
];

export default createRouter({
    history: createWebHistory(),
    routes,
});
It's worth mentioning that we can use unplugin-vue-router package to enable file based routing feature. But for this tutorial, we’ll stick with the official Vue Router approach.
Finally, we tweak the code inside the Vue entry file to make it dynamic. Luckily, Vue Router provides RouterView built-in component, which exposes slots that we can leverage to dynamically render route components.
Head to ./resources/js/App.vue and modify it as follows:
<template>
    <router-view v-slot="{ Component, route }">
        <div :key="route.name">
            <Component :is="Component" />
        </div>
    </router-view>
</template>
Now if we hit npm run dev and php artisan serve in the terminal, click on the link to navigate to /test , we will find it working as expected with client-side navigation. But here’s the catch, if we do a hard refresh, Laravel will return a “404 Not Found” error. This is happening because we don’t have web routes defined in Laravel.
To overcome this challenge, we can head to ./routes/web.php and define a single route that will catch all valid routes and use the Blade entry file which contains our Vue application.
Route::get('/{vue_capture?}', function () {
    return view('welcome');
})->where('vue_capture', '[\/\w\.-]*');
With that done, hard refresh won’t ruin our application anymore. However, it’s worth mentioning that 404 pages still need to be handled using Vue Router. You can follow the instructions in the “404-not-found-page” free lesson at VueSchool to handle this scenario like a pro.
At this point, we still don’t have a communication channel between Vue’s client-side components with Laravel backend. For this, we can use axios as our promise-based HTTP client for the browser.
npm install axiosLet’s quickly craft a testing API endpoint in Laravel and consume it from a Vue component. Inside ./routes/api.php , we will add a new API endpoint
Route::get("/test-me", function () {
    return 'Hello from Laravel!';
});
We’ll then consume this new API endpoint from ./resources/js/Pages/HomeRoute.vue component using axios. Let’s prepare a button that will trigger getValue() function which will fire a get request to the endpoint. I’ll also create a ref to store the response value.
<template>
    <div>
        <h2>HOME</h2>
        <router-link to="/test"> Take me to Test page </router-link>
        <button @click.prevent="tiggerEndpoint">Trigger Endpoint</button>
        <p v-if="response">{{ response.data }}</p>
    </div>
</template>
Finally, we’ll use script setup to create the function and variable ref
import axios from "axios";
import { ref } from "vue";

const response = ref();

const getValue = async () => {
    try {
        response.value = await axios.get("/api/test-me");
    } catch (error) {
        // Do something with the error
        console.log(error);
    }
};
When we run the app, and once the button is clicked, the getValue() function will trigger the test-me endpoint and the response will be displayed in the browser.
Summary
Here are some advantages and challenges of integrating Vue with Laravel by nesting Vue in a single Blade file:
Advantages:
- Vue.js and Laravel share the same domain and the same git repository.
- Both frameworks coexist in the same project but are neatly organized in separate directories.
- The application is a client-side rendered, single-page application.
- No need to create Laravel web routes; Vue Router handles client-side navigation, and Axios fetches data from Laravel APIs.
- If a mobile application is needed, the same API endpoints can be used for data retrieval and manipulation.
Challenges:
- Search engines depend on a delayed second wave of indexing, which may take from hours to weeks.
- Page content may experience longer load times since the browser is responsible for client-side processing and rendering.
- Client-side management of navigation, route guards, and other routing-related tasks introduces additional complexity to Laravel developers.
Method 2: Decoupled Vue.js and Laravel Integration
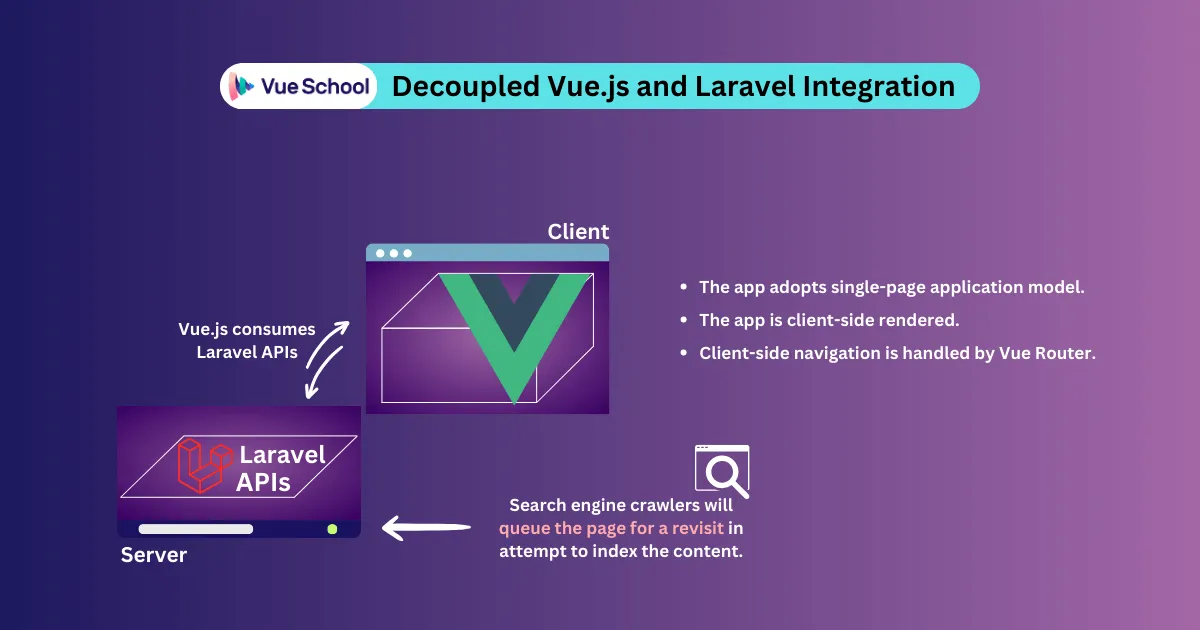
This is also an API-driven approach that shares a similar outcome to Method 1, crafting a dynamic single-page application powered by Vue.js and Laravel. However, it takes the separation of concerns to a new level, treating Vue.js and Laravel as entirely independent projects.
Integration Guide
The Integration mirrors the implementation of Method 1 conceptually, the key difference lies in the independence of Vue.js and Laravel. Both frameworks live as separate projects and are deployed on different domains. Vue takes full ownership of the application's structure and rendering, while Laravel becomes an API powerhouse, crafting dedicated endpoints for dynamic data exchange and interactions.
So, the steps to implement your project with this approach is as follows:
- Create distinct projects: Create a standalone Vue.js app and a separate Laravel app.
- Craft dedicated APIs: Within Laravel, design API endpoints to serve data and facilitate interactions.
- Consume APIs from Vue: Consume Laravel's APIs using Axios or similar HTTP libraries.
Summary
This approach mirrors the performance and user experience of Method 1, offering the same advantages without tackling any of its challenges. The only difference lies in organizational flexibility.
By separating the two frameworks into distinct projects, you empower dedicated teams to operate independently, enabling rapid front-end development without impacting the stable Laravel backend. This approach is ideal for projects where organizational agility and independent development cycles are crucial.
However, for those seeking a more integrated and seamless approach, let's explore how Nuxt.js bridges the gap between Vue.js and Laravel in Method 3.
Method 3: Nuxt.js and Laravel Integration

In this setup, we’re still adopting an API-driven, decoupled integration, but we’re also opting for Nuxt.js instead of a classical Vue.js.
Nuxt seamlessly interacts with Laravel via APIs, offering a unique blend of client-side dynamism and server-side rendering (SSR) capabilities. Additionally, Nuxt handles client-side routing complexities, streamlining development and enhancing user experience.
On the other hand, Laravel takes on the role of a robust API generator, providing a foundation for Nuxt to consume and transform into dynamic, interactive content within the application.
Keen to dive deeper into the Nuxt and Laravel integration and uncover its full potential? Our course "Laravel Backends for Vue.js 3" offers a comprehensive guide, practical tips, and expert insights to guide you through every step.
Integration Guide
The integration steps closely align Method 1 and 2, as we maintain a consistent approach to consuming Laravel APIs within a Nuxt.js app.
- Create distinct projects: Create a standalone Nuxt.js app and a separate Laravel app.
- Craft dedicated APIs: Within Laravel, design API endpoints to serve data.
- Consume APIs from Vue: Consume Laravel's APIs using Axios, similar HTTP libraries, or Nuxt’s built in
$fetchfunction.
Summary
With this method, we’re addressing the challenges introduced in the previous 2 methods. However, it requires prior knowledge of Nuxt’s fundamentals. Not a Nuxt expert yet? No worries! VueSchool has your back with a comprehensive course on Nuxt.js fundamentals.
Here are some of the advantages and challenges of integrating Nuxt.js with Laravel:
Advantages:
- Instant SEO-friendly content available on the server-side and blazing-fast initial loads.
- Smart server-side rendering for smaller page sizes.
- Nuxt handles client-side routing complexities.
- Focus on API development and server-side tasks.
- If a mobile application is needed, the same API endpoints can be used for data retrieval and manipulation.
- Both Nuxt app and Laravel backend are independently deployed and maintained.
Challenges:
- Nuxt.js knowledge is required
Method 4: Embedded Vue Components in Blade Files
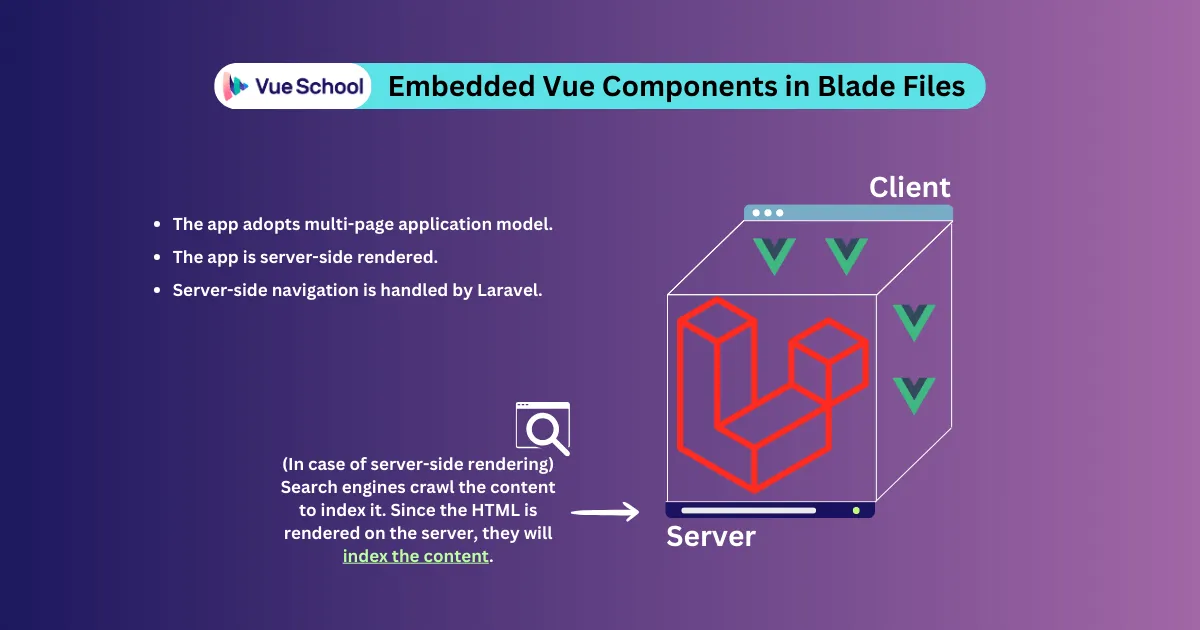
With Vue.js components embedded within Blade files, Laravel serves as the core application. This strategy preserves Laravel's solid architectural foundation while incorporating dynamic Vue.js components, resulting in a more engaging user experience without sacrificing the familiarity of traditional Laravel multi-page and server-side development.
Integration Guide
Let’s start integrating Vue components inside Laravel blade. We first need to follow the same installation process for Vue in Method 1 , but this time, without installing vue-router . Routing along with everything else will be handled by Laravel on the server-side.
Next step, we modify ./resources/js/app.js file and add the following:
import "./bootstrap";
import { createApp } from "vue";

createApp({}).mount("#app");
Vue will look for a <div> with the id of “app” to use for mounting the Vue intsance. Create that <div> within the <body> of ./resources/views/welcome.blade.php file. We also have to import our ./resources/js/app.js file using the @vite() Blade directive.
<head>
    @vite(['resources/js/app.js'])
</head>

<body>
    <div id="app"></div>
</body>
Now, we’ll need a Vue component to test with ./resources/js/Components/TestComponent.vue
<template>
    <p>I'm here to test!</p>
</template>
Of course we need to register that component to our Vue instance inside ./resources/js/app.js to start using it
import "./bootstrap";

import { createApp } from "vue";
import TestComponent from "./Components/TestComponent.vue";

const app = createApp({});

app.component("test-component", TestComponent);

app.mount("#app");
Time for the truth! Head to ./resources/views/welcome.blade.php and start using the new component.
<body class="antialiased">
    <div id="app">
        <test-component></test-component>
    </div>
</body>
Voilà! We just got the Vue component working inside the Laravel Blade engine.
Summary
For existing Laravel projects seeking a dynamic boost, embedding Vue components within Blade files offers the perfect blend of familiarity and innovation. This approach leverages Laravel's established foundation while seamlessly integrating Vue's interactivity, crafting a user experience that's both engaging and SEO-friendly. Think of it as injecting a dose of dynamism into your existing Laravel app, enhancing user journeys without sacrificing the stability and structure you've already built.
Method 5: Vue.js, Inertia.js and Laravel Integration
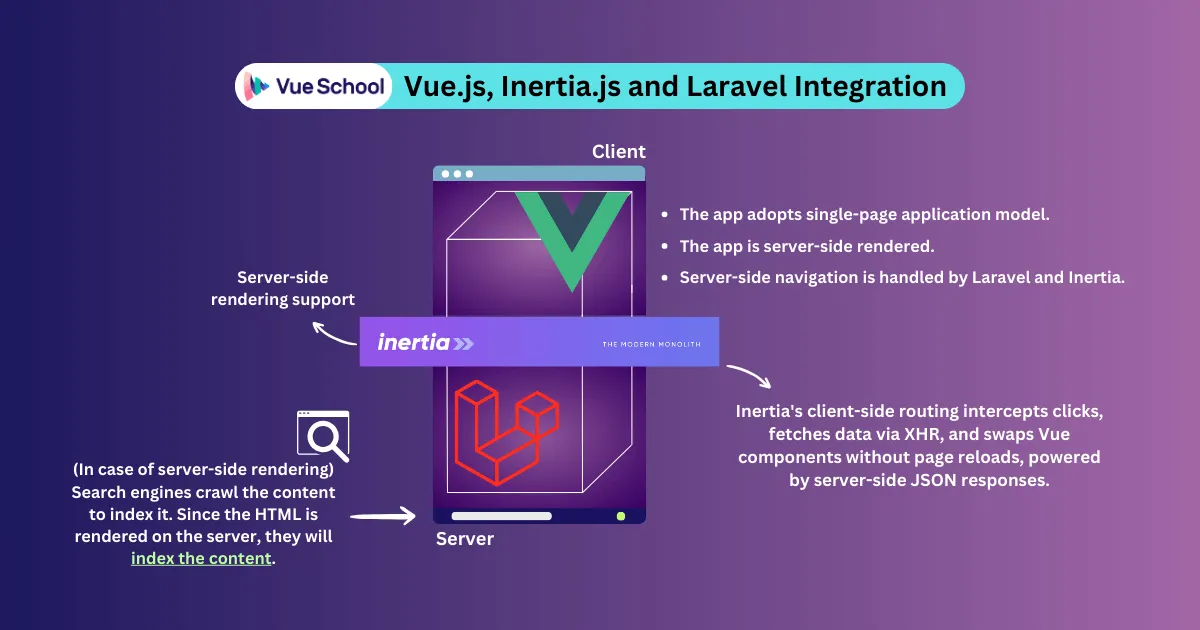
Inertia.js seamlessly combines Vue.js's frontend agility with Laravel's robust backend, eliminating the need for separate API development. Laravel handles routing, data hydration, and authentication, while Vue crafts captivating user experiences, effortlessly receiving data through Inertia.
With server-side rendering, the entire application is initially rendered on the server, ensuring optimal SEO and lightning-fast initial load speeds.
Integration Guide
The quickest and best way to install Inertia.js in Laravel, is by using one of the official Laravel starter kits Laravel Breeze or JetStream. For this guide, I’ll use Laravel Breeze.
First, craft a new Laravel project
composer create-project laravel/laravel example-appThe previous command installed the latest version of Laravel (currently v10.10). Then, install Laravel’s related npm dependencies.
npm installNext, use composer to grab Laravel Breeze using the following command
composer require laravel/breeze --devThen, we install Laravel breeze by hitting the following command
php artisan breeze:installThis will prompt us for our preferred frontend stack, which is for sure, we’ll choose Vue.js with Inertia. Then, it will ask if we would like to include any of the below features:
- Dark Mode
- Inertia SSR
- Typescript (experimental)
We’ll go with “Inertia SSR” to ensure that we have server-side rendering support in our single-page app. Finally, it will ask us to choose between PHPUnit and Pest for the testing framework, feel free to choose the framework you prefer.
After the terminal is finished and everything is loaded, we can start the app with Inertia SSR feature by building the app with npm run build , starting Inertia node server with php artisan inertia:start-ssr and finally php artisan serve
One last thing, if we tried to click on any link to navigate inside the app, the navigation won’t cause a full page refresh. This is thanks to Inertia’s Link component.
If we head to ./resources/js/Pages/welcome.vue , we’ll see that a component called Link is imported from @inertiajs/vue3 and is being used for internal navigation.
import { Link } from "@inertiajs/vue3";This component is Inertia’s magic approach to dynamically change the page’s content without forcing the full page to reload.
<Link
    :href="route('dashboard')"
    >
        Dashboard
</Link>
Let’s trace the implementation of route('dashboard') link back to Laravel’s web routes in ./routes/web.php
Route::get('/dashboard', function () {
    return Inertia::render('Dashboard');
})->middleware(['auth', 'verified'])->name('dashboard');
The only stranger we see in routes is the Inertia::render method.
So, to create an Ineria Link, you need to also create a corresponding route in web.php file and use Inertia::render method to render a Vue page from ./resources/js/Pages/ directory.
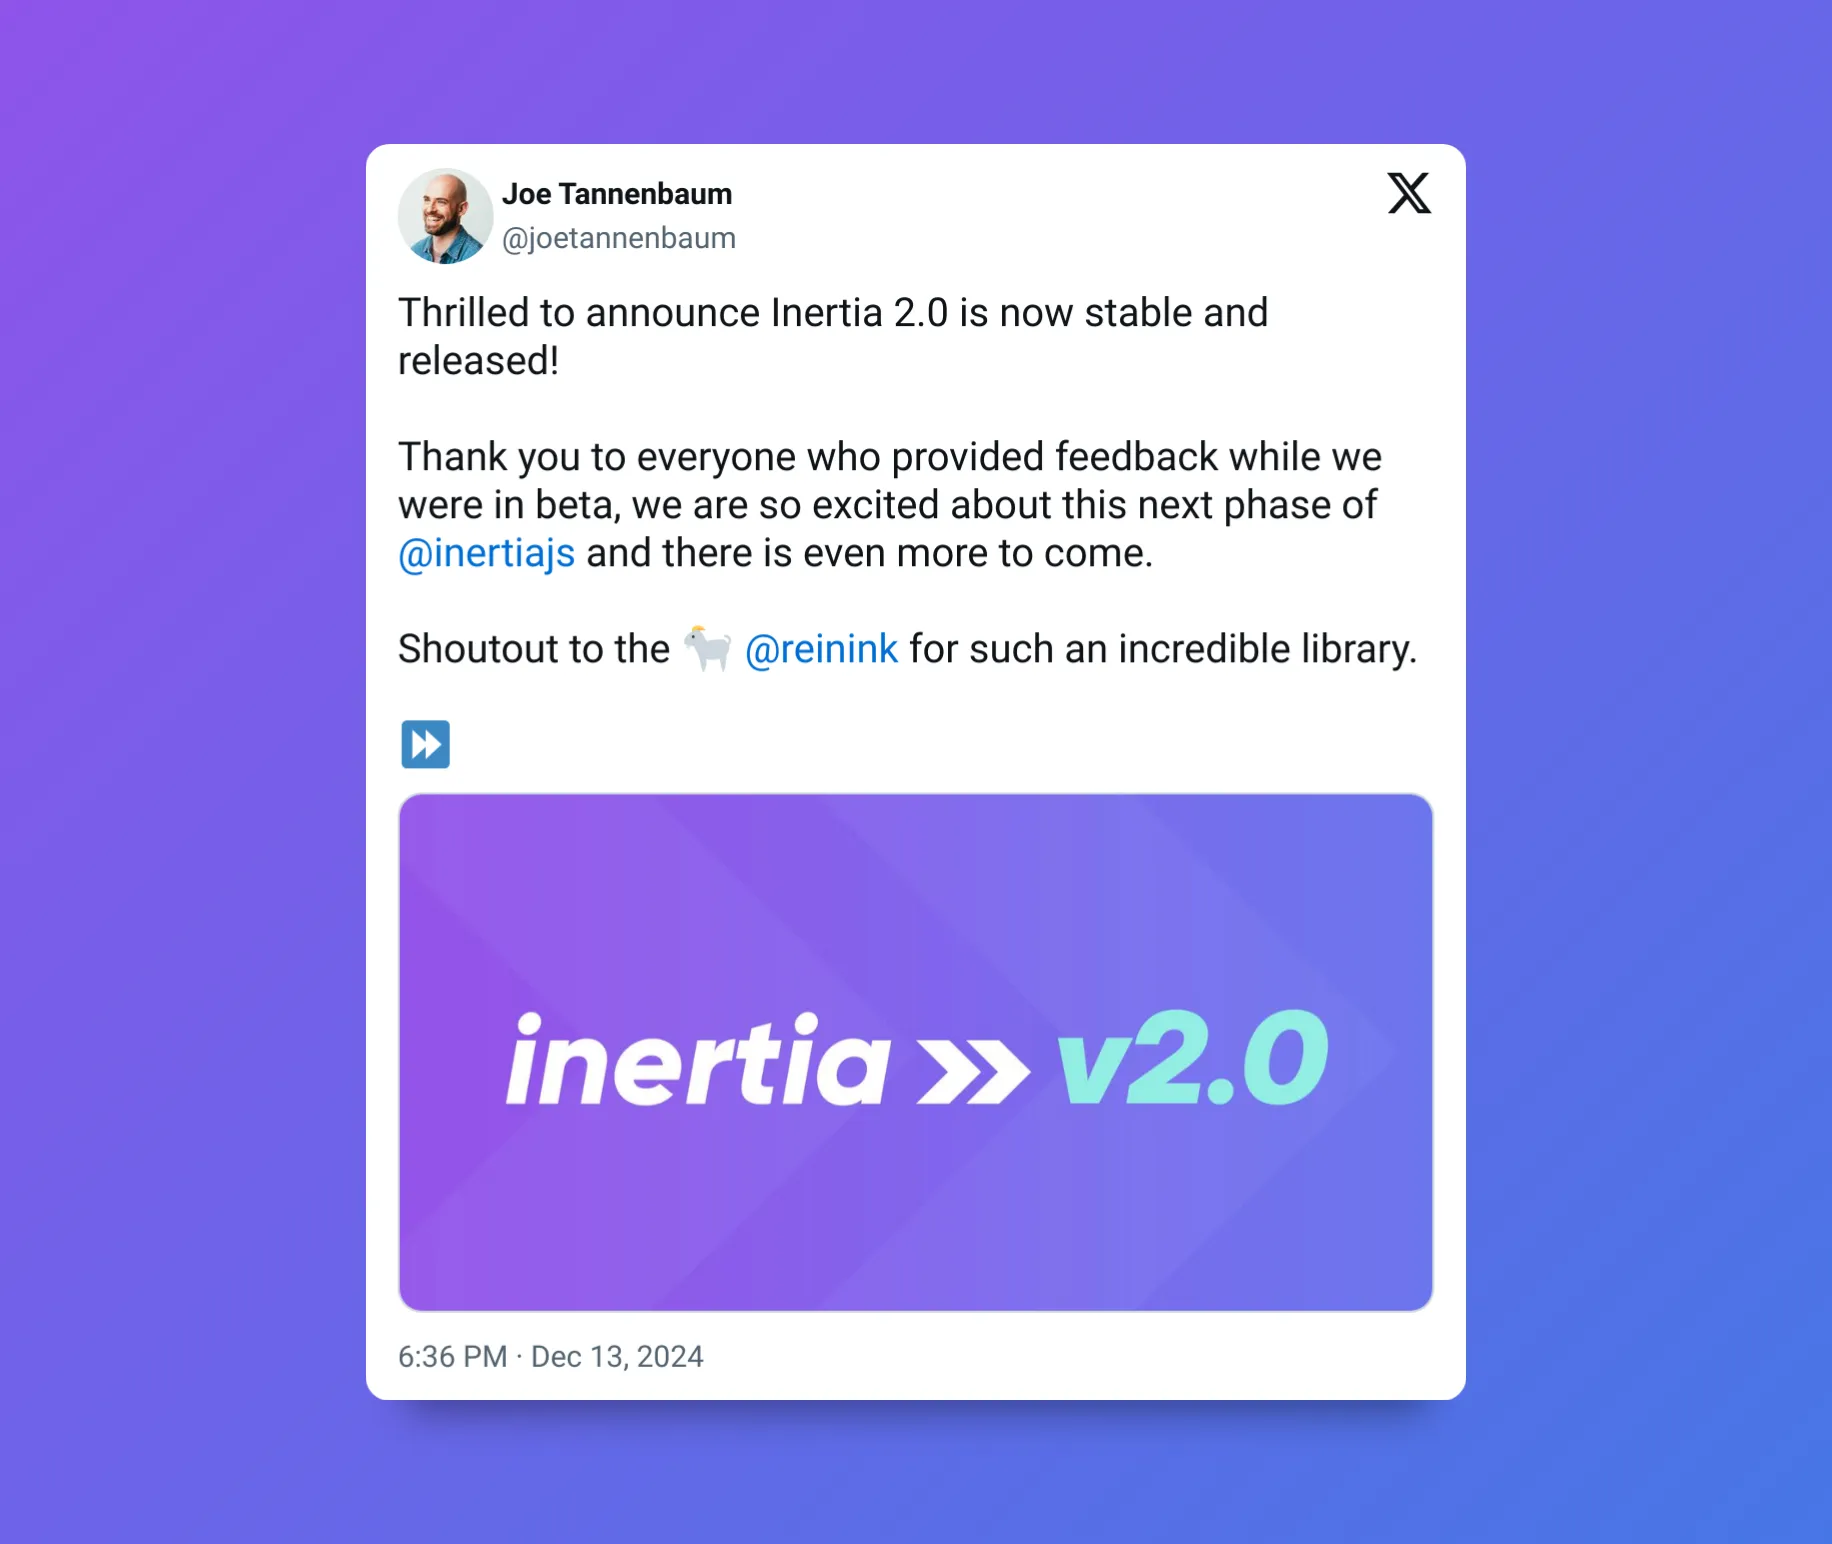
Inertia.js V2 is Out!
It's also worth mentioning that Inertia.js v2 is now released, bringing a suite of powerful features that enhance how we build single-page applications (SPAs) with server-side frameworks! It was announced at Laracon US 2024 among other exciting Laravel updates.
Here's a closer look at the new capabilities in Inertia v2 and how they elevate your app's performance and interactivity:
- Polling: Automatically refresh data at set intervals, ideal for real-time updates like notifications or data dashboards without needing a manual refresh.
- Prefetching: Reduce load times by fetching data before the user even clicks, resulting in instant responses and a smoother browsing experience, especially useful for navigation-heavy apps.
- Deferred Props: Fine-tune component rendering by loading essential data immediately while deferring non-critical data. This feature optimizes load times and improves perceived performance by allowing the UI to become responsive faster.
- Infinite Scrolling: Add smooth content loading as users scroll down, a must for content-rich pages or product feeds. Infinite scrolling makes it easier to deliver large data sets without overloading the initial page load.
- Lazy Loading on Scroll: Perfect for apps with long lists or data-heavy components, lazy loading loads data only when needed, helping reduce memory use and speeding up initial load times.
Upgrading to Inertia v2 is designed to be straightforward, with an easy-to-follow guide that walks you through each step. With these new features, Inertia.js continues to bridge the gap between server-rendered apps and SPAs, making it easier to create responsive, efficient applications with minimal effor
Summary
Inertia lets you build Vue-powered SPAs on top of Laravel without rewriting server-side code. Keep using Laravel's routing, controllers, and data fetching while crafting dynamic UIs with Vue components.
The magic lies in client-side routing. Inertia's <Link> component intercepts clicks, triggers XHR requests to fetch the data from the server. Then, the server, recognizing Inertia, sends back minimal JSON with the new Vue component name and props. Inertia then swaps views, updating browser history without full page reloads.
Basically, you get a smooth SPA experience within Laravel's familiar development environment. So skip the rewrite and enjoy the best of both worlds: server-side power and dynamic Vue UIs.
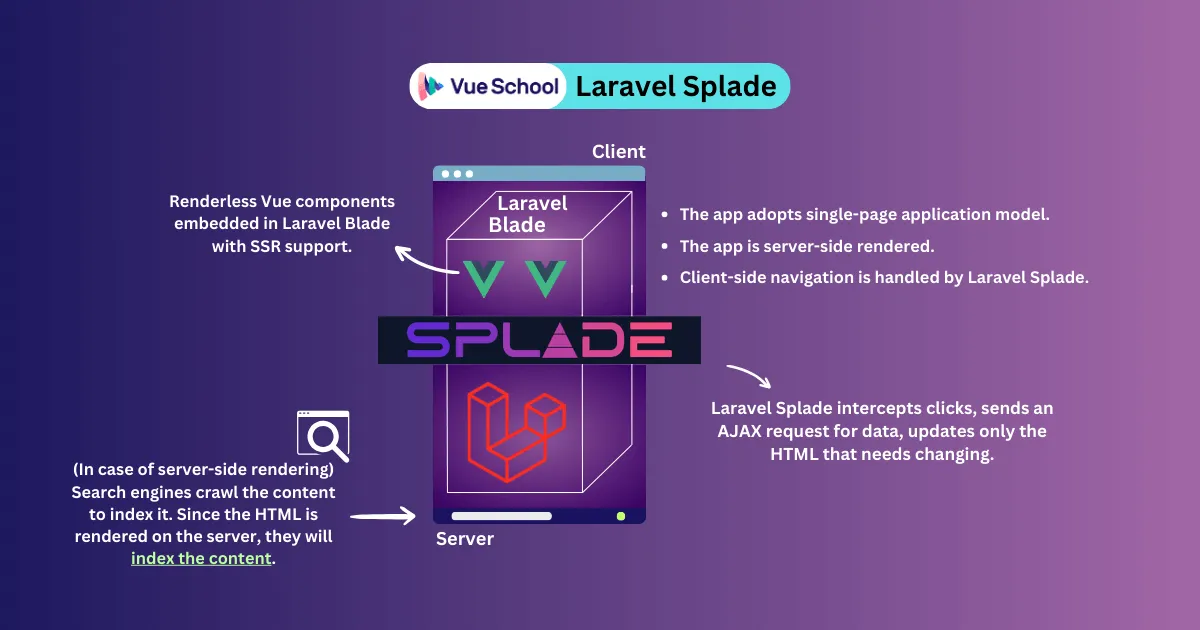
Method 6: Laravel Splade
In this integration method, we leverage Laravel Splade, a relatively recent addition to the Laravel community ecosystem.
Laravel Splade simplifies modern web development by seamlessly blending the strengths of two worlds: The simplicity of Blade's templates and Vue.js's interactive magic. Think dynamic forms, real-time updates, and captivating animations, all living seamlessly into your existing Blade code.
Splade takes a unique approach compared to Inertia.js. Instead of relying solely on Vue’s Single File Components (SFCs), it invites Vue with SSR feature into your Blade templates, creating an Inertia-like experience without leaving Blade templates. This means effortless transitions for Laravel developers, allowing you to leverage your existing Blade expertise while unlocking Vue's client-side power.
Integration Guide
To get started with Splade, let’s create a new Laravel project
composer create-project laravel/laravel example-app
The previous command installed the latest version of Laravel (currently v10.10). Then, install Laravel’s related npm dependencies.
npm install
Now we’re ready to grab and install Laravel Splade
composer require protonemedia/laravel-splade
php artisan splade:install
This installs Tailwind CSS v3.0 and Vue v3.0 on the frontend. On the backend, it installs a Route Middleware, an Exception Handler, and it prepares a default view and its route.
Next, we run npm run dev and php artisan serve to start our Laravel application with Splade activated.
Notice that if we click any link, it won’t trigger a full page refresh. Instead, it will fire an AJAX request returning only the HTML code that needs updating.
To add a new route , head to ./routes/web.php and add your route to the splade middleware group following the below syntax:
Route::middleware(['splade'])->group(function () {
    Route::get('/', fn () => view('home'))->name('home');
});
Then, by using Splade’s Link built-in component, internal navigation won’t trigger full page refresh. Here’s an example of how we can use this component:
<Link href="/">Home</Link>Summary
Splade gives you almost the same advantages as using Vue, Inertia, and Laravel. The main difference is that it's more friendly for Laravel developers because you can stick with the familiar Blade templates. It also offers plenty of components that are ready to be used inside your Blade templates out-of-the-box. Feel free to explore the full documentation for more information.
However, keep in mind that Splade is still pretty new with a big room for improvements. Therefore, take your time to test it well to avoid any surprises in production.
Method 7: Hybridly
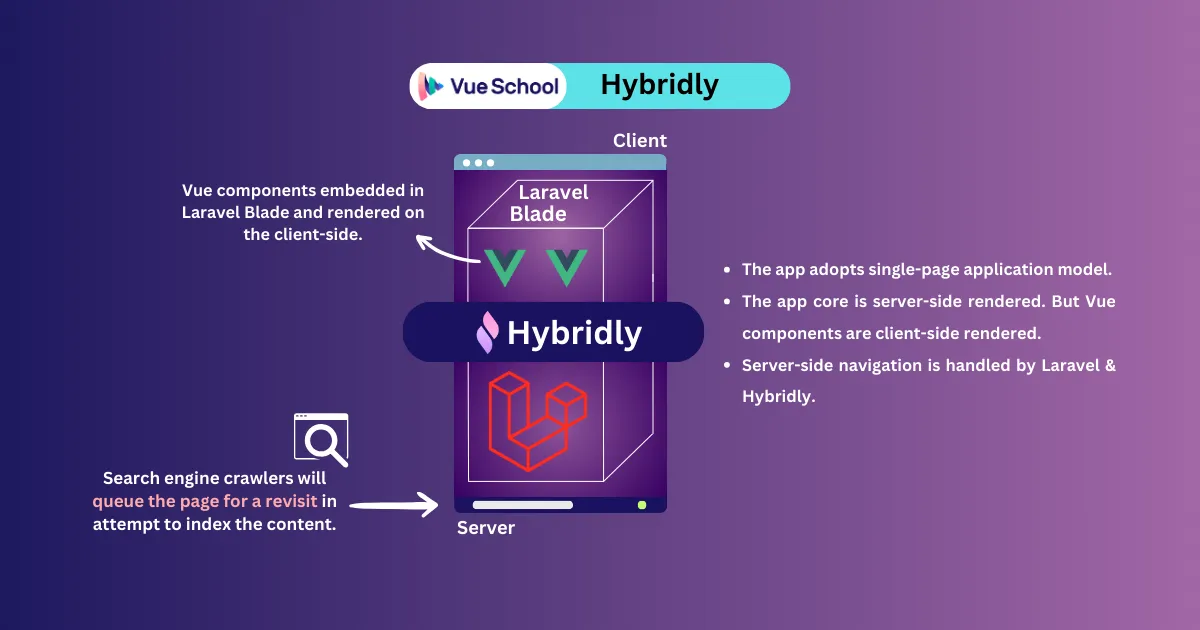
Hybridly offers a compelling alternative for integrating Vue.js with Laravel, aiming to provide a streamlined and developer-centric experience. It achieves this by introducing a hybrid rendering approach that leverages the strengths of both server-side rendering (SSR) and Single-File Components (SFCs). This approach empowers developers to craft dynamic and interactive web applications while preserving the advantages of Laravel's Blade templating system.
One of Hybridly's biggest advantages is its ability to integrate Vue components directly into Blade templates. This eliminates the need for separate build processes or complex file structures. As a result, Laravel developers familiar with Blade syntax can easily adopt Hybridly.
Think of it like this: Laravel acts as the application's core, while Vue.js on the client-side takes care of the crazy-good dynamic features. This approach is similar to Nuxt's Universal Rendering in terms of having some content generated on the server-side and other generated on the client-side via the hydration process, but with a key difference. Nuxt already offers server-side rendering (SSR), which Hybridly plans to implement SSR in the future.
Integration Guide
The recommended approach is to leverage the preset in a new Laravel project. Start by running the following command in a freshly-installed Laravel project directory:
npx @preset/cli apply hybridly/presetThis preset automatically sets up Tailwind CSS and Pest for you. Here are some optional flags to customize the preset:
--i18n  Installs and configures vue-i18n for internationalization.
--no-pest   Skips Pest installation (testing framework).
--no-strict Disables Laravel strict mode.
--no-ide    Excludes laravel-ide-helper installation (IDE helper).
Now, let’s get to the server-side setup. Inside the same Laravel project, run the below commands:
composer require hybridly/laravel
php artisan hybridly:install
Create a file named root.blade.php inside the resources/application directory. This file serves as the main layout for your application.
<!DOCTYPE html>
<html>
    <head>
        <meta charset="utf-8">
        <meta name="viewport" content="width=device-width, initial-scale=1">
        @vite(['resources/css/app.css', 'resources/application/main.ts'])
    </head>
    <body class="antialiased">
        @hybridly
    </body>
</html>
Then we setup the client-side by installing the required dependencies
npm install hybridly vue axios -DNext, we add Hybridly to Vite. We do that renaming vite.config.js to vite.config.ts, and register hybridly/vite as a plugin.
import { defineConfig } from 'vite'
import hybridly from 'hybridly/vite'

export default defineConfig({
    plugins: [
        hybridly({
            laravel: {
                detectTls: true
            }
        }),
    ],
})
Finally, delete the resources/js directory and create a resources/application/main.ts file with the following code:
import { initializeHybridly } from 'virtual:hybridly/config'

initializeHybridly()
And that’s it! You’re good to start your app. For more details installation, viewing the official documentation is recommended.
Summary
Here's a breakdown of its strengths and who can benefit the most:
- Seamless Integration: Hybridly integrates Vue js components directly within Blade templates, eliminating the need for separate build processes and complex file structures. This makes it a natural fit for Laravel developers already familiar with Blade syntax.
- Developer Experience: Hybridly prioritizes a smooth development workflow, allowing you to leverage your existing Blade knowledge while empowering Vue.js to handle interactive features within your application.
- Future-Proof: While currently lacking built-in server-side rendering (SSR), Hybridly has plans to implement it in the future, potentially enhancing SEO for some applications.
It's an ideal choice for:
- Laravel Developers: If you're comfortable with Laravel and want to integrate Vue.js for dynamic features without a steep learning curve, Hybridly is a great choice.
- Interactive App Focus: Building interactive, user-driven web applications where SEO is not a top priority makes Hybridly a strong contender.
- Fast-Paced Development: Hybridly's focus on developer experience and streamlined workflow can be particularly valuable for projects with rapid development cycles.
If SEO is crucial for your project, consider Inertia.js since it already offers built-in SSR support as we mentioned earlier.
Conclusion
Ultimately, the best way to integrate Vue.js and Laravel depends on the specific needs of your project. Ask yourself: Is quick development time crucial? Do you prioritize SEO optimization? Or is a seamless user experience with minimal page refreshes your top priority?
Choose the integration method that best aligns with your project's core purpose and your own development comfort level. By doing so, you'll build a robust, flexible, and user-centric web application with Vue.js and Laravel.
Lastly, we explored seven different ways to integrate Vue and Laravel, but maybe you have a secret sauce! Have you tried any unique integration approaches? Share your favorite method or one we missed on Twitter or just use the comments section.
Related Courses
Start learning Vue.js for free

Comments
Latest Vue School Articles

5 Component Design Patterns to Boost Your Vue.js Applications


Vibe Coding a Collaborative Editor with Comment Support with Nuxt UI and Jazz
Our goal is to be the number one source of Vue.js knowledge for all skill levels. We offer the knowledge of our industry leaders through awesome video courses for a ridiculously low price.
More than 200.000 users have already joined us. You are welcome too!
© All rights reserved. Made with ❤️ by BitterBrains, Inc.