
Home Rolled Store with the Vue.js Composition API

Part of the series: Store Solutions in Vue.js
Throughout this series we've explored various store solutions both official and DIY. We'll end the series by taking a look at a home rolled solution with Vue 3's composition API.
Before we continue, if you haven't read the previous articles in this series, I encourage you to go back and at least look over articles 1. What is a Store and 2. Vuex, the Official Vue.js Store as we won't go much into principles in this article, but rather focus on implementation.
Installation and Setup
As opposed to Vuex or Pinia the composition API comes shipped with Vue 3, therefore there is no external package to install and setup. If you are using Vue 2, you can install the composition-api Vue plugin.
Store Definition
Defining a store with the composition API can be approached in a number of different ways. Since it's a home rolled solution it's really up to you to decide exactly how you want to structure it, but the important piece is that your state is passed to the reactive method so that your state is reactive. In fact, reactive is the equivalent Vue.observable renamed in Vue 3 to avoid confusion with RxJS observables.
As an alternative to reactive you could use ref but I prefer reactive for this use case. ref is typically used for primitive values such as strings or booleans while reactive is used for objects. Since, we've been pretty well conditioned to think about state as a single entity, it works well to reference all the state inside of the store under a state object and thus I prefer reactive. Using reactive also means I don't have to use .value when referring to any of the state, which feels more intuitive to me.
For now, we can just export an anonymous function that returns an empty object. Later on, we'll be specific about what state and actions we export from the module.
// store/loggedInUser.js
import {reactive} from 'vue'
// state
const state = reactive({})
export default ()=>({})
Then, accessing the store in the component is now as simple as importing it from the store and calling the exported function.
//AppComponent.vue
<script>
import useLoggedInUser from "./store/loggedInUser.js";
export default{
  setup(){
    const loggedInUser = useLoggedInUser()
  }
}
</script>
State
Now we've got our store defined but it's a little sad because it's not keeping up with any state. A store is nothing without it's state, so let's add some. We can do this by adding properties to the object passed to reactive. And just like that our state is reactive!
// store/loggedInUser.js
import {reactive} from 'vue'
const state = reactive({
  name: 'John Doe',
  email: 'fake@email.com',
  username: 'jd123',
})
Now we'll pass the state we want to expose from the loggedInUser store to the object that gets exported. We could do this with a state property.
// store/loggedInUser.js
export default ()=>({
  state // shorthand for state:state
})
However this pattern, while succinct, has 2 downsides:
- It means we'd only be able to access the state under a state property in the consuming component
- It does nothing to keep the state from being altered directly from the consuming component
Instead we can create computed properties for each property in the state we'd like to expose.
// store/loggedInUser.js
import {reactive, computed} from 'vue'

const state = reactive({
  name: 'John Doe',
  email: 'fake@email.com',
  username: 'jd123',
})

export default () => ({
  name: computed(()=> state.name),
  email: computed(()=> state.email),
  username: computed(()=> state.username),
  posts: computed(()=> state.posts),
})
This method is a bit more verbose but it has 3 benefits:
- It allows us to directly access state in the consuming component without have to nest down into a state property
- It prevents the consuming component from directly altering the state.
- and it even allows us to pick and choose which state to expose
Also, if you aren't concerned with picking and choosing what state to expose you could create a helper function that loops through all your state and automatically creates computed properties from them.
// helper.js
import {computed} from 'vue'
export const withState =  (target, state)=>{
  Object.keys(state).forEach(prop =>{
    target[prop] = computed(()=> state[prop])
  })
  return target
}
// store/loggedInUser.js
import {withState} from '../helper'
const state = reactive({
name: 'John Doe',
email: 'fake@email.com',
username: 'jd123',
})
export default () => withState({}, state)Finally, we can access the state in the template after returning the loggedInUser from the setup function.
// AppComponent.vue
<template>
  <h1>Hello, my name is {{name}}</h1>
</template>
<script>
import loggedInUser from "@/store/loggedInUser";
export default{
  setup(){
    const loggedInUser = useLoggedInUser()
    return loggedInUser
  }
}
</script>
We can even use the spread operator on the loggedInUser when returning it from the setup function, should we need to expose any other variables to the template. You might hesitate to use the spread operator here as we used the reactive method to define the state. Why? Because spreading a reactive object would break it's reactivity. However, notice we aren't spreading the state but rather the object returned from the loggedInUser.js module, where the state is defined as computed props. That means we can spread all we want!
const somethingElse: ref('')
return {...loggedInUse, somethingElse}
Getters
Not only can the composition API handle our reactive state but we can also combine it with the composition API's computed function to easily create getters.
// store/loggedInUser.js
const state = reactive({
  //...
  posts: ['post 1', 'post 2', 'post 3', 'post 4']
})

// getters
const postsCount = computed(() => state.posts.length)
After defining the computed prop, we can expose it from the store by adding it to the object that's exported.
// store/loggedInUser.js
export default () => withState({
  postsCount
}, state)
Since we've already returned the loggedInUser from the setup function, we can now directly access postsCount within the template.
// AppComponent.vue
<template>
  <h1>Hello, my name is {{name}}</h1>
  <p>I have {{ postsCount }} posts available.</p>
</template>
<script>
import loggedInUser from "@/store/loggedInUser";
export default{
  setup(){
    const loggedInUser = useLoggedInUser()
    return loggedInUser
  }
}
</script>
Actions
With the composition API you will of course want to define actions to change the state in your store. There are a number of directions you could take to define actions but the important part is just that you provide them, in order to expose a controlled interface for modifying the store's state.
With the composition API there are absolutely no new concepts to learn when defining actions. They are just functions. They don't expect any special params and can define whatever params needed to make an action with an intuitive interface. Also, accessing the state is as simple as referencing the state variable.
// store/loggedInUser.js
const state = reactive({
  //...
  posts: ['post 1', 'post 2', 'post 3', 'post 4']
})
//...
const insertPost = (post) => state.posts.push(post)
In order to expose the action, we just need to add it to the exported object.
// store/loggedInUser.js
export default () => withState({
  //..
  insertPost
}, state)
Then in your component, the action is available as a method on the loggedInUser or directly in the template as we've return the loggedInUser from the setup method.
// AppComponent.vue
<template>
  <!-- ... -->
  <input v-model="post" type="text" />
  <button @click="insertPost(post)">Save</button>
</template>
<script>
import loggedInUser from "@/store/loggedInUser";
export default{
  setup(){
    const loggedInUser = useLoggedInUser()
    const post = ref('')
    return {...loggedInUser, post}
  }
}
</script>
You may not feel the difference just reading the code above but when actually putting the composition API store solution into practice, actions simply feel more natural as they are just plain Javascript functions. No need to dispatch or commit anything.
Organizing in Modules
With the direction we've taken so far we can treat our store just as Pinia does: as modular by default. We can just create new domain specific files for each store or module and only import them as needed. Alternatively you could probably make a single entry point for your store and treat it more like Vuex does but I don't see any real benefit to doing so, therefore we will not explore that any further in this article.
Vue DevTools
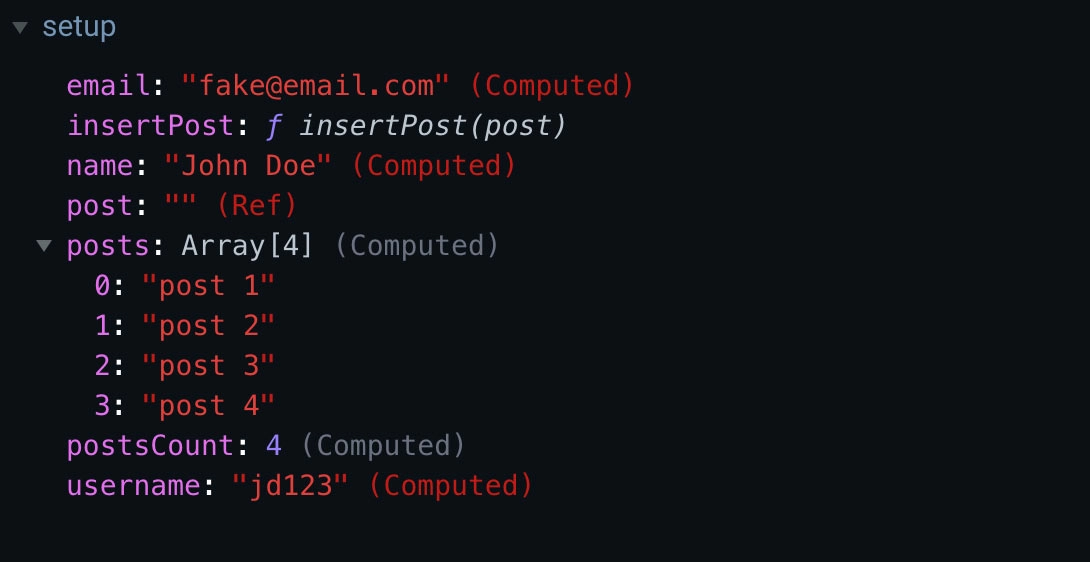
As far as devtools is concerned, the composition API approach doesn't offer any special solutions. There is absolutely no time traveling available and there is no dedicated panel for viewing your store's state. Despite that, however, you can still view the state on the component in Vue DevTools under "setup" so long as your returning the whole thing from the setup function. As a bonus, you even get to see what actions are available to you.
Notable Features
To wrap things up for the composition API as a store solution, let's just take quick recap of its most notable features to help you in your decision for implementing the store best fit for you and your project.
- No extra library needed
- Available with Vue 3 or Vue 2 with the composition api plugin
- Can customize to your liking
- Provides opportunity to learn more about stores and push boundaries of what a store can be
- No need to fuss with mutations
- IDE support for actions because they're just plain Javascript
On the flip side, you still get basically all the same drawbacks using the Vue composition API as you would using Vue.observable (see last article in series) due to it's home rolled natured. However, because of how the Composition API has influenced official solutions like Pinia and even up and coming versions of Vuex, you'd probably be doing yourself a service to at least try it out.
Conclusion
The Composition API is a powerful tool not just for extacting logic to be shared between components but can even be a powerful solution for sharing state. If you'd like more info on rolling your own store with the Composition API Filip Rakowski has also written an excellent article on the topic.
This concludes the series on Store Solutions in Vue.js. If you missed any articles feel free to go back and read them all!
Start learning Vue.js for free

Comments
Latest Vue School Articles

Just Released: Nuxt Hub Multi-Vendor and First-Class DB

Vue.js – 2025 In Review and a Peek into 2026
Our goal is to be the number one source of Vue.js knowledge for all skill levels. We offer the knowledge of our industry leaders through awesome video courses for a ridiculously low price.
More than 200.000 users have already joined us. You are welcome too!
© All rights reserved. Made with ❤️ by BitterBrains, Inc.