Pinia, an Alternative Vue.js Store

Part of the series: Store Solutions in Vue.js

An alternative option for creating a store for your Vue.js application is Pinia. Pinia is the new kid on the block when it comes to stores for Vue. It was started by Vue core team member Eduardo San Martin Morote with the first commit to the repo being made on Nov 18, 2019. Pinia boasts an intuitive API and many of the features you've come to expect from a Vue.js store.
Pinia supports both Vue 2 and Vue 3 but the examples I show below are all for Vue 3 using Pinia 2 (currently in alpha). There are minor differences between Pinia for Vue 2 and Vue 3, so check out the official Pinia docs for more info.
Installation and Setup
To install Pinia, you can use npm or yarn.
yarn add pinia@next
# or with npm
npm install pinia@next
After it's done installing you'll need to import createPinia from the Pinia library and add it as a Vue plugin with the use() method on your Vue app.
// main.js
import { createPinia } from 'pinia'
//...
createApp(App)
.use(createPinia())
.mount('#app')
Now you're ready to start making stores!
Store Definition
A store in Pinia is approached a little differently than the store in Vuex. In Vuex there is a single primary store available across the entire app (though you can break it up into modules if desired). Pinia, on the other hand, is modular out of the box. There is no single main store, but rather you create different stores and name them as makes sense for your application. For example, we can create a logged in user store.
// store/loggedInUser.js
import { defineStore } from 'pinia'

export const useLoggedInUserStore = defineStore({
  // id is required so that Pinia can connect the store to the devtools
  id: 'loggedInUser',
  state: () =>({}),
  getters: {},
  actions:{}
})
To access the loggedInUserStore we have to import it in the component where we'd like to use it and call useLoggedInUserStore() in the setup function, setting it to a variable of our choice (in this case: user).
//AppComponent.vue
<script>
import { useLoggedInUserStore } from "@/store/loggedInUser";
export default{
  setup(){
    const user = useLoggedInUserStore()
  }
}
</script>
This greatly differs from Vuex, which makes the store instance automatically available on your application instance. The Pinia way however, also makes it clearer for both the developer and your IDE where the store is coming from as it's a standard Javascript module import.
If you prefer not to use the Composition API and the setup function, you can still use Pinia with some of it's helper functions. We'll get more into those below.
State
With a store setup, it's time to define some state. In order to do this, we set a state property in the store to a function that returns an object holding the different state values. This is very similar to how we define data in components. In fact, the only difference is the property name: state vs data.
//store/loggedInUser.js
//...
state: ()=>({ name: 'John Doe', email: 'fake@email.com', username: 'jd123'})
Now, in order to access the loggedInUserStore's state from within a component we just reference the state property we need directly on the user constant we created earlier. There's absolutely no need to nest down into a state object from the store and if you ask me the result is quite elegant.
// AppComponent.vue
<template>
  <h1>Hello, my name is {{user.name}}</h1>
</template>
<script>
setup(){
  const user = useLoggedInUserStore()
  // acces it directly in setup
  // don't have to use user.state.name
  user.name // John Doe
  // or return it to access it in template
  return {user}
},
</script>
One important note, if you're fond of destructing you might take a look at the above code and think, "I can make that even sweeter!" However, that won't work on the user as it would cause the state to loose it's reactivity.
❌ const {name, email} = useLoggedInUserStore()Finally, if you're more comfortable with the Object API and prefer not to use the setup function you can use Pinia's mapState function to access state from your stores. The difference here from Vuex, is that as the first argument, you have to tell the mapState function which store to map from and then as, the second argument, which state properties to map.
//AppComponent.vue
<template>
  <h1>Hello, my name is {{name}}</h1>
</template>
<script>
import {mapState} from 'pinia'
export default{
  computed:{
    ...mapState(useLoggedInUserStore, ['name'])
  }
}
</script>
Defining state in Pinia feels very familiar since we're all used to defining data on our components and accessing it directly on the store feels intuitive as well. Though manually importing your stores into the components where you need them might take a little getting used to, it actually provides well received transparency and just feels like normal Javascript.
Getters
Getters in Pinia serve the same purpose as getters in Vuex and as computed properties in components. Moving from Vuex getters to Pinia getters isn't much of a mental leap. They look mostly the same except that with getters in Pinia, you can access the state in 2 different ways.
The first way of accessing a getter is via the "this" keyword. This works for traditional function declarations and method shorthand. It does not work however, for arrow functions because of the way arrow functions treat the scope of the "this" keyword.
import { defineStore } from 'pinia'

export const usePostsStore = defineStore({
  id: 'PostsStore',
  state: ()=>({ posts: ['post 1', 'post 2', 'post 3', 'post 4'] }),
  getters:{

    // traditional function
    postsCount: function(){
      return this.posts.length
    },
    // method shorthand
    postsCount(){
      return this.posts.length
    },

    // cannot access state using "this" with an arrow function
    ❌ postsCount: ()=> this.posts.length
  }
})
The second way of accessing a getter is via a state parameter on the getter function. This is meant to encourage use of arrow functions for short, precise getters.
import { defineStore } from 'pinia'

export const usePostsStore = defineStore({
  //...
  getters:{
    // arrow function
    postsCount: state => state.posts.length,
  }
})
Also, Pinia doesn't expose the other getters via the second function parameter like Vuex but rather via the "this" keyword.
import { defineStore } from 'pinia'

export const usePostsStore = defineStore({
  //...
  getters:{
    // use "this" to access other getters (no arrow functions)
    postsCountMessage(){ return ${this.postsCount} posts available }
  }
})
Once getters are defined, they can be accessed as properties on the store instance in the setup function just like state properties are, no need to access under a getters object.
// FeedComponent.vue
<template>
  <p>{{postsCount}} posts available</p>
</template>

<script>
import { usePostsStore } from "@/store/PostsStore";

export default {
  setup() {
    const PostsStore = usePostsStore();
    return { postsCount: PostsStore.postsCount };
  }
};
</script>
If you prefer the options API over the composition API, you can use the mapState helper provided by Pinia. Note that the helper is called mapState and not mapGetters as Pinia accesses both in the exact same way.
<template>
  <p>{{postsCount}} posts available</p>
</template>

<script>
import { mapState } from 'pinia'
import { usePostsStore } from "@/store/PostsStore";

export default {
  computed:{
    ...mapState(usePostsStore, ['postsCount'])
  }
};
</script>
Actions
Unlike Vuex, Pinia provides only a single avenue for making the rules that define how the state can be changed. Forgoing mutations, Pinia relies on actions alone. Coming from working with Vuex, this is a stark contrast and yet a refreshing way to work. Not only is there no boilerplate code needed to build up mutations but actions aren't called via a dispatch method with a magic string but just as any other method (and yes, if your code editor supports autocomplete/intellisense, it will work with Pinia actions!).
Here's some more info and best practices when it comes to actions in Pinia.
Actions:
- can be called via components or in other actions
- can be called from other store actions
- are called directly on the store instance (no need for a "dispatch" method)
- can be asynchronous or synchronous
- can have as many parameters as desired
- can contain logic about how the state should be changed
- can change the state properties directly with
this.propertyNameor use a $patch method to group multiple state changes together for a single entry in the Vue devtools timeline
import { defineStore } from 'pinia'

export const usePostsStore = defineStore({
  id: 'PostsStore',
  state: ()=>({
    posts: ['post 1', 'post 2', 'post 3', 'post 4'],
    user: { postsCount: 2 },
    errors: []
  }),
  getters:{
    postsCount: state => state.posts.length,
  },
  actions:{
    async insertPost(post){
      // contains logic for altering differenct pieces of state
      try{
        await doAjaxRequest(post)

        // directly alter the state via the action and
    // change multiple pieces of state
        this.posts.push(post)
        this.user.postsCount++

    // OR alternatavley use .$patch to group change of posts and user.postsCount in devtools timeline
    this.$patch((state) => {
          state.posts.push(post)
          state.user.postsCount++
        })
      }catch(error){
        this.errors.push(error)
      }

    }
  }
})
Once you've defined a store's actions they can be accessed in the setup method just like state and getters.
// PostEditorComponent.vue
<template>
  <input type="text" v-model="post" />
  <button @click="insertPost(post)">Save</button>
</template>
<script>
import { usePostsStore } from '@/store/PostsStore';
export default{
  data(){
    return { post: '' }
  },
  setup(){
    const PostsStore = usePostsStore()
    return { insertPost: PostsStore.insertPost }
  },
}
</script>
Once again, if you prefer the options API you can skip the setup function to access store actions use the Pinia helper function mapActions.
// PostEditorComponent.vue
<template>
  <input type="text" v-model="post" />
  <button @click="insertPost(post)">Save</button>
</template>
<script>
import {mapActions} from 'pinia'
import { usePostsStore } from '@/store/PostsStore';
export default{
  data(){
    return { post: '' }
  },
  methods:{
    ...mapActions(usePostsStore, ['insertPost'])
  }
}
</script>
Organizing in Modules
As previously mentioned, Pinia is modular by nature. There is no single root store. The Pinia docs call all the different store instances you create "stores" but you can also think of them as modules from Vuex. They serve the same purpose, to organize your store based on domain logic.
When you need access to anything from one store all you have to do is import it and use it. That philosophy applies to both component's setup methods, as well as other stores. I won't dive into examples (you can see the official docs for examples on accessing one store's getters from another store and accessing one store's actions from another store) but suffice it to say, it's pretty intuitive. It behaves just like regular Javascript modules.
Vue Devtools
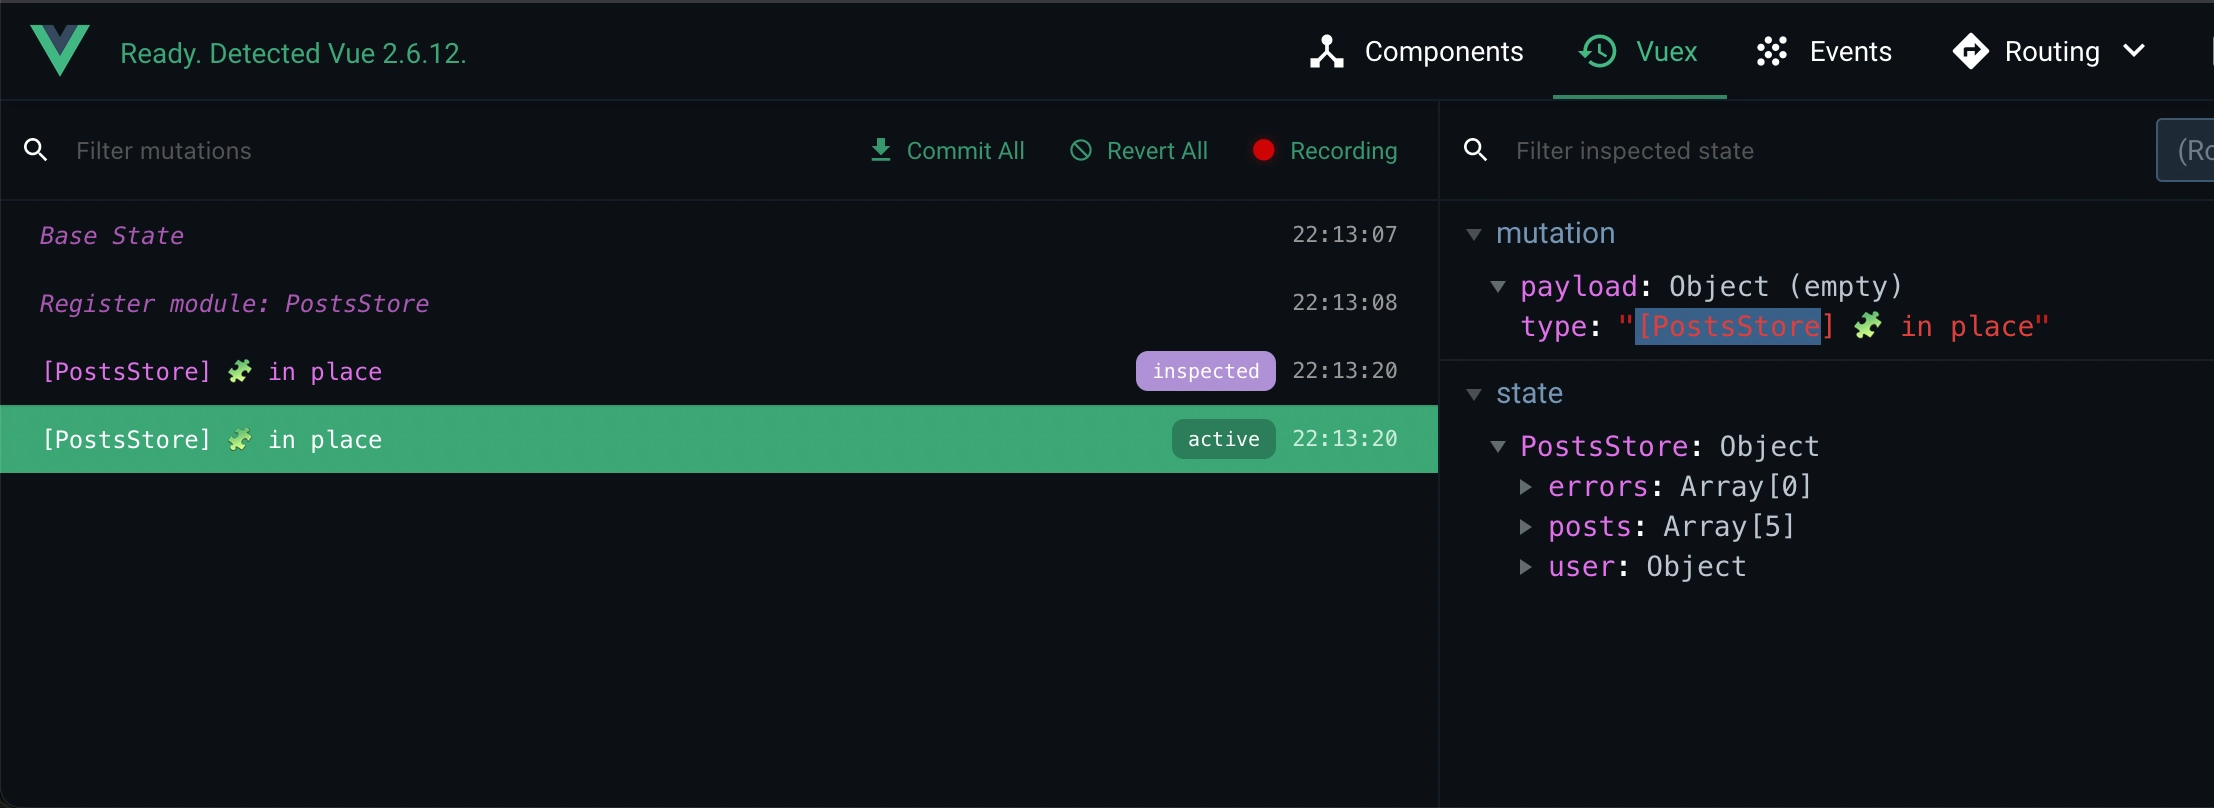
As far as devtools are concerned, Pinia holds it's own pretty well. In Vue 2, Pinia supports viewing the state in the Vuex tab and even doing time travel. I will admit the labels for the time travel aren't nearly as nice as when you're using mutations in Vuex but I don't think there is really a way around it, as you're altering the state directly without calling a named mutation. Instead of the mutation name in the devtools you see a label telling you which store the change came from and whether or not it was a patch or an "in place" change (that is, made directly on this.propName).

To me though, this is a tradeoff worth making. I read and write code much more often than I use time travel in the devtools. I would much rather skip the mutations boilerplate and write code like PostsStore.insertPost(post) that can be autocompleted.
As for Vue 3, at the time of writing this in May 2021, Pinia only supports viewing the state in the devtools and not the time travel feature. However, this is actually more than Vuex provides for Vue 3, as it's not supported at all yet in the latest devtools.
Notable Features
To wrap things up for Pinia let's just take quick recap of its most notable features to help you in your decision for implementing the store best fit for you and your project.
- Maintained by a Vue.js core team member
- Feels more like regular old javascript importing modules, calling actions as methods, accessing the state directly on the store, etc.
- Drops the need for mutations boilerplate
- Integrates with Vue Devtools
Conclusion
Though a new addition to the Vue ecosystem, Pinia is proving to be a promising store solution with an intuitive API. Just remember, it's still in the early stages of development and is not as time tested as Vuex or as well documented by the community at large. As such, it might not be a great fit for large scale, long running projects but could be just what's needed for your next smaller scale or one off Vue 3 project! And, it certainly has the potential to scale for all your project needs when it reaches stable release.
Though Vuex and Pinia both have their pros and cons, there's still more to come. In the next lesson, we'll take a look at how Vue.observable() can be used as a home rolled store for your Vue 2 projects.
Start learning Vue.js for free

Comments
Latest Vue School Articles
Just Released: Nuxt Hub Multi-Vendor and First-Class DB

Vue.js – 2025 In Review and a Peek into 2026

Our goal is to be the number one source of Vue.js knowledge for all skill levels. We offer the knowledge of our industry leaders through awesome video courses for a ridiculously low price.
More than 200.000 users have already joined us. You are welcome too!
© All rights reserved. Made with ❤️ by BitterBrains, Inc.


