Migrating from Vue 2 To Vue 3 – New Features

Welcome back, fellow Vue.js enthusiasts, as we embark on an exhilarating journey of discovering the cutting-edge features and advancements awaiting us in Vue 3!
In our previous article, "Migrating from Vue 2 to Vue 3 - Deprecated and Updated Features," we explored the essential updates and changes to Vue 3 that lay the groundwork for a seamless transition from Vue 2 to Vue 3.
In this article we take the next step as we dive headfirst into the exciting world of some of Vue 3's brand-new features!
This revolutionary iteration of the beloved JavaScript framework is set to redefine the way we build web applications, offering an abundance of enhancements, optimizations, and tools designed to make our development experience smoother, faster, and more delightful.
Without delay let’s set the ball rolling
Composition API
Our first and most exciting feature is the Composition API.
According to the Vue.js Documentation, the Composition API is a set of APIs that allows us to author Vue components using imported functions instead of declaring options. It is an umbrella term that covers the following APIs:
- Reactivity API, e.g.
ref()andreactive(), that allows us to directly create reactive state, computed state, and watchers. - Lifecycle Hooks, e.g.
onMounted()andonUnmounted(), that allow us to programmatically hook into the component lifecycle. - Dependency Injection, i.e.
provide()andinject(), that allow us to leverage Vue's dependency injection system while using Reactivity APIs.
With Composition API, you can organise code into smaller logical pieces, group them together, and even reuse them when required. Let’s see a basic example to understand the difference of coding structure between the Options API and Composition API.
This is how our code looks like in the Options API:
<template>
  <div>
    <div>count: {{ count }} {{ isGreaterthanFive }}</div>
    <button @click="increase()">Increase Count</button>
    <input type="text" name="user" v-model="name" id="" />
    <div>{{ printUser }}</div>
  </div>
</template>

<script>
export default {
  data() {
    return {
      count: 0,
      name: "",
    };
  },
  methods: {
    increase() {
      this.count++;
    },
  },
  computed: {
    isGreaterthanFive() {
      return this.count > 5 ? "Greater than 5" : "not Greater than 5";
    },
    printUser() {
      return this.name ? `Name is ${this.name}` : "Use Not Stated";
    },
  },
};
</script>
Now the same code can have separation based on logical concern in the Composition API and it’ll look something like this:
<script setup>
import { ref, computed } from "vue";

// Count logic
const count = ref("");
const increase = () => {
  count.value++;
};
const isGreaterthanFive = computed(() => {
  return count.value > 5 ? "Greater than 5" : "not Greater than 5";
});

// Name logic
const name = ref("");
const printUser = computed(() => {
  return name.value ? `Name is ${name.value}` : "Use Not Stated";
});
</script>

<template>
  <div>
    <div>count: {{ count }} {{ isGreaterthanFive }}</div>
    <button @click="increase">Increase Count</button>
    <input type="text" name="user" v-model="name" id="" />
    <div>{{ printUser }}</div>
  </div>
</template>
The Composition API brings a lot advantages over the Options API according to Vue’s official documentation which include:
- Better logic reuse.
- More flexible code organization.
- Better Type interface as Vue 3 is written in Typescript.
- Smaller production bundle and less overhead.
The Composition API is definitely a huge upgrade from the Options API, as it provides us the opportunity to fully use JavaScript’s capabilities in our Vue.js projects. Though learning the composition API does introduce a steeper learning curve but it is totally worth it. Definitely checkout our Vue 3 Composition API course for an extensive guide to leveraging the full potential of the Composition API with real-world scenario examples.
Teleport
Teleport just blows my mind with the way it works. Imagine being able to transport an element from one part of the DOM to another. Teleport enables us to retain the markup within a component while visually presenting it in a different location within the DOM.
A perfect example use-case for teleport is modals. Let’s take a quick look at an example
//AppModal.vue
<template>
  <Teleport to="body">
    <div>
      <div class="modal_content">
        </div>
        <div class="modal_title">
          <h2>This is my modal</h2>
        </div>
        <div class="modal_info">
          <p>
            Lorem ipsum dolor, sit amet consectetur adipisicing elit. Dolores itaque
            inventore dignissimos suscipit delectus, ipsa repellat minima et vitae
            perspiciatis quasi unde earum corporis labore at in temporibus repudiandae
            totam
          </p>
        </div>
      </div>
    </div>
  </Teleport>
</template>

//App.vue
<template>
 <div>
 <button @click="isOpen = true">Open Modal</button>
 <AppModal v-if="isOpen" />
 </div>
</template>
Let’s see the results
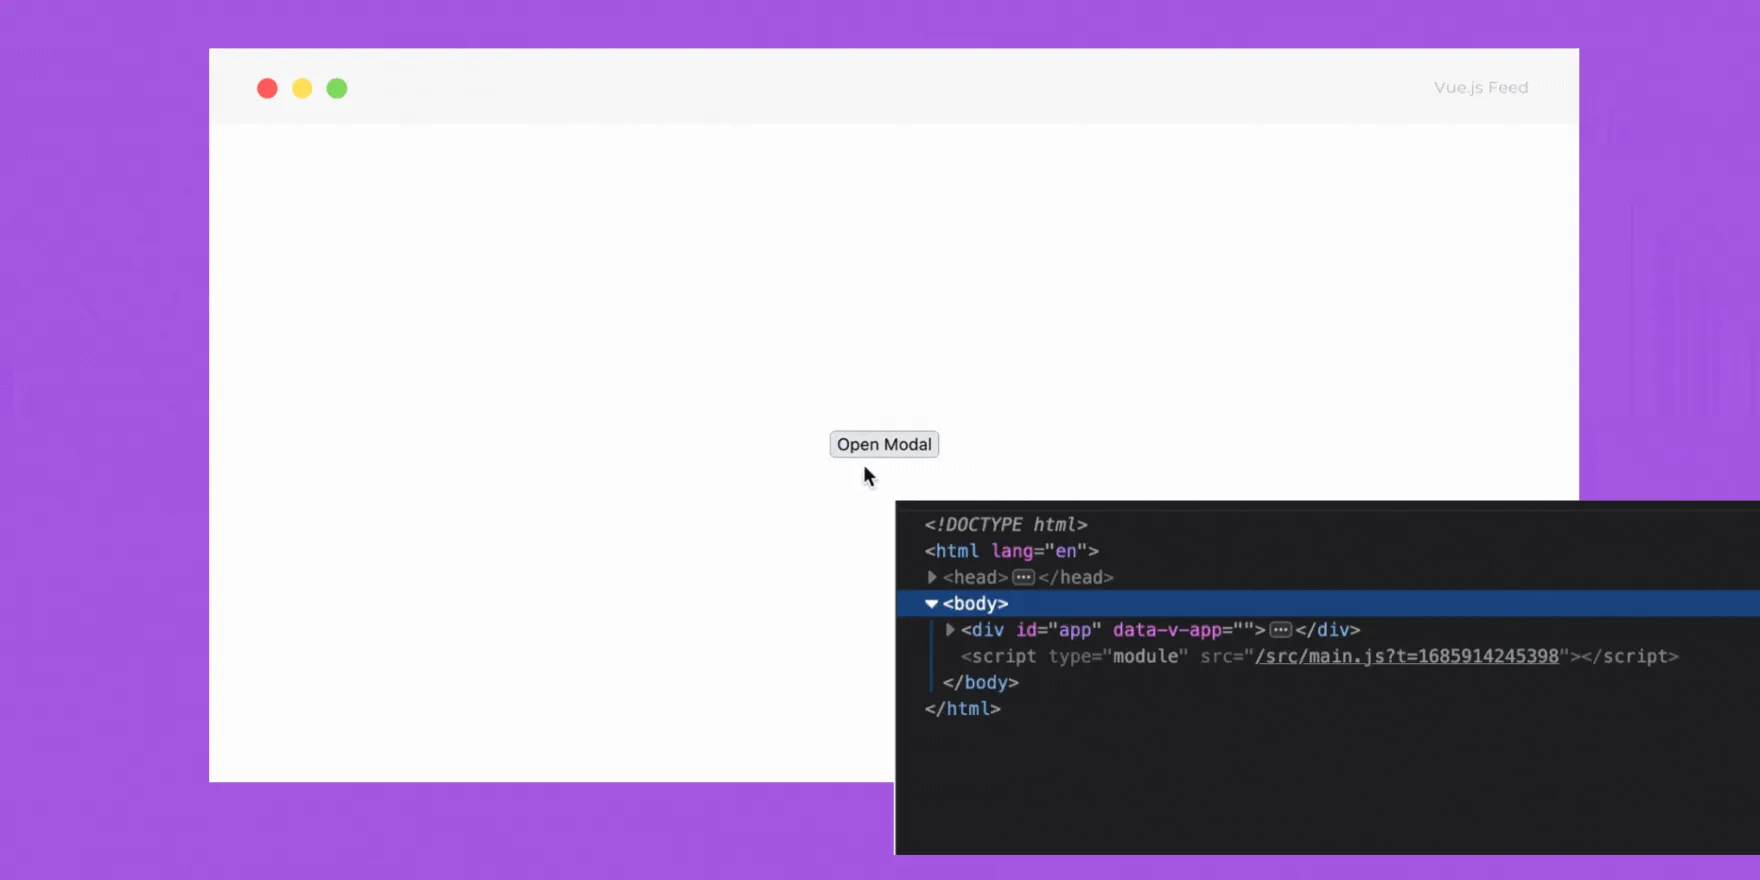
With our above example, our modal component will be rendered in our body as a direct child component even though it is positioned differently.
State Driven CSS
In Vue.js, you might be used to applying different classes to tags based on the logic in your code. That's because we might want to reactively update an element’s class based on certain conditions.
For example, suppose a variable check is set to true, we want a div to show as red, but otherwise, it should be blue. For such use cases, it's common to see the following code:
<div :class="check === true ? 'red' : 'blue'">
    Hello World
</div>
In Vue 3, you can actually put Vue reactive variables directly in your CSS, thereby avoiding adding extra classes.
Let's look at a simple example. Suppose we have the following script in our Vue template:
<script setup>
import { ref } from 'vue'

const color = ref('#ff0000');

if(check == true) {
  color.value = '#0000ff';
}
</script>

<template>
        <input value="Hello World" />
</template>
Simple, right? If check is true, the color variable is '#0000ff'. Otherwise, it's '#ff0000'. Right in our CSS, with Vue 3, we can now directly reference color by using v-bind:
<style>
  input {
    color: v-bind(color)
  }
</style>
Now color updates reactively and the color of input will change to whatever the color variable is set to. That means you can avoid some awkward logic in your HTML tags, and use JavaScript variables directly in your CSS - and I think that's pretty cool.
DefineEmits
defineEmits is a macro in the Vue.js Composition API that allows you to declare the events a component can emit to its parent. It is used within the `` section of a component and helps in making the component's API more explicit and self-documenting.
Here's an example of how to use defineEmits:
<!-- MyComponent.vue -->
<script setup>
import { defineEmits } from 'vue'

const emit = defineEmits(['my-event'])

function triggerEvent() {
  emit('my-event', 'payload')
}
</script>
In this example, we declare that the component can emit an event called my-event. We then use the emit function returned by defineEmits to emit the event with a payload when the triggerEvent function is called.
This is very useful as it documents component events in a single place in case we have multiple component events in a single component. Plus, we can now also validate payloads.
<script>
export default {
  // define as object to use validation
  emits:{

    // or provide function to validate
    // return truthy for valid, falsy for invalid
    'check-name'(payload){
      return !!(typeof payload === 'string')
    }
  },
  data() {
    return {
        name:''
    }
  },
  methods: {
    sendData() {

      this.$emit('check-name', this.name)
    }
  }
}
</script>
Suspense
<Supense> is a built-in component in Vue.js for orchestrating async dependencies in a component tree. It can render a loading state while waiting for multiple nested async dependencies down the component tree to be resolved.
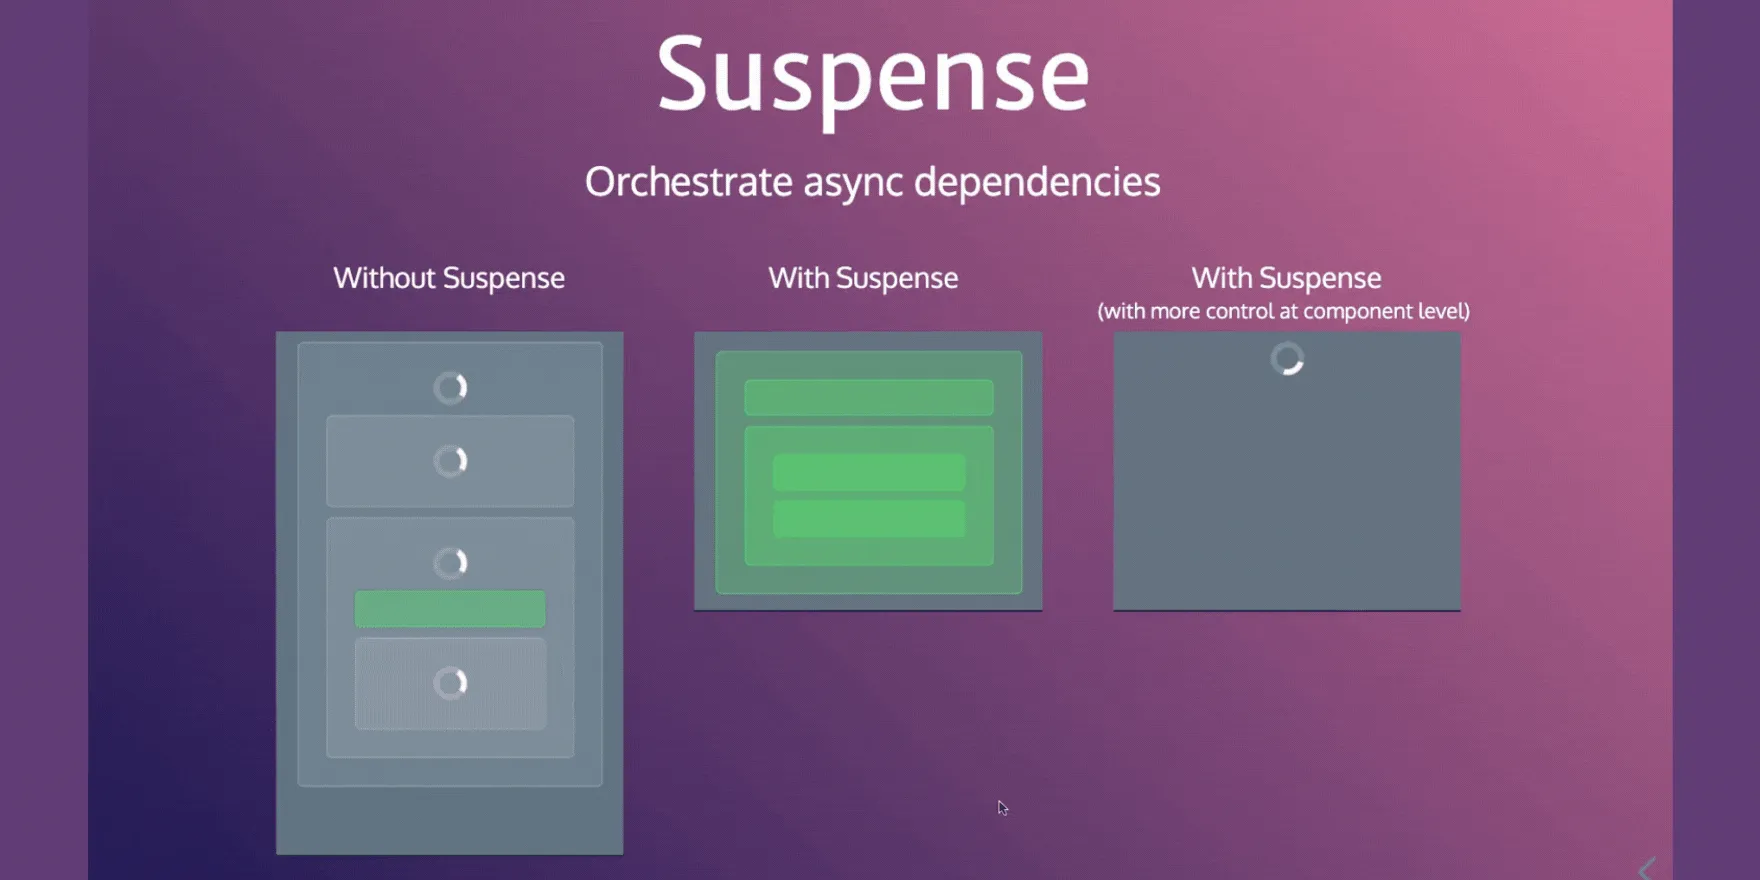
This allows you to display top-level loading or error states while waiting for nested async dependencies, such as components with an async setup() hook or async components, to be resolved.
<Supense> has two slots: #default and #fallback. The default slot content is shown if possible, and the fallback slot content is shown when waiting for async dependencies to resolve.
Please note that <Supense> is an experimental feature, and its API may change before it reaches stable status. But Nuxt 3 uses Suspense and therefore you shouldn’t be too worried about it going through any breaking changes anytime soon. But it is awesome so let’s see it in action
//PostComments.vue
<script setup>
import axios from 'axios'

const response = await axios.get('https://dummyjson.com/comments')
const comments =  await response.data.comments
</script>

<template>
    <div>
       <div>Comments</div>
       <ol>
       <li v-for="comment in comments" :key="comment">{{ comment.body }}</li></ol>
    </div>

</template>

//App.vue
<script setup>
import PostComments from './components/PostComments.vue';
</script>

<template>
  <Suspense>
    <template #default>
      <div style="display: flex"><PostComments /></div>
    </template>
    <template #fallback>
      <div>loading</div>
    </template>
  </Suspense>
</template>
With our above code, our PostComments.vue component gets a list of comments from our API. While waiting for response data from our API with <Supense> we are able to display our loading indicator until PostComments.vue receives a response.
Conclusion
In conclusion, the transition from Vue 2 to Vue 3 has taken us on a thrilling ride, unveiling a plethora of new features that redefine the possibilities of web development.
With the Composition API, Teleport, State driven CSS, Suspense, and many more features not mentioned in this article, Vue 3 equips us with lots of tools to build faster, more modular, and visually dynamic applications. Kudos to the Vue.js Team as they keep improving this stellar framework with new exciting features. If you are stuck on Vue.js 2 then the time to upgrade is now. The Vue.js Team announced that Vue.js 2 will reach it’s end of life by end of this year (2023).
BTW, I had the opportunity to learn all these awesome features in a hands-on Vue School workshop. So stay tuned and definitely don’t miss out on the next workshop or any of our workshops for a guaranteed all-round learning experience.
And here we go again, don't be afraid to take the leap and upgrade to Vue 3. Your projects and clients will thank you for it.
Start learning Vue.js for free

Comments
Latest Vue School Articles

5 Component Design Patterns to Boost Your Vue.js Applications


Vibe Coding a Collaborative Editor with Comment Support with Nuxt UI and Jazz
Our goal is to be the number one source of Vue.js knowledge for all skill levels. We offer the knowledge of our industry leaders through awesome video courses for a ridiculously low price.
More than 200.000 users have already joined us. You are welcome too!
© All rights reserved. Made with ❤️ by BitterBrains, Inc.