
Techniques for Sharing Data between Vue.js Components

With the growing adoption of component-based architectures, modern applications are becoming larger and more complex. These applications are broken down into small, reusable components, making them easier to build, maintain, and test. However, as your app grows, sharing data between Vue.js components becomes essential for creating interactivity and functionality.
In this Vue.js guide, you’ll explore different techniques to share data between Vue components. We'll focus on props in Vue.js and other effective methods to pass data to components. Whether you're new to Vue or looking to expand your knowledge, this article will help you learn how to pass data to Vue components efficiently.
Passing Data in Vue Using Props
The first technique for passing data is Vue.js Props. Props allow us to transfer data from a parent vue component to a child component. When we build component applications we form a component tree architecture ie. we have smaller components embedded in bigger components which are all then connected to our root component.
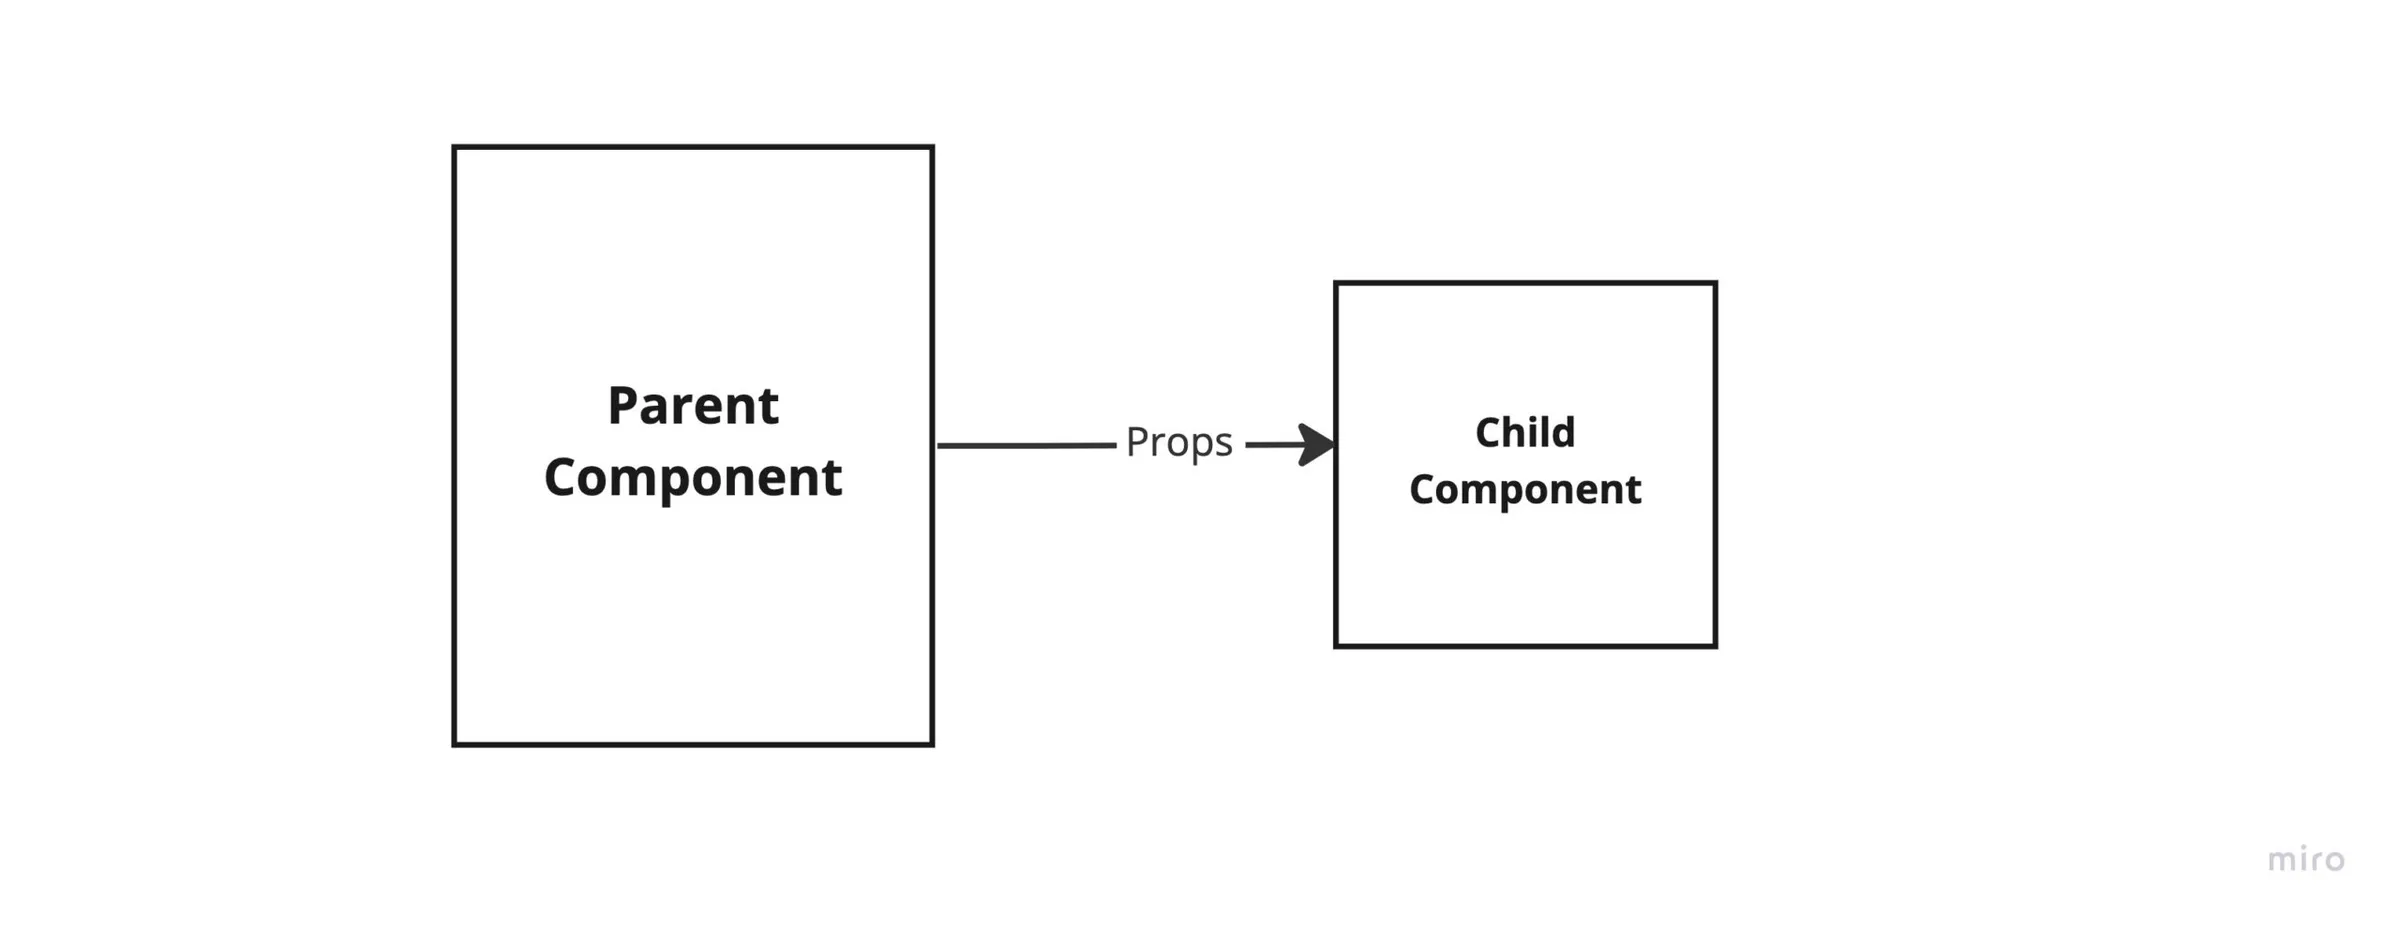
Props is a unidirectional Data Transfer Technique. We can only transfer data from the parent component to the child component so a state can only be changed from our parent component.
Props are added to our component via the template section.
//~/parentComponent.vue

<template>
  <child-component myprop="hello world"></child-component>
</template>
In this example, we are passing the prop myprop with a value of "hello world" to our child component. We will then be able to access this value from inside of the child-component by initializing our props object in the script tag of our child component .vue file
//~/childcomponent.vue

<template>
  <div>
      {{ myprop }}
  </div>
</template>

<script setup>
const props = defineProps({
            myprop:String
        })
</script>
Our myprop key has a value of String which is the constructor function of the expected type. Props can be of type String, Number, Boolean, Array or, Object.
Passing Data in Vue Using Emits
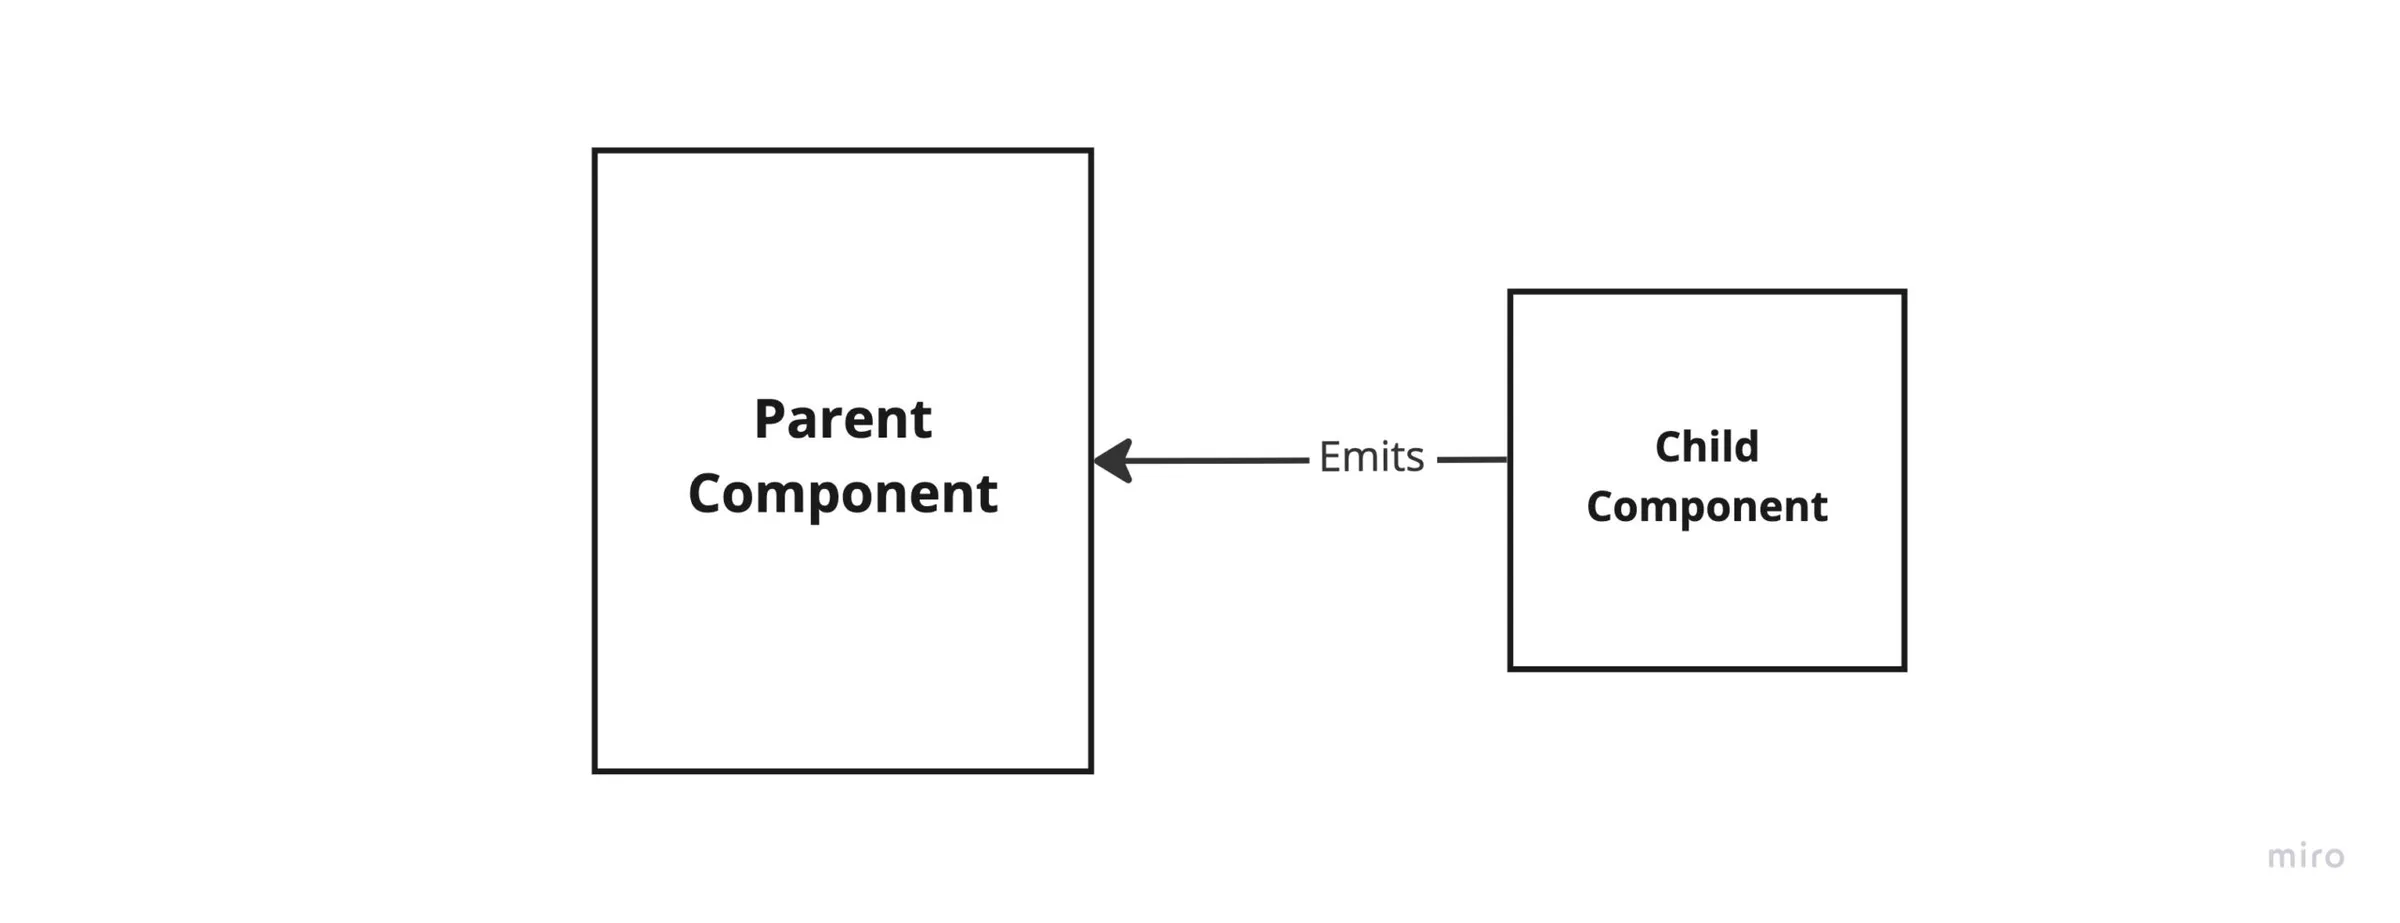
Emits or Component Events can be used to share data from a child vue component to its parent component. But this can only be achieved by triggering events from your child component. I use emits to notify my parent component that something has happened in my child component.
Lets jump right to an example;
//~/childcomponent.vue

<script setup>
const username = ref("");
</script>

<template>
  <div>
    <form action="submit" @submit.prevent="$emit('changeUsername', username)">
      <input
                type="text"
                v-model="username"
                placeholder="Enter your name" />
            <button
        type="sumbit"
      >
        Change Username
      </button>
    </form>
    <p>Value: {{ username }}</p>
  </div>
</template>
For our example, our child component is a basic form which will receive the username of a test user by input. On submission we emit a changeUsername event to our parent component with the username value to update our username state.
//~/parentComponent.vue

<script setup>
const username = ref("");
</script>

<template>
  <div>
    <ChildComponent
      @changeUsername="
        (payload) => {
          username = payload;
        }
      "
    />
    <p class="username">Hello, {{ username }}</p>
  </div>
</template>
Passing Data in Vue Using Slots
Slots are a mechanism for Vue components that allows you to compose your components in a way other than the strict parent-child relationship. Slots give you an outlet to place content in new places of our child component or make components more generic. Slots are great for creating layouts.
The best way to understand them is to see them in action. Let’s start with a simple example:
//~/button.vue

<template>
  <div>
    <button><slot></slot></button>
  </div>
</template>
<div>
<Button1>Button first</Button1>
<Button1
><span>Button with icon</span>
<span
><img src="..pathto/someIcon.svg" alt="anyIcon" /> </span
></Button1>
</div>
</template>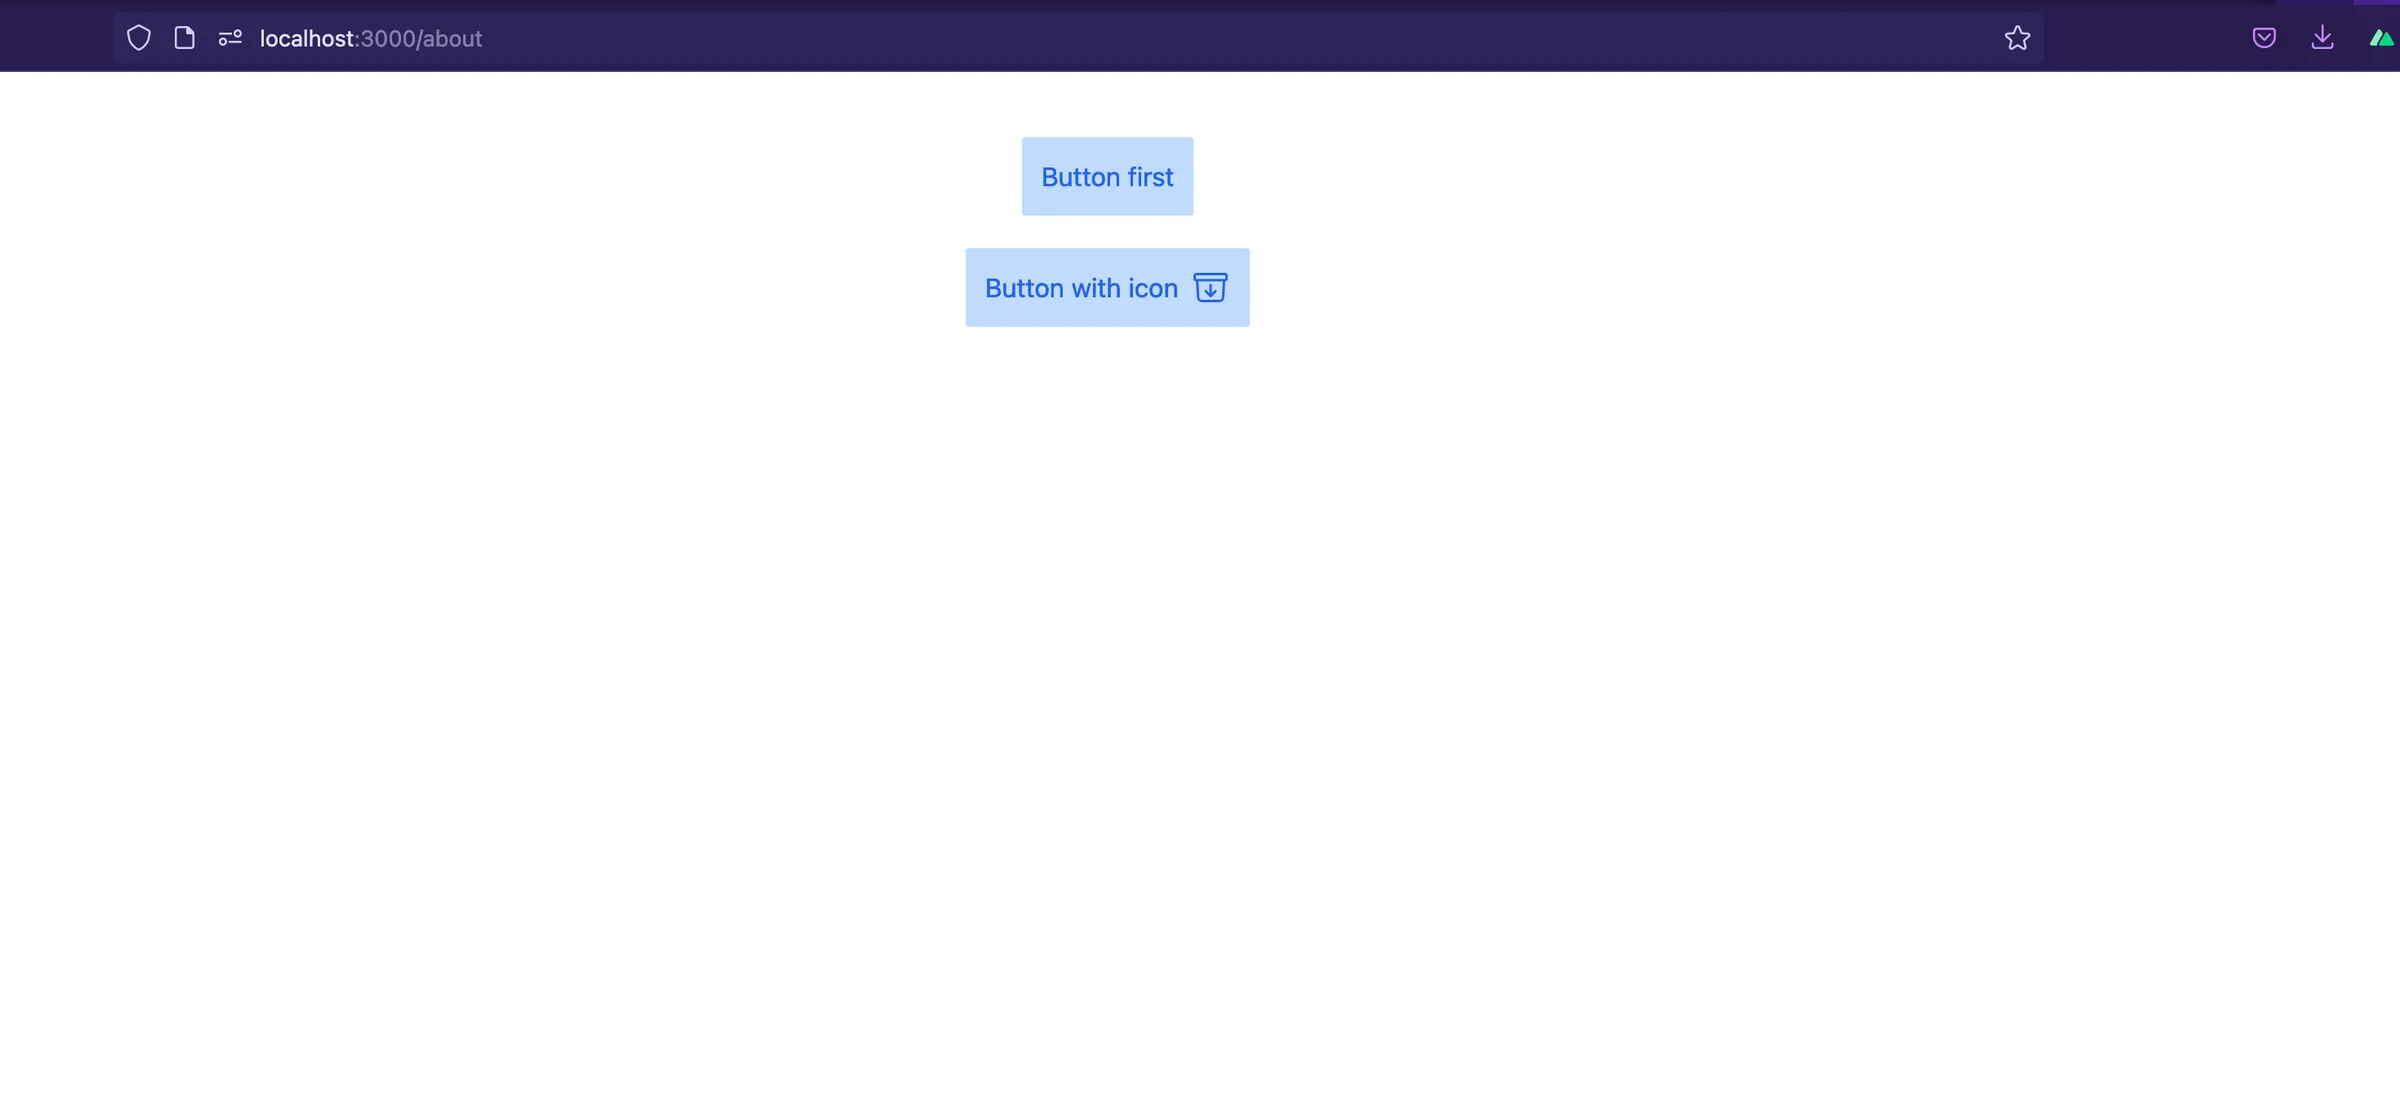
From our example we notice that we can reuse our button component and insert dynamic data into it without affecting the original component.
Passing Data in Vue Using Scoped Slots
In Vue.js, scoped slots allow you to pass data from a child component to its parent, making it more flexible than regular slots. The parent can access the data provided by the child and define how it should be used within the slot content.
<!-- Parent Component -->
<template>
  <ChildComponent>
    <template #="{ message }">
      <p>{{ message }}</p>
    </template>
  </ChildComponent>
</template>

<script setup>
import { ref } from 'vue'
import ChildComponent from './ChildComponent.vue'
</script>
<!-- Child Component -->
<template>
<slot :message="dynamicMessage"></slot>
</template>
<script setup>
import { ref } from 'vue'
const dynamicMessage = ref('Hello from the child component!')
</script>In this example, the ChildComponent exposes a scoped slot with a message passed to the parent. The parent can then access this data and use it within the slot content. Scoped slots are ideal for creating reusable components and passing dynamic data back to the parent.
Passing Data in Vue Using Stores
As our application grows in size and complexity, passing data through components can become messy. We will have to pass data from a parent component to a child component which may be deeply nested in the component tree. Stores introduce an advanced method of passing data across components by eliminating the problem of prop drilling. Prop drilling refers to transporting data or states as props to the intended destination through intermediate components.
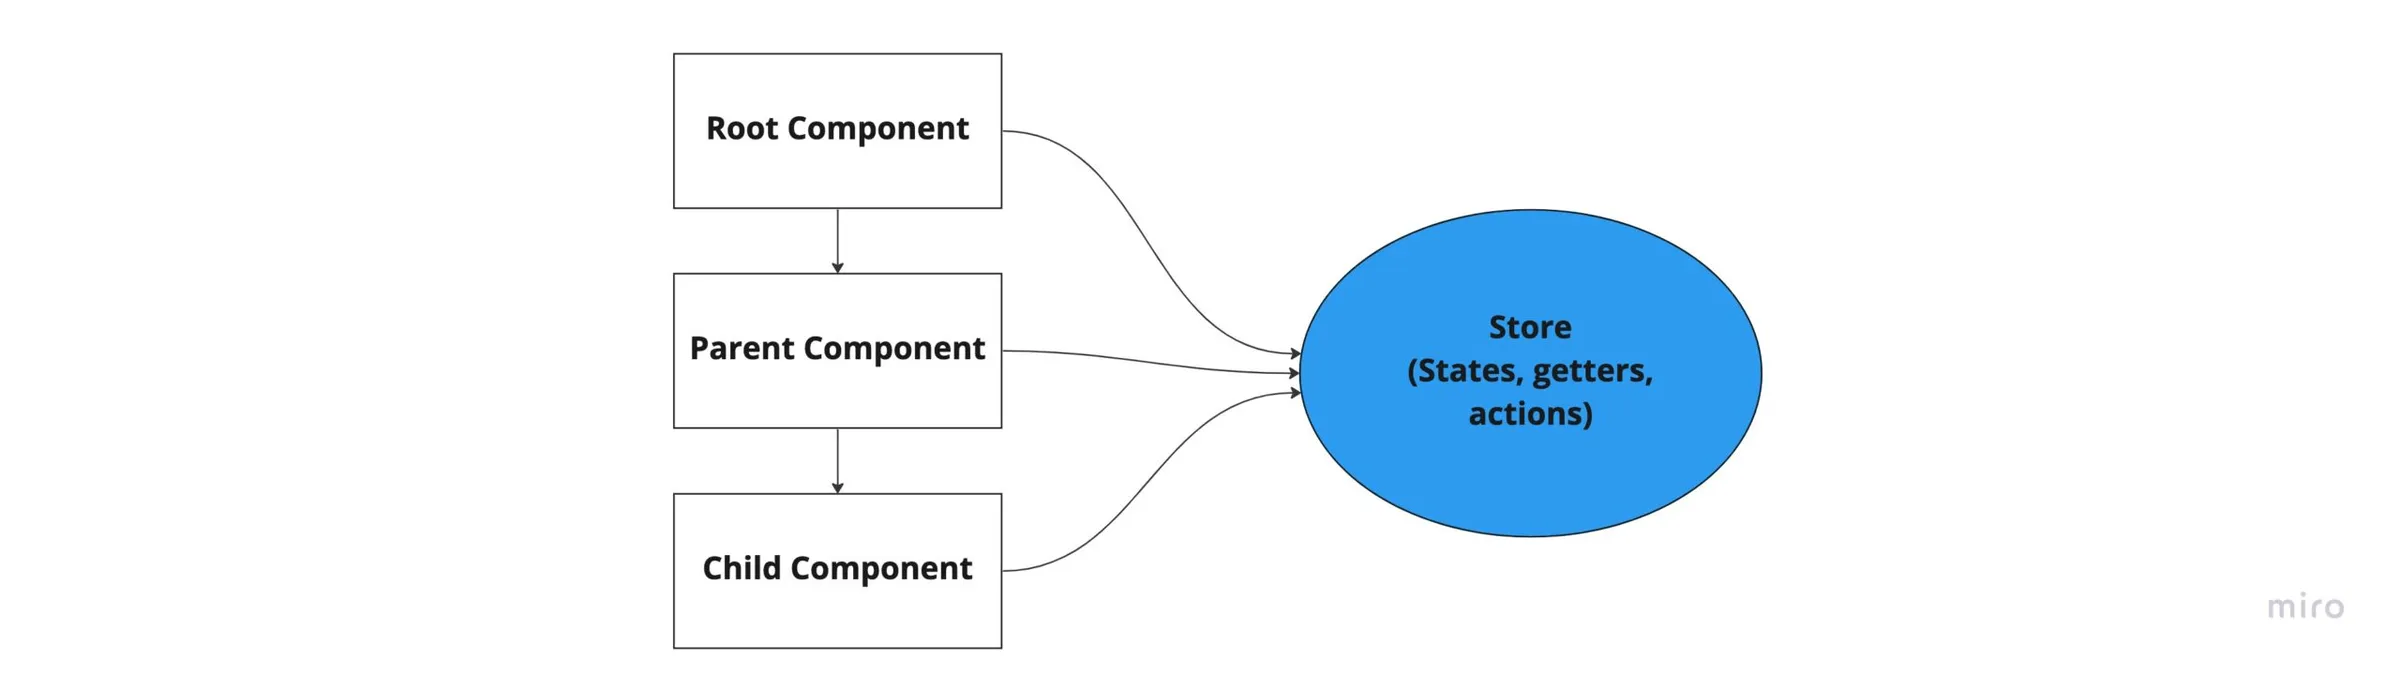
With stores, our states or data are stored in a centralized point to be accessed by any components irrespective of their hierarchy in the component tree. This is a common way of handling states for big Vue.js applications. Popular state management tools for Vue.js include Pinia and Vuex. For our basic example, we will use Pinia which is the official state management tool for Vue js 3.
First Let’s add Pinia into our Vue.js application
//yarn
yarn add pinia

//or with npm
npm install pinia

//instructing vue to use pinia
//~app.vue

import { createPinia } from 'pinia'
app.use(pinia)
Let’s define our store
//~store/testStore.js

import {defineStore} from 'pinia'

export const useTestStore = defineStore('test', {
    state: () => {
        return{
            username: null
        }
    },
    actions:{
        changeUsername (payload) {
            this.username = payload
        }
    }
})
Our store contains a state which is the central data point of our store and an action which is a method to change the state.
Now let’s try to access our state from a component. We’ll use the composition api for this tutorial. To find out how you can access the store using the options api you can check out the Pinia Documentation . Additionally, the Mastering Pinia course is a great place to learn everything about Pinia and state managamenent.
//~index.vue
<script setup>
import { useTestStore } from "~~/store/testStore";

const store = useTestStore();
</script>

<template>
  <div>
    <ChildComponent />
    <p class="username">Hello, {{ store.username }}</p>
  </div>
</template>
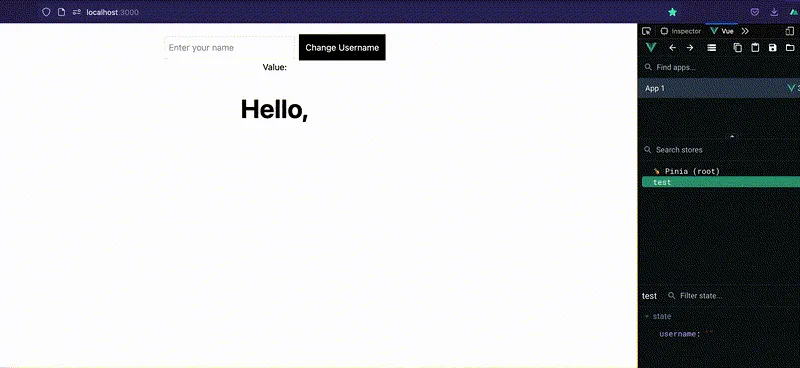
Now we are able to view username in our DOM.
Next is to use our form in the child component to change the state username in our store using our changeUsername action.
//~childcomponent.vue
<script setup>
import { useTestStore } from "~~/store/testStore";
const store = useTestStore();

const username = ref("");
</script>

<template>
  <div>
    <form action="submit" @submit.prevent="store.changeUsername(username)">
      <input type="text" v-model="username" placeholder="Enter your name" /><button
        type="sumbit"
      >
        Change Username
      </button>
    </form>
    <p>Value: {{ username }}</p>
  </div>
</template>
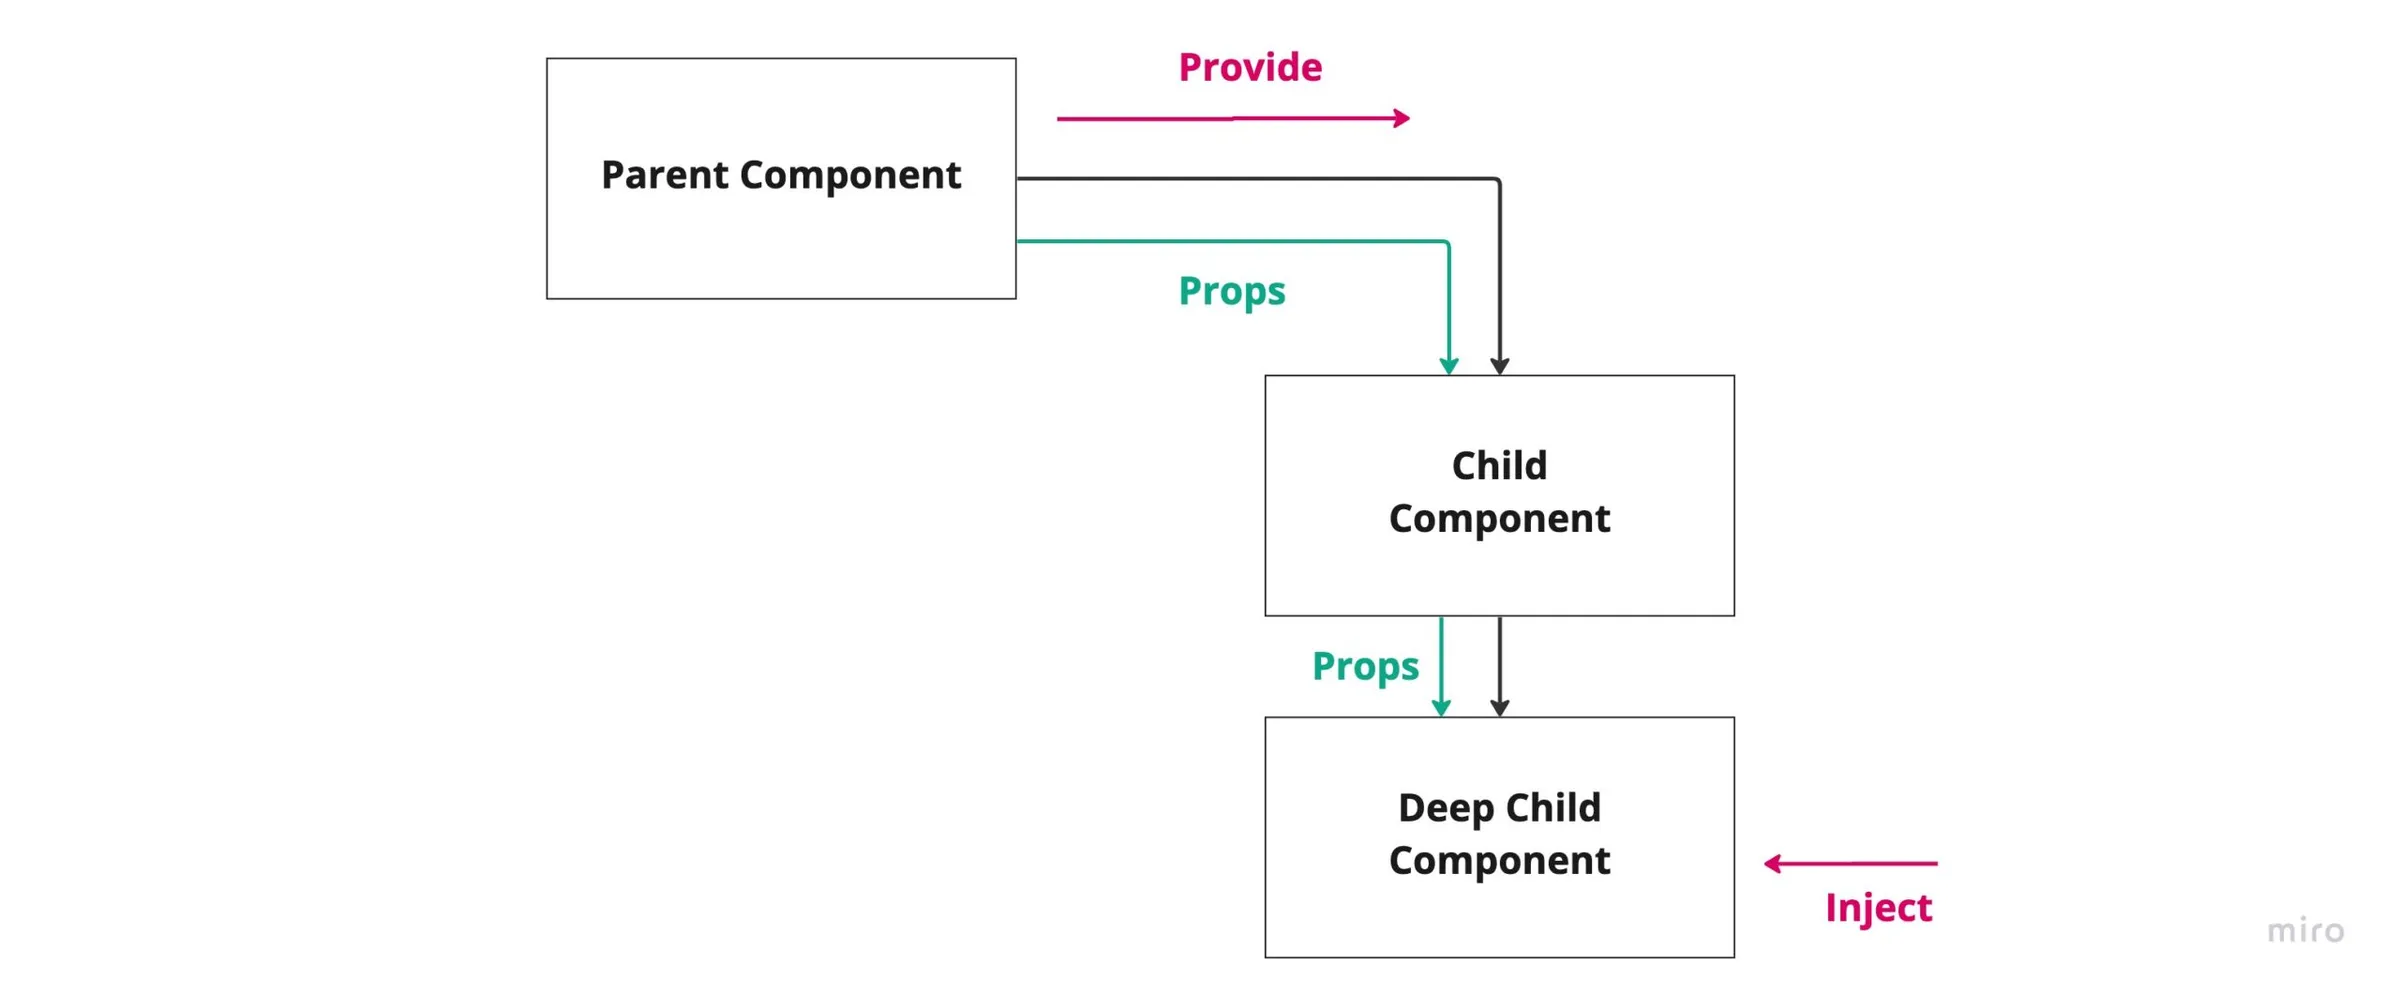
Passing Data in Vue Using Provide and Inject
Provide and Inject technique is also another useful technique of preventing prop drilling when building complex Vue.js applications. With this technique the parent component can provide dependencies for all its child components. This means that any component in the component tree, regardless of how deep it is, can inject dependencies that are provided by components higher up in the component chain.
Let’s jump into an example. To provide data to a component's descendants, use the provide()function
The provide()function accepts two arguments. The first argument is called the injection key
which can be a string or a Symbol. The second is the data or state we want to provide to our child components.
//~parentcomponent.vue

<template>
  <div>
    <form action="submit">
      <input type="text" v-model="username" placeholder="Enter your name" />
            <button
        type="sumbit"
      >
        Change Username
      </button>
    </form>
    <display-child />
  </div>
</template>

<script setup>
import { ref, provide } from "vue";

const username = ref("");

provide("username", username);
</script>
To inject data provided by an ancestor component, use the inject() function
//~displayChild.vue
<template>
<div>
<p>Value: {{ username }}</p>
</div>
</template>
<script setup>
import { inject } from "vue";
const username = inject("username");
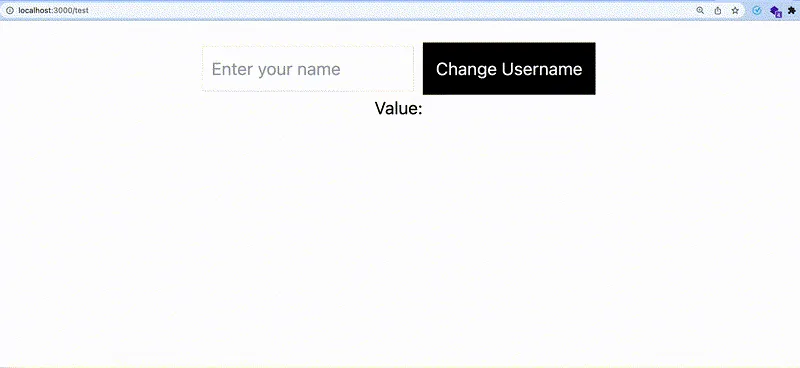
</script>Let’s check if everything works.
Conclusion
Hope you enjoyed reading this article on Sharing Data between Vue.js Components. Components are very essential in creating amazing Vue.js applications. Knowing when and where to use these various techniques for passing data between your components is key to making you an awesome Vue.js developer.
Thinking of how to get started? Our Vue.js 3 Masterclass Course has everything you need and more on building awesome components for your next Vue.js project.
Start learning Vue.js for free

Comments
Latest Vue School Articles

5 Component Design Patterns to Boost Your Vue.js Applications


Vibe Coding a Collaborative Editor with Comment Support with Nuxt UI and Jazz
Our goal is to be the number one source of Vue.js knowledge for all skill levels. We offer the knowledge of our industry leaders through awesome video courses for a ridiculously low price.
More than 200.000 users have already joined us. You are welcome too!
© All rights reserved. Made with ❤️ by BitterBrains, Inc.