
How to Master Vue Router in Vue.js 3 with Composition API

Creating a dynamic, smooth single-page application (SPA) is essential for modern web development. In this article, we’ll guide you through setting up Vue Router in a Vue.js 3 project using the Composition API for seamless routing. As Vue.js 3 relies on Vite as its default build tool, we’ll leverage Vite’s fast development environment to enhance the performance and efficiency of your app.
Why Single Page Applications?
Before diving into Vue Router, let's understand why single page applications (SPAs) are preferred over multi-page applications (MPAs).
Multi-Page Applications (MPAs):
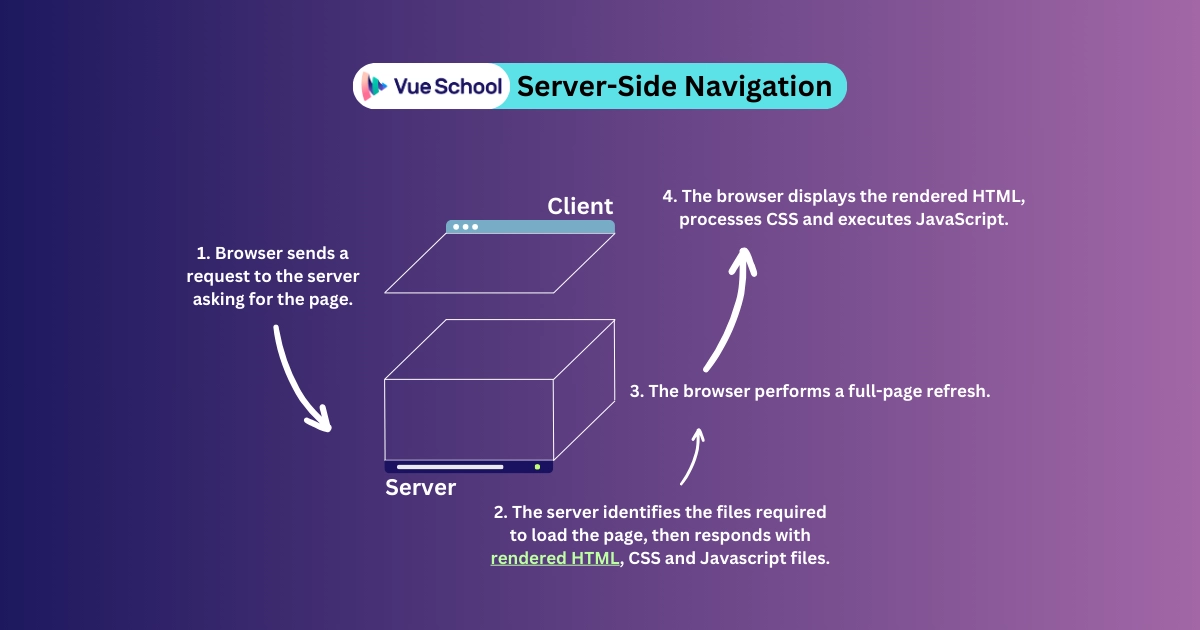
Multi-page apps are usually server-side rendered, and they reload the entire web page every time the user navigates to a new page. This approach is slower because each navigation requires a full-page refresh, including all resources like CSS, JavaScript, and images. This can lead to a disjointed user experience, especially for web applications that require frequent navigation.
Single Page Applications (SPAs):
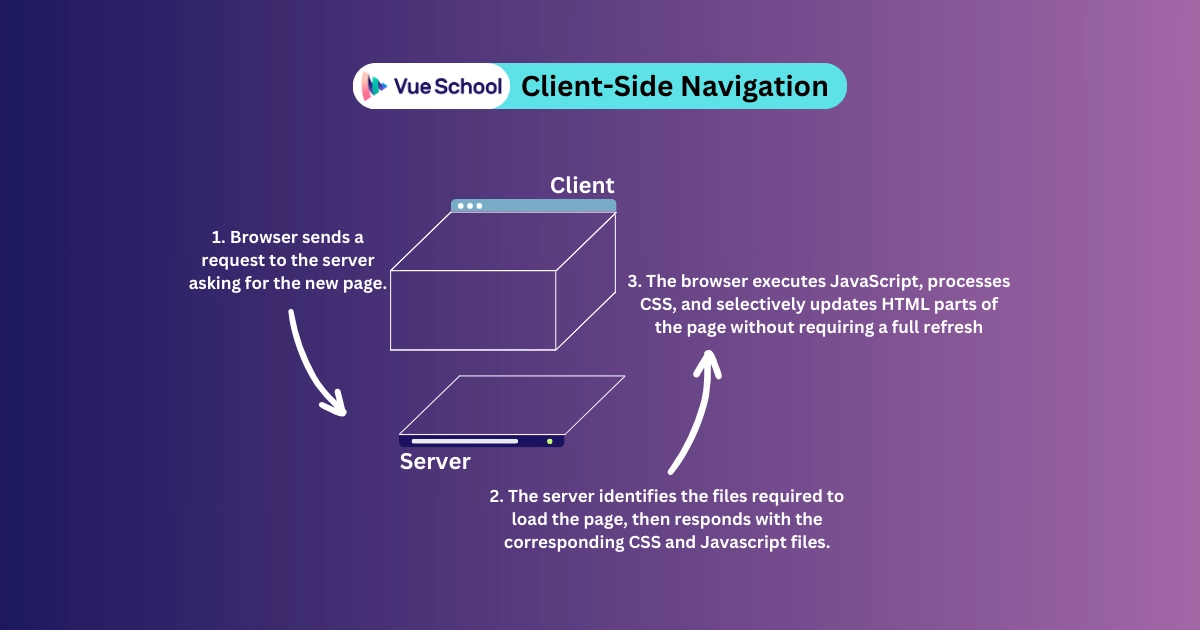
Single-page apps, on the other hand, are client-side rendered. They load the necessary resources once and dynamically update the content as the user navigates. This results in a faster and smoother user experience since only the required components are loaded and rendered. SPAs provide an app-like experience in the browser, making interactions quicker and more fluid.
Introducing Vue Router
Vue Router is the official router for Vue.js, providing a way to navigate between different views or components in a Vue application. It enables the development of SPAs with ease, offering a seamless and efficient navigation experience.
How Vue Router Enhances SPA Experience
Vue Router maps components to routes, allowing you to define which component should be displayed for each URL. When a user navigates, Vue Router dynamically swaps the components without reloading the entire page, maintaining the SPA feel. This means users can navigate between different sections of your app instantly, without waiting for a new page to load.
Setting Up Vue Router
Let's set up Vue Router in our project. We'll start by installing Vue Router if it’s not already included in your project.
npm install vue-router@4Or, you can opt-in for Vue Router if you’re installing a new Vue.js 3 app using the create-vue scaffolding tool.
Configuring Vue Router
Assuming you have already set up Vue Router using the create-vue command, your project should have some basic boilerplate code. Here’s how to configure Vue Router:
import { createRouter, createWebHistory } from 'vue-router';

const router = createRouter({
  history: createWebHistory(import.meta.env.BASE_URL),
  routes: []
});

export default router;- createRouter: This function creates a new router instance.
- createWebHistory: This mode uses the HTML5 history API to handle navigation without reloading the page.
- routes array: This array will hold our route definitions.
This router instance is then exported and used in main.ts to configure the Vue instance.
// src/main.js

import { createApp } from 'vue'

import App from './App.vue'
import router from './router'

const app = createApp(App)
app.use(router)
app.mount('#app')
Creating and Registering Routes
Now, let's create and register routes for our homepage and projects page.
Defining Components
Create components for the views inside the /views directory:
- HomeView.vue
<template>
  <div>
    <h2>Home</h2>
    <RouterLink to="/projects">Projects</RouterLink>
  </div>
</template>
- ProjectsView.vue
<template>
  <div>
    <h2>Projects</h2>
    <RouterLink to="/">Home</RouterLink>
  </div>
</template>
These components display simple navigation links to each other using the RouterLink component, which is essential for SPA navigation.
Registering Routes
In router/index.js, define the routes and map them to the components:
import { createRouter, createWebHistory } from 'vue-router';
import HomeView from '@/views/HomeView.vue';
import ProjectsView from '@/views/ProjectsView.vue';

const router = createRouter({
  history: createWebHistory(import.meta.env.BASE_URL),
  routes: [
    { path: '/', name: 'home', component: HomeView },
    { path: '/projects', name: 'projects', component: ProjectsView }
  ]
});

export default router;
With these routes defined, Vue knows which component to render for each path.
Using RouterView in App.vue
In App.vue, use the RouterView component to display the current route’s component:
<template>
  <main>
    <RouterView />
  </main>
</template>
RouterView acts as a placeholder where the matched component will be displayed.
Testing Vue Router Implementation
With Vue Router set up, we can now test our implementation by running the app.
Running the App
Run the app by executing the following command in your terminal:
npm run devWhat to Expect
Open your browser and navigate to http://localhost:5173. You should see the homepage displaying "Home" with a link to the projects page. Click on the "Projects" link, and you should be navigated to the projects page displaying "Projects" with a link back to the homepage.
Watch for the following:
- Smooth Transitions: Notice that the transition between pages is smooth without a full-page reload.
- No Flickering: There should be no flickering or delays typically associated with full-page refreshes.
- Network Activity: Open the browser's developer tools (usually by pressing F12) and navigate to the Network tab. You will observe that navigating between pages does not trigger new document requests.
This behavior confirms that Vue Router is correctly set up, providing a seamless SPA experience.
Optimizing Performance with Lazy Loading
Lazy loading routes in Vue Router is a powerful technique for improving performance in your Vue.js applications. By lazy loading routes, you can split your application into smaller chunks and load them on demand, resulting in faster initial page loads and improved user experience. To see this in action, let’s tweak the /projects route in the router/index.js file:
{
    path: '/projects',
    name: 'projects',
    component: import('@/views/ProjectsView.vue')
}
the code snippet above, we've implemented lazy loading for the projects route. This means that the ProjectView component will only be requested from the server when the user navigates to the /projects page, optimizing performance by reducing the initial bundle size.
Leveraging Composition API
In Vue 3, the Composition API offers a more flexible and powerful way to manage component logic. It works seamlessly with Vue Router, allowing you to handle route-related logic more effectively. Here's a simple example of using the Composition API with Vue Router:
<script setup>
import { ref } from 'vue';
import { useRouter } from 'vue-router';

const router = useRouter();
const message = ref('Welcome to the Home Page');

function navigateToProjects() {
  router.push('/projects');
}
</script>

<template>
  <div>
    <h2>{{ message }}</h2>
    <button @click="navigateToProjects">Go to Projects</button>
  </div>
</template>
In this example, useRouter is used to get the router instance, and ref is used to create reactive state. The navigateToProjects function uses router.push to programmatically navigate to the projects page.
Conclusion
With Vue Router set up and configured, your application now benefits from smooth, efficient navigation between pages. This setup is not only optimal for user experience but also streamlines the development process. By leveraging the power of Vue Router and the Composition API, you can build robust, dynamic single page applications that provide a seamless experience for users and developers alike.
For more detailed learning and advanced techniques, enroll in the Vue.js Masterclass 2024 Edition on Vue School.
Start learning Vue.js for free

Comments
Latest Vue School Articles

Just Released: Nuxt Hub Multi-Vendor and First-Class DB


Vue.js – 2025 In Review and a Peek into 2026
Our goal is to be the number one source of Vue.js knowledge for all skill levels. We offer the knowledge of our industry leaders through awesome video courses for a ridiculously low price.
More than 200.000 users have already joined us. You are welcome too!
© All rights reserved. Made with ❤️ by BitterBrains, Inc.