The Right Package Manager Commands, Faster with Ni

Have you ever run npm install in a Yarn project by mistake? Or typed yarn add when you meant pnpm add? Context-switching between projects with different package managers is a common source of friction for JavaScript developers.
Enter ni (pronounced "nee", I think 🤔) - a brilliant utility that automatically detects which package manager your project uses and runs the correct command. No more mental overhead, no more wrong commands, just type ni and let it figure out the rest.
The Problem: Too Many Package Managers
Modern JavaScript development gives us choices: npm, Yarn, pnpm, Bun, and Deno. Each has its strengths, and you'll likely encounter all of them across different projects. But each also has its own command syntax:
- Installing dependencies:
npm installvsyarnvspnpm installvsbun install - Adding packages:
npm i reactvsyarn add reactvspnpm add reactvsbun add react - Running scripts:
npm run dev -- --port=3000vsyarn run dev --port=3000vspnpm dev --port=3000
The cognitive overhead adds up, especially when you're juggling multiple projects in a day.
The Solution: One Command to Rule Them All
ni provides a unified interface that works across all package managers. It detects your project's package manager by looking at lock files (package-lock.json, yarn.lock, pnpm-lock.yaml, bun.lockb, or deno.json) and automatically translates your command to the correct syntax.
Plus, it's built by Anthony Fu, the creator of Vitest, so you know it's got to be good.
Installation
Installing ni is straightforward. You can use npm:
npm i -g @antfu/niOr if you're on macOS, use Homebrew:
brew install niThere's even an asdf plugin if that's your preferred tool manager.
Core Commands
ni - Install Dependencies
The base command replaces all the various install commands:
ni
# Automatically runs:
# npm install
# yarn install
# pnpm install
# bun install
# deno install
Adding a package? Just pass the package name:
ni vite
# Automatically runs:
# npm i vite
# yarn add vite
# pnpm add vite
# bun add vite
# deno add vite
Dev dependencies work as expected:
ni @types/node -D
# Automatically runs the appropriate command for dev dependencies
Global installs use the -g flag:
ni -g eslint
# Uses your configured global agent (npm by default)
Production installs (omitting dev dependencies):
ni -P
# npm i --omit=dev
# yarn install --production
# pnpm i --production
# bun install --production
Frozen/locked installs for CI:
ni --frozen
# npm ci
# yarn install --frozen-lockfile (Yarn 1)
# yarn install --immutable (Yarn Berry)
# pnpm install --frozen-lockfile
# bun install --frozen-lockfile
nr - Run Scripts
Running scripts is one of the most frequent tasks, and nr makes it effortless:
nr dev --port=3000
# npm run dev -- --port=3000
# yarn run dev --port=3000
# pnpm run dev --port=3000
# bun run dev --port=3000
# deno task dev --port=3000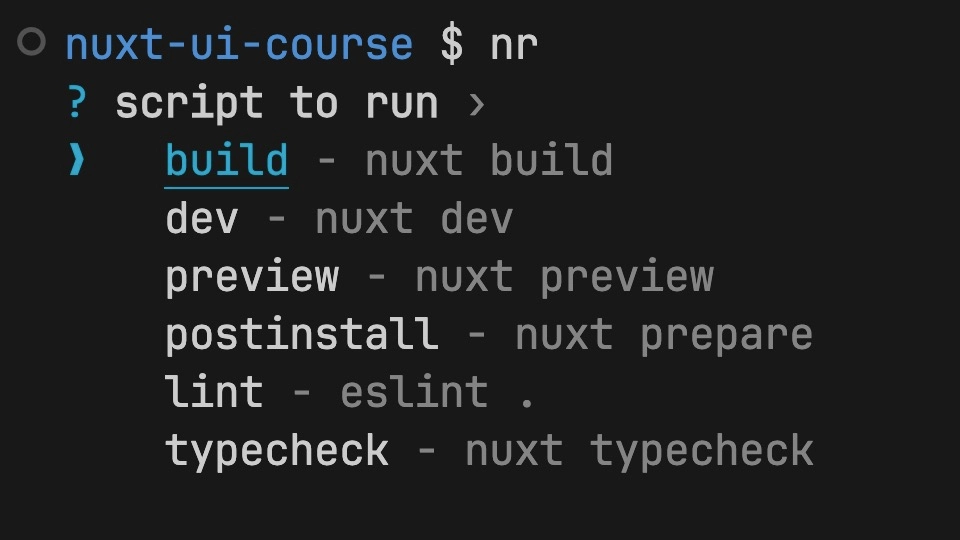
Without any arguments, nr becomes interactive:
nr
# Shows a list of available scripts to choose from
Rerun your last command with a dash:
nr -
# Reruns the last command you executed
For monorepos, you can interactively select the package and script:
nr -p
# Interactively select package and script to run
Pro tip: nr even supports shell completion! Add it to your shell config:
# Bash
nr --completion-bash >> ~/.bashrc

# Zsh
mkdir -p ~/.zim/custom/ni-completions
nr --completion-zsh > ~/.zim/custom/ni-completions/_ni
echo "zmodule $HOME/.zim/custom/ni-completions --fpath ." >> ~/.zimrc
zimfw install
nlx - Execute Packages
Need to run a package without installing it? `nlx has you covered:
nlx vitest
# npx vitest
# yarn dlx vitest
# pnpm dlx vitest
# bunx vitest
# deno run npm:vitest
This is perfect for trying out CLI tools or running one-off commands.
nun - Uninstall Packages
Removing packages is just as intuitive:
nun webpack
# npm uninstall webpack
# yarn remove webpack
# pnpm remove webpack
# bun remove webpack
# deno remove webpack
Run nun without arguments for an interactive uninstall menu:
nun
# Interactively select packages to remove
Plus more!
There are still more commands to explore so head over to the GitHub repository to read the complate documentation.
How It Works
The magic behind ni is elegantly simple: it looks for lock files in your project directory. When you run a command, ni:
- Scans for
yarn.lock,pnpm-lock.yaml,package-lock.json,bun.lockb, ordeno.json - Determines which package manager you're using (or checks the
packageManagerfield inpackage.json) - Translates your command to the appropriate package manager syntax
- Executes the command
This lock-file-first approach makes sense because you should be using lock files anyway (and you definitely should in production environments).
Practical Tips for Using Ni
1. Start with ni in new projects
Even if you're not sure which package manager you'll use, install dependencies from the start with ni. It will prompt you to choose, creating the appropriate lock file.
2. Use nr for all script running
The interactive script selection is incredibly handy when you can't remember exact script names. Just type nr and browse.
3. Add shell completion
The tab completion for nr saves time when you have many scripts. Set it up once and enjoy it forever.
4. Leverage the preview flag
When learning or debugging, use the ? flag to see what command will actually run:
ni vite ?
# Shows: npm i vite (or equivalent for your package manager)
5. Tell your AI Agents about Ni
I've got a global cursor rule setup in my own projects instructing cursor to always use ni with some examples of how it works (just like from this article). This saves me the headache of stearing agents to use the correct command.
Why You Should Use Ni
- Reduced cognitive load: Stop thinking about which package manager commands to use
- Fewer mistakes: No more running the wrong package manager command
- Faster onboarding: New team members don't need to know which package manager you use
- Better for monorepos: When different packages use different managers,
nihandles it - Future-proof: As new package managers emerge,
nican support them without you changing habits
Conclusion
In a world where JavaScript tooling keeps evolving and fragmenting, ni is a breath of fresh air. It's short, sweet, and too the point. It also doesn't try to replace package managers or force you into a specific choice. Instead, it elegantly solves the context-switching problem by providing a unified interface that works everywhere.
Give it a try - your future self will thank you every time you type ni instead of reaching for npm install... or was it yarn? You won't need to remember anymore.
Start learning Vue.js for free

Comments
Latest Vue School Articles

Just Released: Nuxt Hub Multi-Vendor and First-Class DB

Vue.js – 2025 In Review and a Peek into 2026
Our goal is to be the number one source of Vue.js knowledge for all skill levels. We offer the knowledge of our industry leaders through awesome video courses for a ridiculously low price.
More than 200.000 users have already joined us. You are welcome too!
© All rights reserved. Made with ❤️ by BitterBrains, Inc.