Vue Suspense — Everything You Need to Know

Vue 3's Suspense component is a game-changer for managing asynchronous operations in your applications. It allows for coordinated loading states across your app, ensuring a smoother user experience by preventing the "popcorn effect" of multiple, uncoordinated spinners.

Uncoordinated loading with multiple spinners.
With Vue Suspense, you can manage loading states more effectively:
- Unified Loading Indicators: Display a single loading state for multiple asynchronous components.
- Fine-Grained Control: Nest Suspense components to manage loading at various levels of your component hierarchy.
- Enhanced User Experience: Replace generic spinners with placeholders that resemble the final content layout.

Coordinated loading with a single spinner.
Understanding the Popcorn Effect
Without Suspense, each component handles its loading state independently, leading to multiple spinners and content appearing at different times. This uncoordinated loading can be jarring for users.
Multiple independent loading indicators causing the popcorn effect.
Introducing Vue 3 Suspense
Suspense is a built-in component in Vue 3 designed to manage asynchronous dependencies in your component tree. It allows you to define fallback content that displays while waiting for asynchronous components to load.
Basic Structure of Suspense
<Suspense>
  <!-- Asynchronous component -->
  <AsyncComponent />

  <template #fallback>
    <!-- Fallback content while loading -->
    <LoadingSpinner />
  </template>
</Suspense>
In this setup:
<AsyncComponent />is an asynchronous component, either defined with anasync setup()function or loaded usingdefineAsyncComponent.<LoadingSpinner />is the fallback content displayed while the asynchronous component is loading.
Coordinating Loading States with Suspense
By wrapping asynchronous components with Suspense, you can manage their loading states collectively, providing a unified loading experience.
<Suspense>
  <AsyncComponentA />
  <AsyncComponentB />

  <template #fallback>
    <LoadingSpinner />
  </template>
</Suspense>
In this example, <LoadingSpinner /> displays until both <AsyncComponentA /> and <AsyncComponentB /> have resolved, preventing multiple spinners from appearing independently.

Single loading indicator for multiple components.
Nesting Suspense for Fine-Grained Control
Suspense components can be nested to manage loading states at different levels of your application. This approach allows parts of the UI to load independently, improving perceived performance.
<Suspense>
  <AsyncComponentA />

  <template #fallback>
    <LoadingSpinner />
  </template>
</Suspense>

<Suspense>
  <AsyncComponentB />

  <template #fallback>
    <LoadingSpinner />
  </template>
</Suspense>
Nesting Suspense components enables sections of your app to load independently, enhancing user experience.

Nested Suspense components for independent loading.
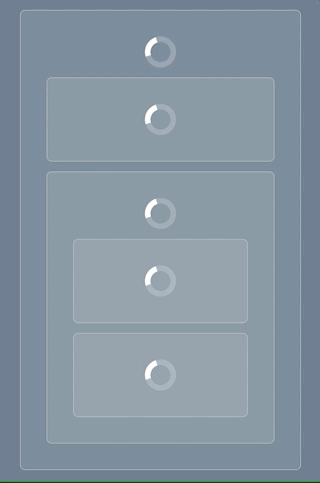
Enhancing User Experience with Placeholders
Instead of generic spinners, consider using placeholders that mimic the structure of the content being loaded. This approach sets user expectations and provides a smoother transition once the content loads.
<Suspense>
  <AsyncComponent />

  <template #fallback>
    <ContentPlaceholder />
  </template>
</Suspense>
Placeholders give users a sense of the upcoming content, improving engagement.

Using placeholders to enhance loading experience.
Best Practices for Using Suspense
- Optimize Performance: Be aware of the potential for asynchronous waterfalls, where nested asynchronous components load sequentially, potentially impacting performance. Structure your components to load in parallel when possible.
- Error Handling: Implement error boundaries to catch and handle errors in asynchronous components, ensuring your application remains robust.
- SEO Considerations: If SEO is a priority, ensure that your use of Suspense and asynchronous components doesn't hinder search engine indexing. Server-side rendering (SSR) can help in delivering fully rendered pages to crawlers.
Vue Suspense Video Tutorial
If you'd like to explore more about the Vue Suspense component, check out the following Youtube video tutorial:
Conclusion
Vue 3's Suspense component offers a powerful way to manage asynchronous operations, providing coordinated loading states and enhancing user experience. By implementing Suspense thoughtfully, you can create applications that load smoothly and efficiently, keeping users engaged and satisfied.
For more detailed information, refer to the official Vue.js documentation on Suspense.
Start learning Vue.js for free

Comments
Latest Vue School Articles

Decoding ChatGPT: How It Works and Why It Matters for Developers


Top 5 Vue CSS Superpowers You Might Be Missing

Our goal is to be the number one source of Vue.js knowledge for all skill levels. We offer the knowledge of our industry leaders through awesome video courses for a ridiculously low price.
More than 200.000 users have already joined us. You are welcome too!
© All rights reserved. Made with ❤️ by BitterBrains, Inc.