
6 Tips for Building Large Scale Vue.js 3 Applications

Part of the series: How to Structure a Large Scale Vue.js Application
Vue.js 3 is a solid framework for building applications both large and small. In our series How to Structure a Large Scale Vue.js Application, we've been exploring how to best utilize it for your large scale projects. We've examined what a good file structure looks like, some standards for predictability, and using ESLint and Prettier for clean and consistent code.
In this article, let's take a look at 6 tips I've picked up from the Vue community and from my own experience developing large scale Vue.js applications.
Tip #1: Prefer Composables Over Mixins
Vue 3 gives us the power to create reusable chunks of logic that can even include reactive state. These reusable chunks are commonly called "composables". They can serve a similar function to mixins (along with other things) but with a few advantages. Composables:
- provide a transparent source of component data, methods, etc
- eliminate naming collisions
- are just plain JavaScript that your IDE can interpret and autocomplete, etc.
Because of these things, I suggest you use composables over mixins for your next large scale Vue.js 3 application.
What does a composable look like? Here's a simple example comparing a mixin with a composable. Both show a reusable piece of code that is meant to fetch a post via an ajax request, keep up with what the state of the request is, and hold the fetched post.
// FetchPostMixin.js
const REQUEST_IN_PROGRESS = "REQUEST_IN_PROGRESS";
const REQUEST_ERROR = "REQUEST_ERROR";
const REQUEST_SUCCESS = "REQUEST_SUCCESS";

export default {
  data() {
    return {
      requestState: null,
      post: null
    };
  },
  computed: {
    loading() {
      return this.requestState === REQUEST_IN_PROGRESS;
    },
    error() {
      return this.requestState === REQUEST_ERROR;
    }
  },
  methods: {
    async fetchPost(id) {
      this.post = null;
      this.requestState = REQUEST_IN_PROGRESS;
      try {
        const res = await fetch(https://jsonplaceholder.typicode.com/posts/${id});
        this.post = await res.json();
        this.requestState = REQUEST_SUCCESS;
      } catch (error) {
        this.requestState = REQUEST_ERROR;
      }
    }
  }
};

// PostComponent.vue
<script>
import FetchPostMixin from "./FetchPostMixin";
export default {
  mixins:[FetchPostMixin],
};
</script>
With this mixin you'd have to be careful not to include any data properties, etc in your component that have the same names as the data properties, etc in the mixin. Also, if you had more than one mixin registered on the component, it would be impossible to tell at a glance where particular data, methods, etc were coming from.
Now compare that to the composable.
//FetchPostComposable.js
import { ref, computed } from "vue";

export const useFetchPost = () => {

  // Request States
  const REQUEST_IN_PROGRESS = "REQUEST_IN_PROGRESS";
  const REQUEST_ERROR = "REQUEST_ERROR";
  const REQUEST_SUCCESS = "REQUEST_SUCCESS";
  const requestState = ref(null);
  const loading = computed(() => requestState.value === REQUEST_IN_PROGRESS);
  const error = computed(() => requestState.value === REQUEST_ERROR);

  // Post
  const post = ref(null);
  const fetchPost = async (id) => {
    post.value = null;
    requestState.value = REQUEST_IN_PROGRESS;
    try {
      const res = await fetch(https://jsonplaceholder.typicode.com/posts/${id});
      post.value = await res.json();
      requestState.value = REQUEST_SUCCESS;
    } catch (error) {
      requestState.value = REQUEST_ERROR;
    }
  };
  return { post, loading, error, fetchPost };
};

// PostComponent.vue
<script>
import { useFetchPost } from "./FetchPostComposable";
export default {
  setup() {
    //clear source of data/methods
    const {
      loading: loadingPost, //can rename
      error, fetchPost, post } = useFetchPost();

    return { loadingPost, error, fetchPost, post };
  },
};
</script>
Not only can we now group things by logical concern, but in the component, we can now see expressly where each data property, method, etc is coming from. Furthermore we can easily rename anything coming from the composable to prevent it from clashing with anything that already exists in the component.
Tip #2: Always Clone Objects Between Components
When working with reactive data in Vue it's possible to pass objects between components. While this can be very handy it can also have unintended side effects. Take this example for instance. A login page has a user data property. It is an object with a name and password property and it gets passed into a LoginForm component.
// LoginPage.vue
<template>
  <LoginForm :user="user" />
</template>
<script>
import LoginForm from './LoginForm.vue'
export default {
  components: {LoginForm},
  data(){
    return {
      user: { name: '', password: ''}
    }
  }
}
</script>
The login form takes in the user and then mutates it's properties directly.
// LoginForm.vue
<template>
<div>
<label>
Name <input type="text" v-model="user.name">
</label>
<label>
Password <input type="password" v-model="user.password">
</label>
</div>
</template>
<script>
export default {
props:{
user: Object
}
}
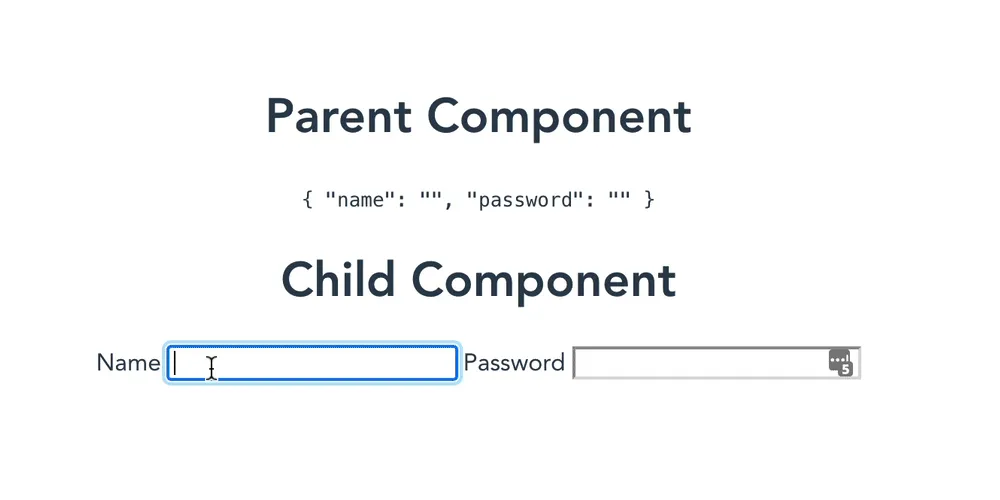
</script>Let's add some headings to the login page so we can see what's going on a little better.
<template>
  <h1>Parent Component</h1>
  <code>{{user}}</code>
  <h1>Child Component</h1>
  <LoginForm :form="user" />
</template>
Now typing in the inputs, you'll see that by altering user in the LoginForm we're actually altering the user in it's parent component as well.
This is NOT how we should be communicating across components. Instead the LoginForm component should have to emit an event when the user data changes and IF the LoginPage wanted to listen to the event and update it's user data, then it could but it wouldn't necessarily have to.
I know when I first started working with Vue this was something that caused issues early and often. So how do we work around it? If you're creating a component that takes in an object as a property, then make sure to clone the object to a local data property before mutating it.
// LoginForm.vue
<template>
 ...
<input type="text" v-model="form.name">
<input type="password" v-model="form.password">
</template>
<script>
export default {
  //...
  data(){
    return {
      // spreading an object effectively clones it's top level properties
      // for objects with nested objects you'll need a more thorough solution
      form: {...this.user}
    }
  },
}
</script>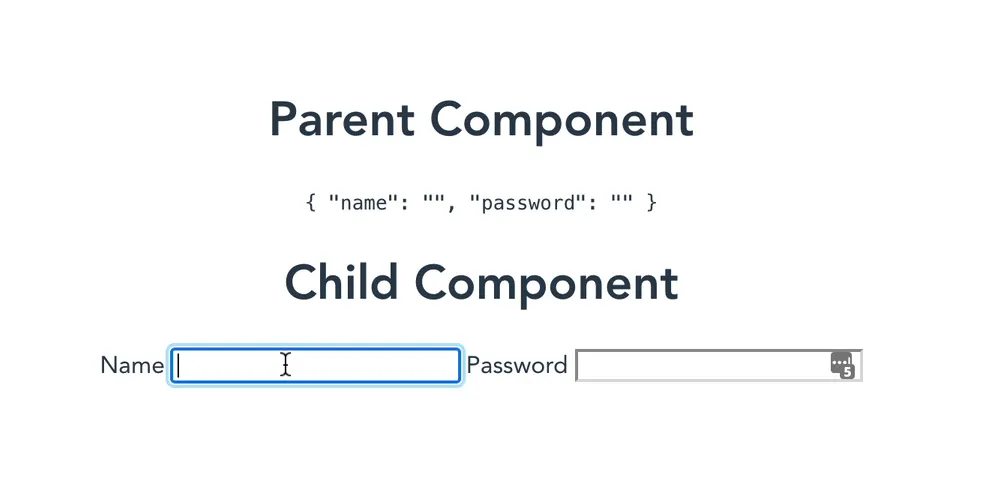
The same concept applies when passing your reactive objects into Vuex actions or anywhere else outside of your component instance.
Tip #3: Use Namespaced Vuex Store Modules
While Vuex provides a great pattern for managing your application wide state, if too much of that global state exists you can quickly wind up with a bloated and hard to navigate store file.
To remedy this Vuex gives you the ability to break your store up into different modules each of which handles it's own domain (ie. one module handles posts, another users, another comments, etc).
Without Modules
// store/index.js
export default {
  state:{
    posts:[],
    users:[],
    comments:[]
  },
  actions:{
    fetchPost(){},
    fetchPosts(){},
    fetchUser(){},
    fetchUsers(){},
    fetchComment(){},
    fetchComments(){},
  }
}
With Modules
// store/index.js
import posts from './modules/posts.js'
import users from './modules/users.js'
import comments from './modules/comments.js'
export default{
  modules:{ posts, users, comments }
}

//store/modules/posts.js
// and the same for each of the other domains with
// common state, actions named the same (possible because of namespacing)
// and any other domain specific state and logic named as fits
export default {
  namespaced: true,
  state:{
    items:[]
  },
  actions:{
    fetchOne(){},
    fetchAll(){}
  }
}
To see the exact syntax for working with these modules you can visit the official Vuex documentation. Not only will your store be easier to navigate but calling actions and accessing state dynamically will be easier.
If you're utilizing Vuex in a growing project and aren't already employing modules, then the time to refactor is now because refactoring to namespaced modules in a late state can be very painful.
Tip #4: Write Tests
Software will only ever get more complex as it grows, thus it's vital that, as it does grow, we have a mechanism with which we can quickly ensure things are still working as expected.
So what makes a codebase testable? While I'm by no means a testing guru, my experience has taught me a couple things about testing.
- The more focused a "unit" is (be that a class, function, component, whatever) the easier it is to test.
- and the more external dependencies a piece of code relies on, typically the harder it is to test.
For your Vue projects, this means there are a few practical steps you can do to make things more testable.
- As often as is practical make components all props down/events up so that they don't have any external dependencies.
- Extract reusable logic to helper functions that can be tested outside of the context of a component
- Give your helper functions a single responsibility and never allow them to create side effects
- When testing components utilize the Vue Testing Library which is a higher level abstraction over (and built on top of) Vue Test Utils
Above all, just make sure to write tests even when you don't want to... I promise, you'll thank yourself later. Oh, and have a good way of automating test runs and have test failures prevent deploys (CI/CD), otherwise you'll end up with a test suite that is never run.
Tip #5: Interact With REST API's Via SDK's
First off, what is an SDK? You can think of an SDK as a language specific API to interact with your actual API. So instead of calling axios or fetch directly within your components, you can use something like post.find(1).
So, which would you rather write? A hard coded request to an API endpoint.
axios('https://someapi.com/posts/1')Or an autocompletable method on a resource class?
post.find(1)To me the answer is obvious. But maybe you need a little bit more convincing. Utilizing SDKs when available or creating your own SDKs for your own REST API endpoints can provide the following advantages.
- Less need to pour over API documentation. Instead browse through SDK methods via the intellisense feature of your IDE.
- Keeping your API URL structure irrelevant to your actual application makes updates to the actual API simpler. Yes, your SDK has to know the structure but it's probably limited to one or 2 places and not littered throughout your application codebase.
- Much less likely to make a typo. In fact, your IDE will probably type half of it for you.
- Ability to abstract concerns related to making requests to your API. For instance, checking the request status can be something as simple as this:
if(post.isLoading){} - Create a similar syntax for the way you interact with resources on the front end as you do on the backend (with limitations due to security of course). For instance, if you use Laravel to power your Rest API, you can combine Spatie's excellent laravel-query-builder package with a number of front end libraries that make API requests by mimicking the Laravel models api but on the client side.
- More easily refactor the API integration when the REST API changes (for instance when an endpoint name or the authentication method changes)
There are downsides to this approach. You do actually have to spend time coding out the SDK as well as documenting the SDK in addition to the REST API. In my experience though, the efficiency benefits are well worth it.
Tip #6: Wrap Third Party Libraries
My last tip for building large scale Vue.js applications is to create a wrapper around third party libraries. For instance, instead of using axios directly in your codebase you could create a more generically named class like Http whose methods call axios under the hood. It might look something like this:
// Http.js
import axios from 'axios'
export default class Http{
  async get(url){
    const response = await axios.get(url);
    return response.data;
  }
  // ...
}
Yeah, I know... at first glance this seems kind of pointless (unless you're getting paid by the line ?). However, there are some pretty handy advantages to this practice.
Changing Dependencies without Changing Interface
Let's say for some reason down the line you have to switch away from axios. It is third party code after all, over which you have no control. So you decide to use fetch for your http solution. Ok, that's not so bad. You don't have to scour your entire codebase for instances of axios being used instead you make the switch in one place: your Http.js file.
// Http.js
export default class Http{
  async get(url){
    const response = await fetch(url);
    return await response.json();
  }
  // ...
}
Just like that you're making HTTP requests with fetch instead of axios.
Furthermore, while a single developer might make this switch, it doesn't even really matter if anyone else on the team knows that it happened. Everyone will simply continue using the Http class in the same way they have been.
More Obvious Route to Extending Functionality
Another advantage to wrapping third party dependencies is that it will often expose more obvious ways of extending your class API to handle related functionality. For instance, maybe you'd like to always alert the user when an ajax request fails. Don't manually use a try catch everywhere you're making a request. Instead, let your Http class do it for you.
export default class Http{
  async get(url){
    try {
      const response = await fetch(url);
      return await response.json();
    } catch (err) {
      alert(err);
    }
  }
  // ...
}
Or maybe you want to add caching for your requests.
// Http.js
import Cache from './Cache.js' // some random cache implementation of your choice
export default class Http{
  async get(url){
    const cached = Cache.get(url)
    if(cached) return cached
    const response = await fetch(url);
    return await response.json();
  }
  // ...
}
The possibilities here are literally endless.
It is worth noting here that the axios library does provide a concept called interceptors that can handle some of these extensions for you, however their presence is less obvious. Using the wrapper class, making extensions is just a matter of knowing what's possible with JavaScript, there's no need to look through documentation to find the proper place to "hook" into the third party code. Not only that, some third party dependencies might not be as comprehensive as axios and even expose the needed hooks.
Finally, while some of the other tips on this list could be applied to large scale and smaller scale applications alike, this one really is just for the large scale side. For small scale applications the benefits are not worth the overhead in my opinion.
Conclusion
Vue 3 makes for a great solution for developing large scale web applications but if you're not careful you can end up having it work against you rather than for you. To make the most of Vue 3 consider employing these 6 tips for your next large scale application!
Do you have any tips you'd like to add? Leave a comment below and help us all become better Vue.js developers!
Looking into leveling up your business?
We help companies all around the world build Vue applications more efficiently. Do you feel your team would benefit from professional Vue training or consulting? Or perhaps you need some extra hands developing your next milestone?
We are happy to hear your business needs and figure how we can help you out. Check out our business pricing for team training or contact us for business inquires any time!
Start learning Vue.js for free

Comments
Latest Vue School Articles

5 Component Design Patterns to Boost Your Vue.js Applications

Vibe Coding a Collaborative Editor with Comment Support with Nuxt UI and Jazz
Our goal is to be the number one source of Vue.js knowledge for all skill levels. We offer the knowledge of our industry leaders through awesome video courses for a ridiculously low price.
More than 200.000 users have already joined us. You are welcome too!
© All rights reserved. Made with ❤️ by BitterBrains, Inc.