


Use Supabase Auth with Vue.js 3

Supabase is a self-proclaimed "Open Source Firebase Alternative". I've been interested in working with Supbase for a bit now and thought I'd experiment with using their authentication API to get authentication setup for a Vue.js 3 application.
First, though why would you use Supabase Auth? Most importantly if you're using Supabase as your data store, (which comes with some pretty sweet perks), Supabase Auth is the only way that you can manage access to that data. Secondly, though, Supabase Auth also comes with a number of different features:
- user permissions without the middleware (via Postgres' Row Level Security)
- Magic email links
- social provider logins
- and all the other Auth funcationality you'd expect wrapped in a simple JavaScript SDK
With that said, it's also worth mentioning that Supabase Auth is NOT a stand alone auth provider and is only meant to be used alongside the other Supabase services (data, storage, etc).
Alright, let's get started implementing Supabase Auth in our Vue.js 3 application.
Install Supabase
I'll assume you already have a Vue.js 3 application that is setup with Vue Router, if not you can download this boilerplate code to follow along with. I'll also assume you already have a Supabase account and project setup. If not, you can head over to supabase.io and it will walk you through first steps.
Then to work with Supabase auth as well as any of it's other services we need to install the Supabase JavaScript SDK.
npm install @supabase/supabase-jsSet Up Supabase
After Supabase is installed, there are a few steps we need to go through to set it up. I'll create a composable called UseSupabase.js in which to organize this setup.
// UseSupabase.js
import { createClient } from "@supabase/supabase-js";
// these can come from an environment variable if desired
// not required however as they are 100% exposed on the client side anyway
// and that's ok, Supabase expects this (security is provided by Row Level Security)
const supabaseUrl = "";
const supabaseKey = "";
// setup client
const supabase = createClient(supabaseUrl, supabaseKey);
// expose supabase client
export default function useSupabase() {
return { supabase };
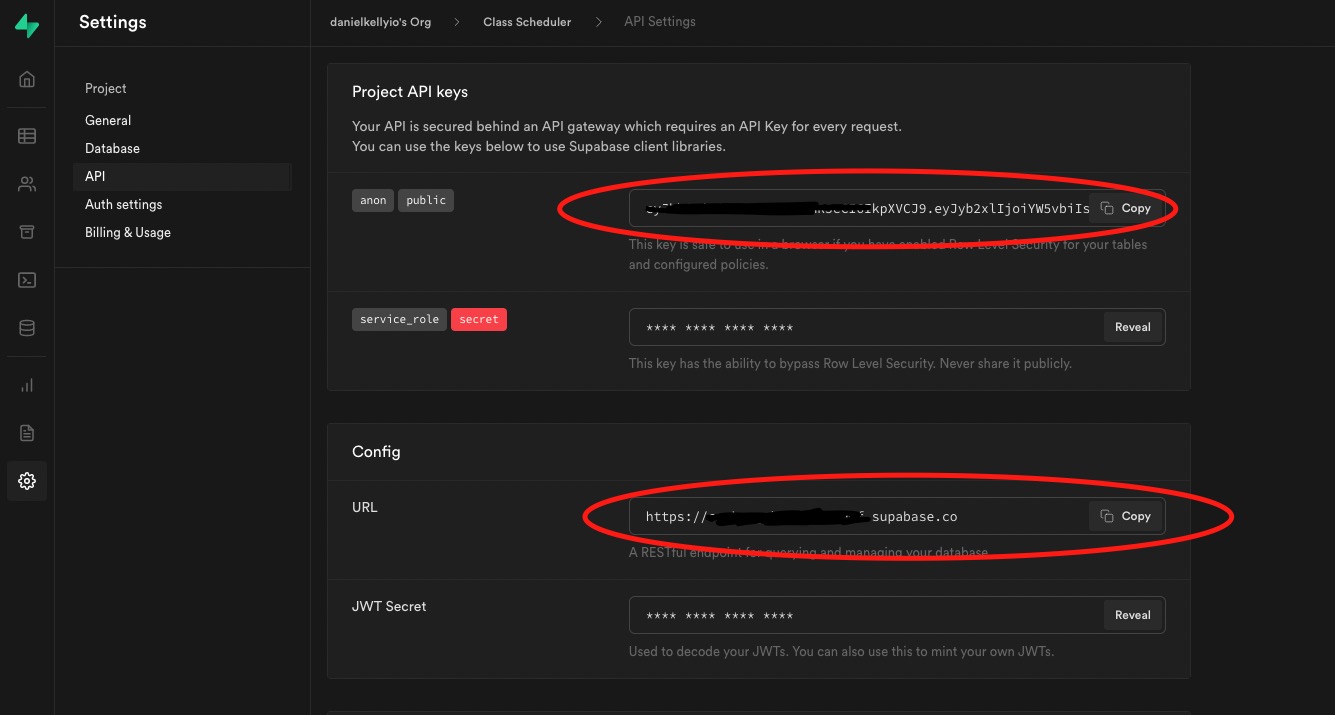
}The supabaseUrl and the supabaseKey can be found in the Supabase Dashboard under Settings > API.
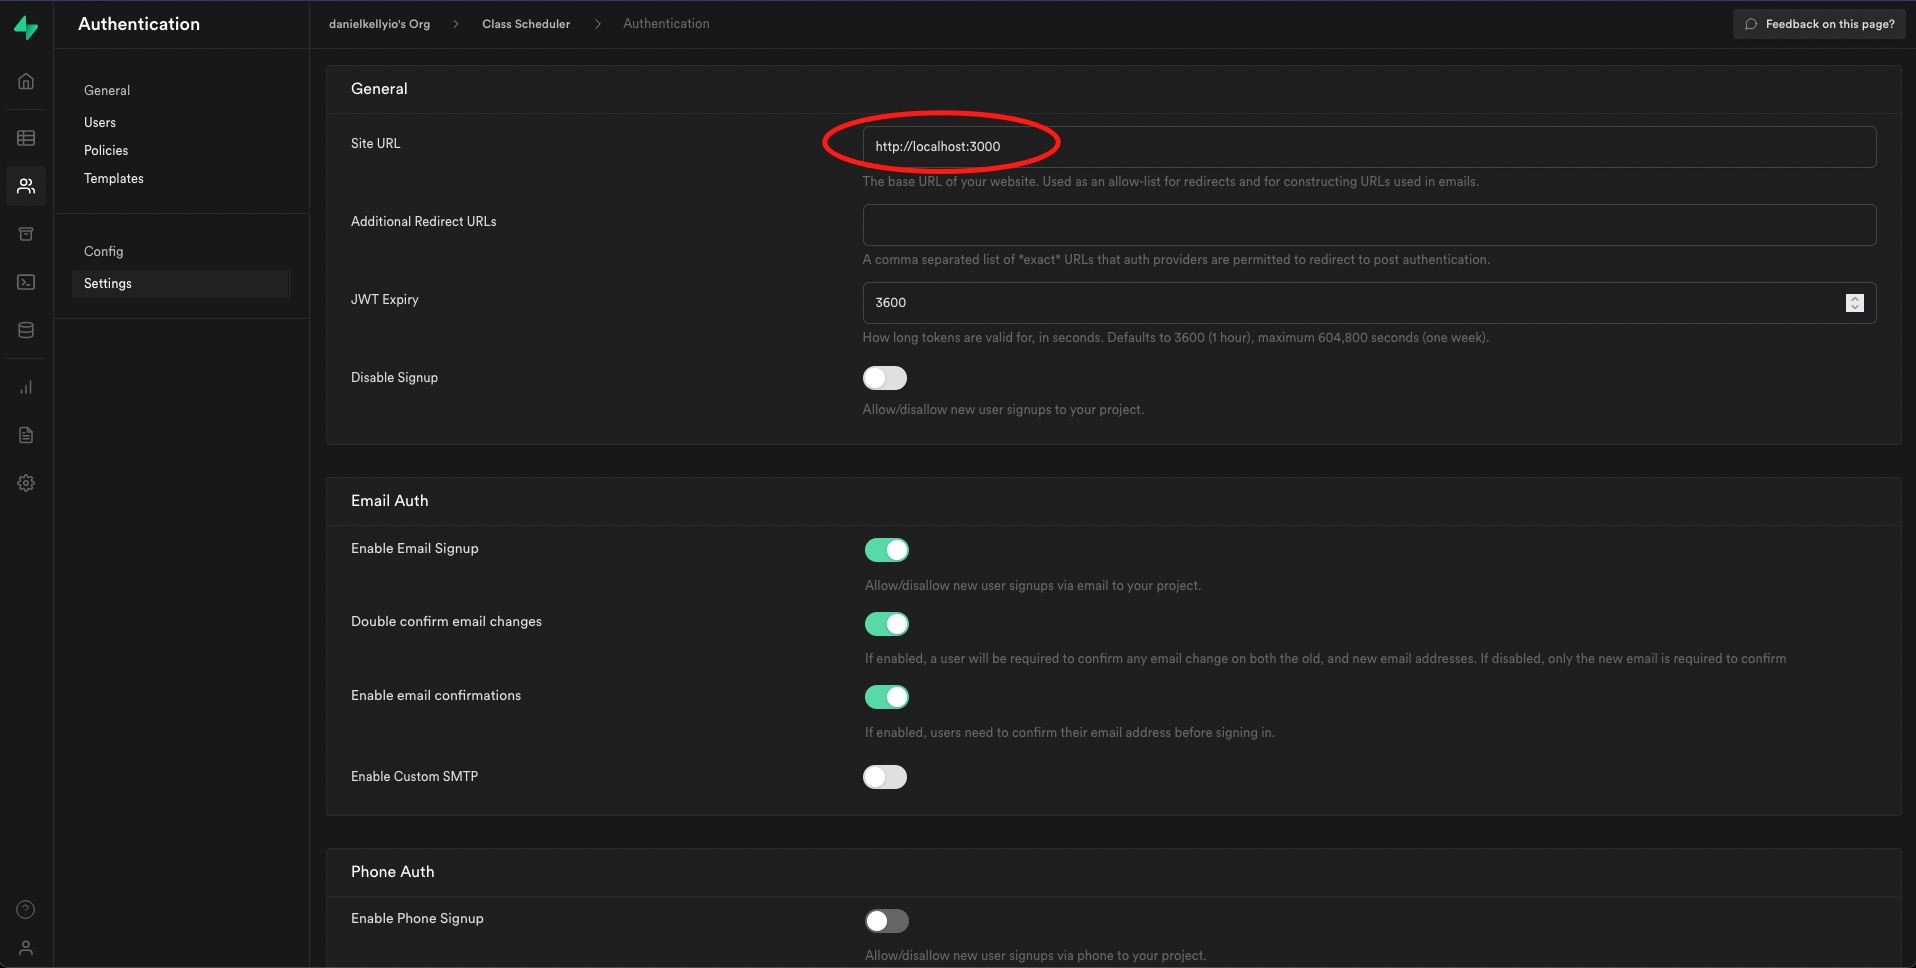
While you're in the Supabase interface you can also go to Autentication > Settings and setup your site url so that Supabase knows how to redirect confirmation emails, etc properly. It defaults to localhost:3000 but you can change it as necessary.
Create an AuthUser Composable
With the Supabase SDK setup, we can now move on to using it. First, I'll create an AuthUser composable to abstract away some of the interactions with the AuthUser and stub all the methods that we'll need to fill in. This is helpful in case we ever want to move away from Supabase in the future, and helps us group all AuthUser functionality into one place.
import { ref } from "vue";

// user is set outside of the useAuthUser function
// so that it will act as global state and always refer to a single user
const user = ref(null);

export default function useAuthUser() {
  /**
   * Login with email and password
   */
  const login = async ({ email, password }) => {};

  /**
   * Login with google, github, etc
   */
  const loginWithSocialProvider = (provider) => {};

  /**
   * Logout
   */
  const logout = async () => {};

  /**
   * Check if the user is logged in or not
   */
  const isLoggedIn = () => {};

  /**
   * Register
   */
  const register = async ({ email, password, ...meta }) => {};

  /**
   * Update user email, password, or meta data
   */
  const update = async (data) => {};

  /**
   * Send user an email to reset their password
   * (ie. support "Forgot Password?")
   */
  const sendPasswordRestEmail = async (email) => {};

  return {
    user,
    login,
    loginWithSocialProvider,
    isLoggedIn,
    logout,
    register,
    update,
    sendPasswordRestEmail,
    maybeHandleEmailConfirmation,
  };
}
Create Pages
Next, let's create the pages that will be necessary for going through a typical user authentication flow. I've done a little styling using Tailwind CSS but feel free to adapt the styles to your needs.
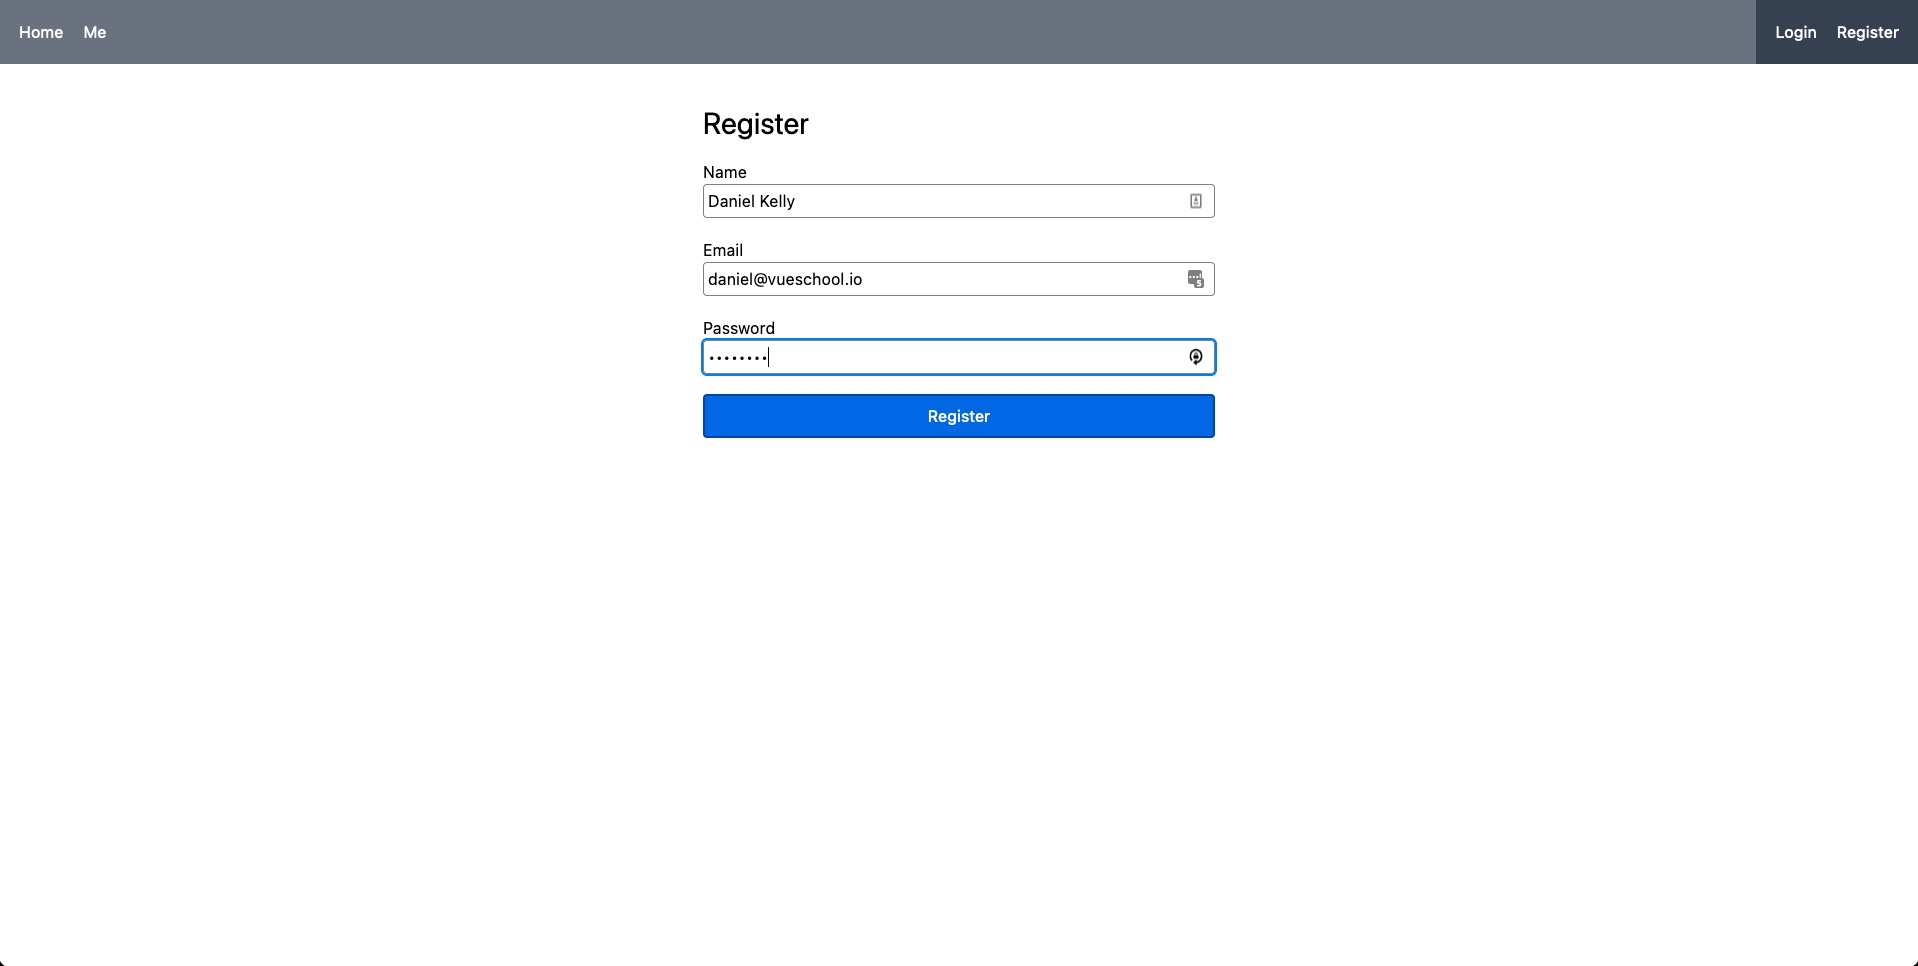
Register.vue
The first page we'll need is a register page. It needs to contain the necessary fields to create a user in Supabase. Those fields are email and password. We can add arbitrary meta data to our users in Supabase as well, meaning we can also make the users real name a part of registration.
// Register.vue
<script>...</script>
<template>
  <form class="max-w-lg m-auto" @submit.prevent="handleSubmit">
    <h1 class="text-3xl mb-5">Register</h1>
    <label>Name <input v-model="form.name" type="text" /></label>
    <label>Email <input v-model="form.email" type="email" /></label>
    <label>Password <input v-model="form.password" type="password" /></label>
    <button>Register</button>
  </form>
</template>
In the script section, we can use a reactive reference to keep up with the form data, as well as provide a function to handle the submit of the form. On form submit, we'll call the register function from the AuthUser composable (which is still empty but we'll fill it out with the supabase specific calls in a bit) and then redirect to a page instructing the user to check their email to confirm registration.
// Register.vue
<script setup>
import { ref } from "vue";
import useAuthUser from "@/composables/UseAuthUser";
import { useRouter } from "vue-router";

// Use necessary composables
const router = useRouter();
const { register } = useAuthUser();

// Form reactive ref to keep up with the form data
const form = ref({
  name: "",
  email: "",
  password: "",
});

// function to hand the form submit
const handleSubmit = async () => {
  try {

        // use the register method from the AuthUser composable
    await register(form.value);

        // and redirect to a EmailConfirmation page the will instruct
        // the user to confirm they're email address
    router.push({
      name: "EmailConfirmation",
      query: { email: form.value.email },
    });
  } catch (error) {
    alert(error.message);
  }
};
</script>
<template>...</template>
Lastly, we'll need to register the route for the page.
// router/index.js
const routes = [
//...
{
name: "Register",
path: "/register",
component: () => import("@/pages/Register.vue"),
},
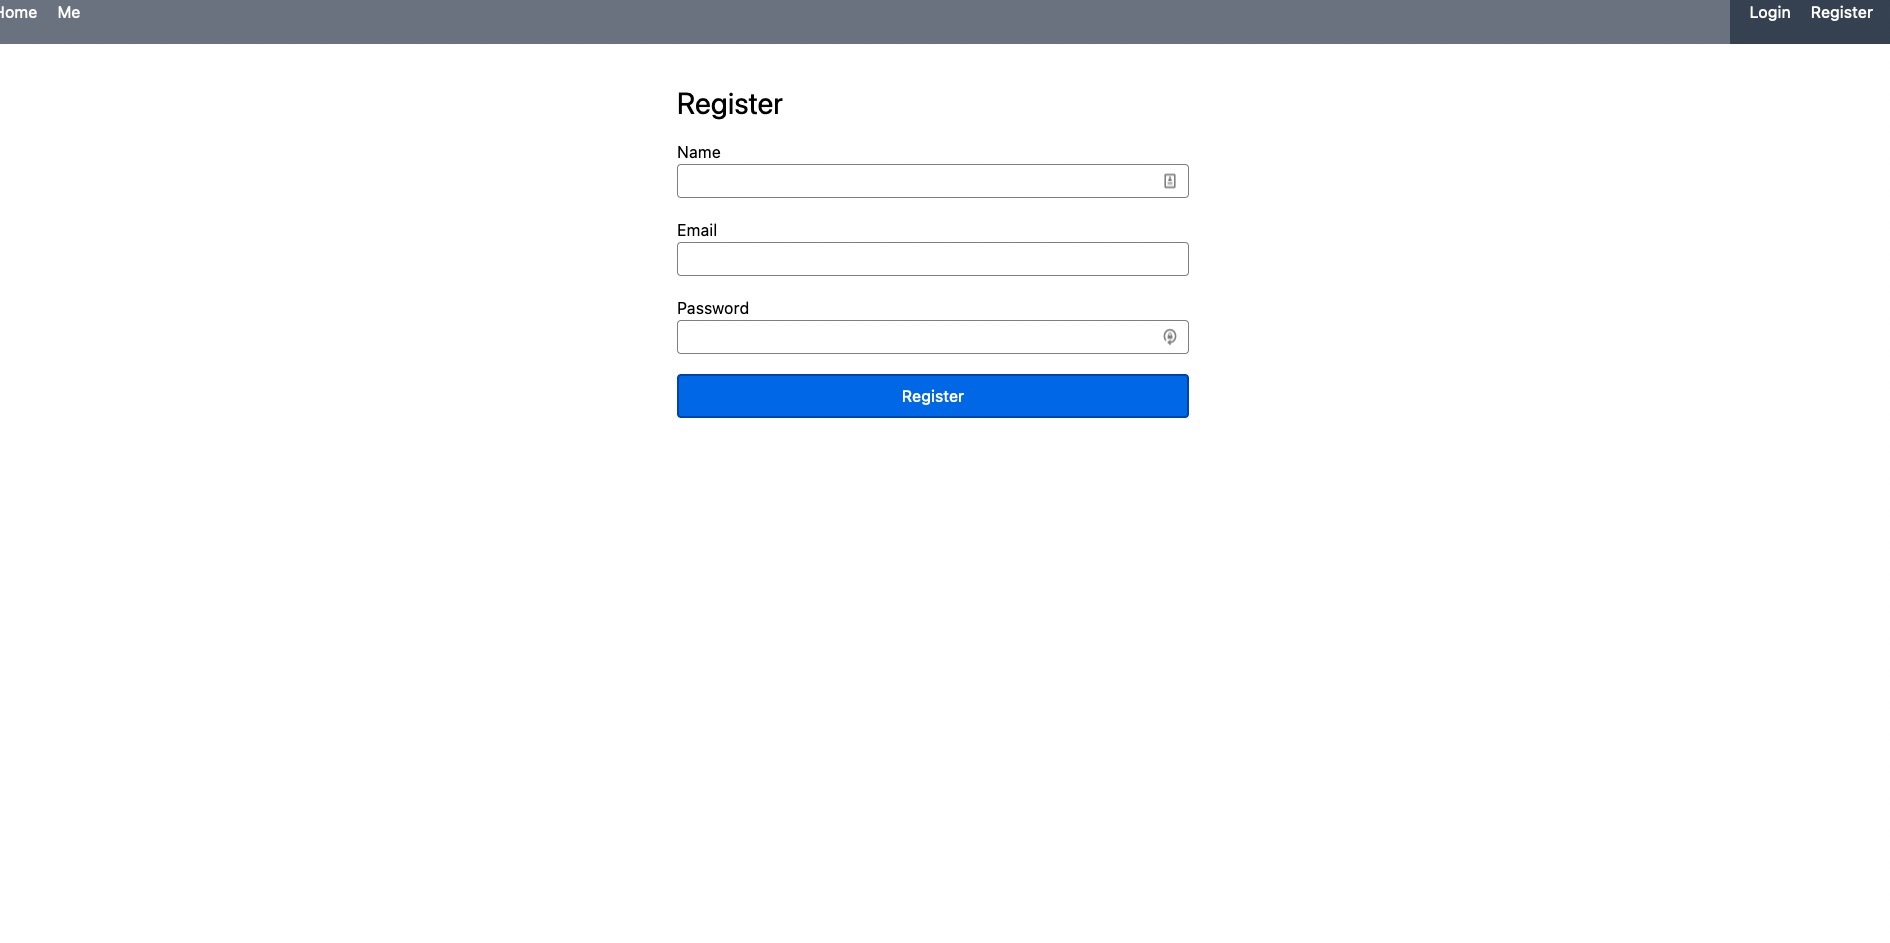
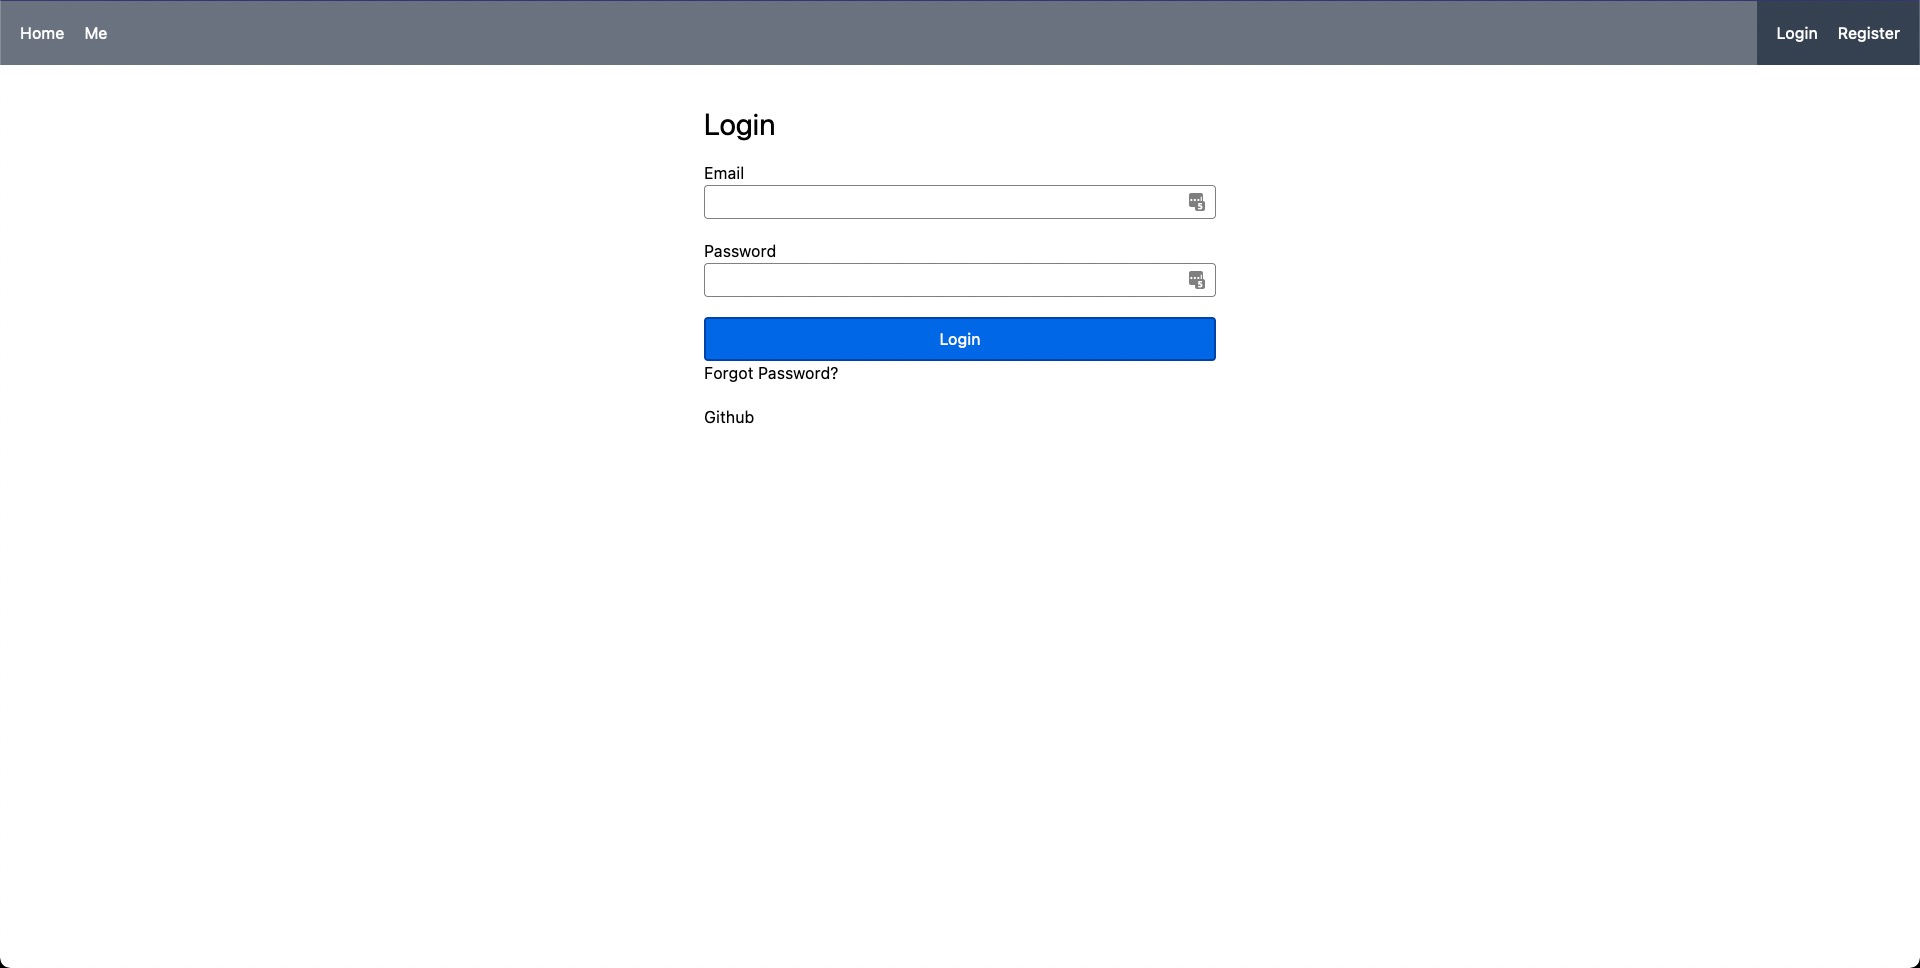
]If you used the boilerplate code, visiting /register should give you a page that looks something like this.
EmailConfirmation.vue
Since we're redirecting to a EmailConfirmation page after registration, we of course need to have it exist. It'll just be a simple template with a message. When we redirected above, we also provided the email from the registration form as a query variable, so we can display it here.
<template>
  <div>
    <h1 class="text-3xl">Thanks for registering!</h1>
    <p>
      Please confirm your email to finishing registering:
      {{ $route.query.email }}
    </p>
  </div>
</template>
Once again we also need to register the route.
// router/index.js
const routes = [
    //...
    {
    name: "EmailConfirmation",
    path: "/email-confirmation",
    component: () => import("@/pages/EmailConfirmation.vue"),
    },
]
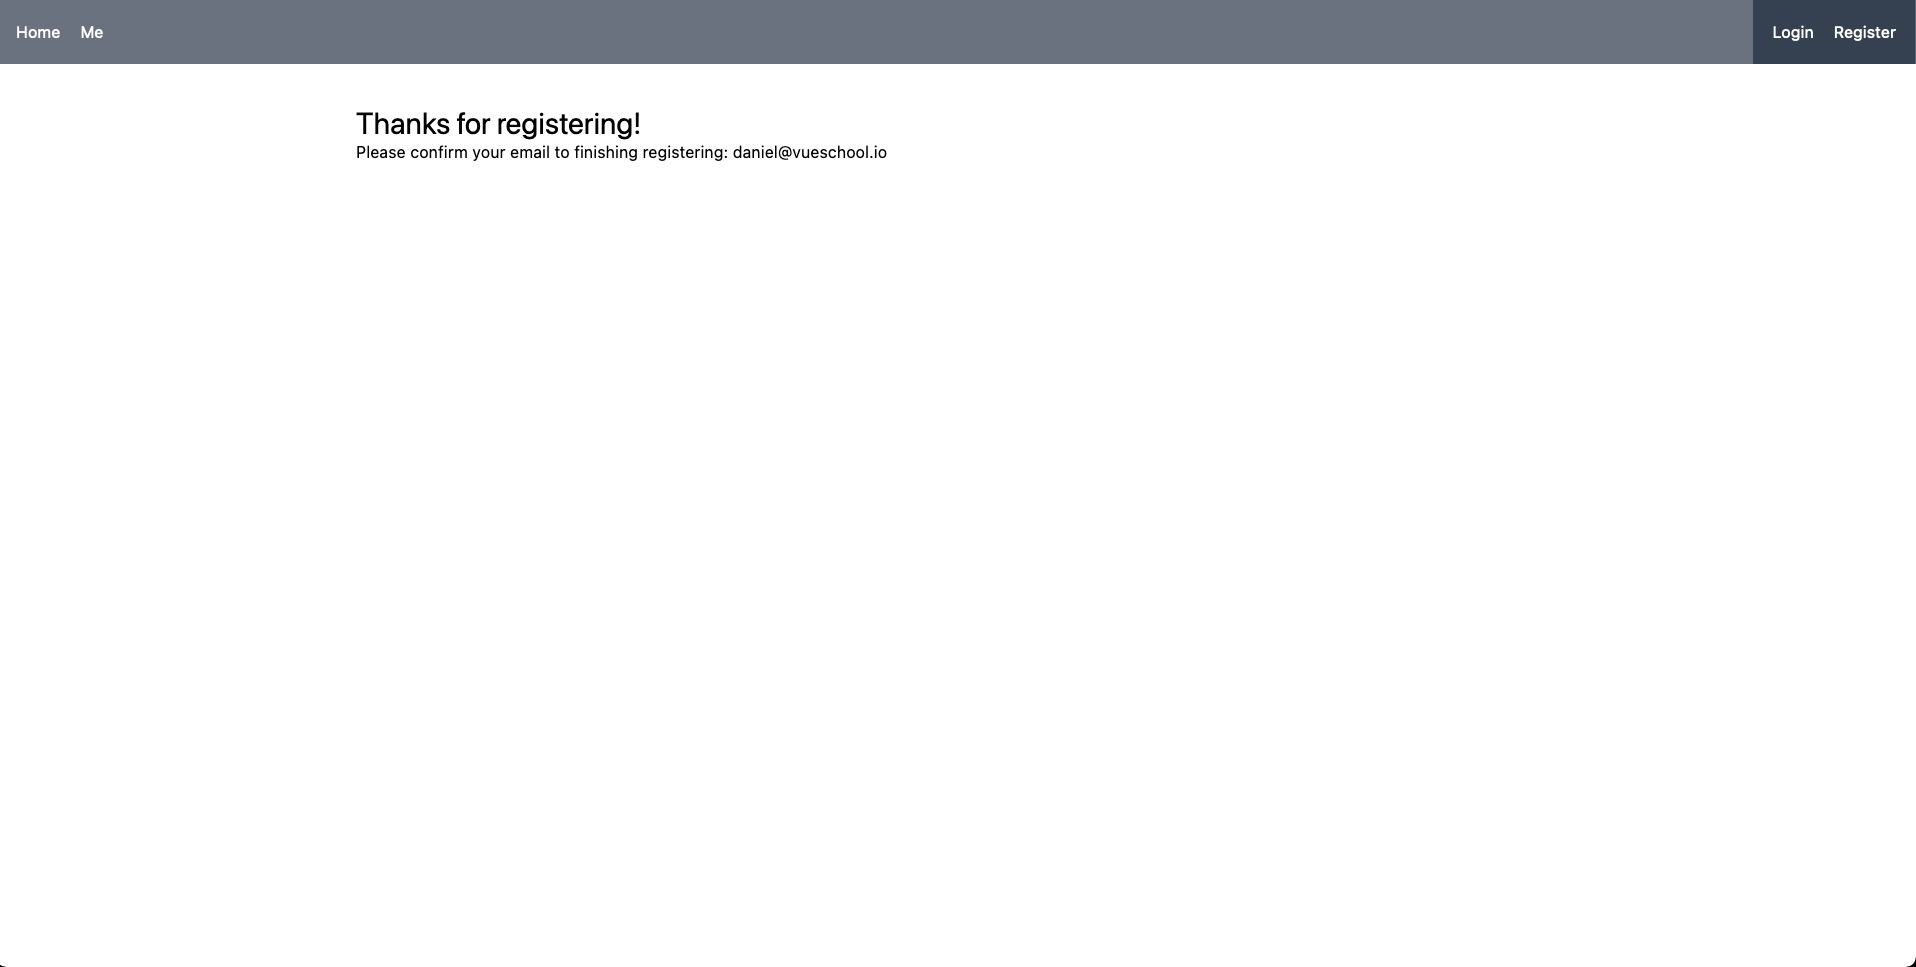
Now visiting the /email-confirmation route with an email query variable will look like this.
Login.vue
After registering and confirming their email, a user will have to log in. Let's create the page for that next.
The template will consist of a form with an email and password field, as well as a link to a forgot password page, and a link to handle login with Github.
<script>...</script>
<template>
  <div class="max-w-lg m-auto">
    <form @submit.prevent="handleLogin">
      <h1 class="text-3xl mb-5">Login</h1>
      <label>Email <input v-model="form.email" type="email" /></label>
      <label>Password <input v-model="form.password" type="password" /></label>
      <button>Login</button>
      <router-link to="/forgotPassword">Forgot Password?</router-link>
    </form>
    <div class="mt-5">
      <a @click.prevent="handleLogin('github')">Github</a>
    </div>
  </div>
</template>
In the script section, we can create a reactive reference to keep up with the form values and a function to handle the form submission.
<script setup>
import { ref } from "vue";
import useAuthUser from "@/composables/UseAuthUser";
import { useRouter } from "vue-router";

// Use necessary composables
const router = useRouter();
const { login, loginWithSocialProvider } = useAuthUser();

// keep up with form data
const form = ref({
  email: "",
  password: "",
});

// call the proper login method from the AuthUser composable
// on the submit of the form
const handleLogin = async (provider) => {
  try {
    provider
      ? await loginWithSocialProvider(provider)
      : await login(form.value);
    router.push({ name: "Me" });
  } catch (error) {
    alert(error.message);
  }
};
</script>
<template>...</template>
After registering the route, you can visit the /login route and see a nice login form.
// router/index.js
const routes = [
    //...
    {
    name: "Login",
    path: "/login",
    component: () => import("@/pages/Login.vue"),
  },
]
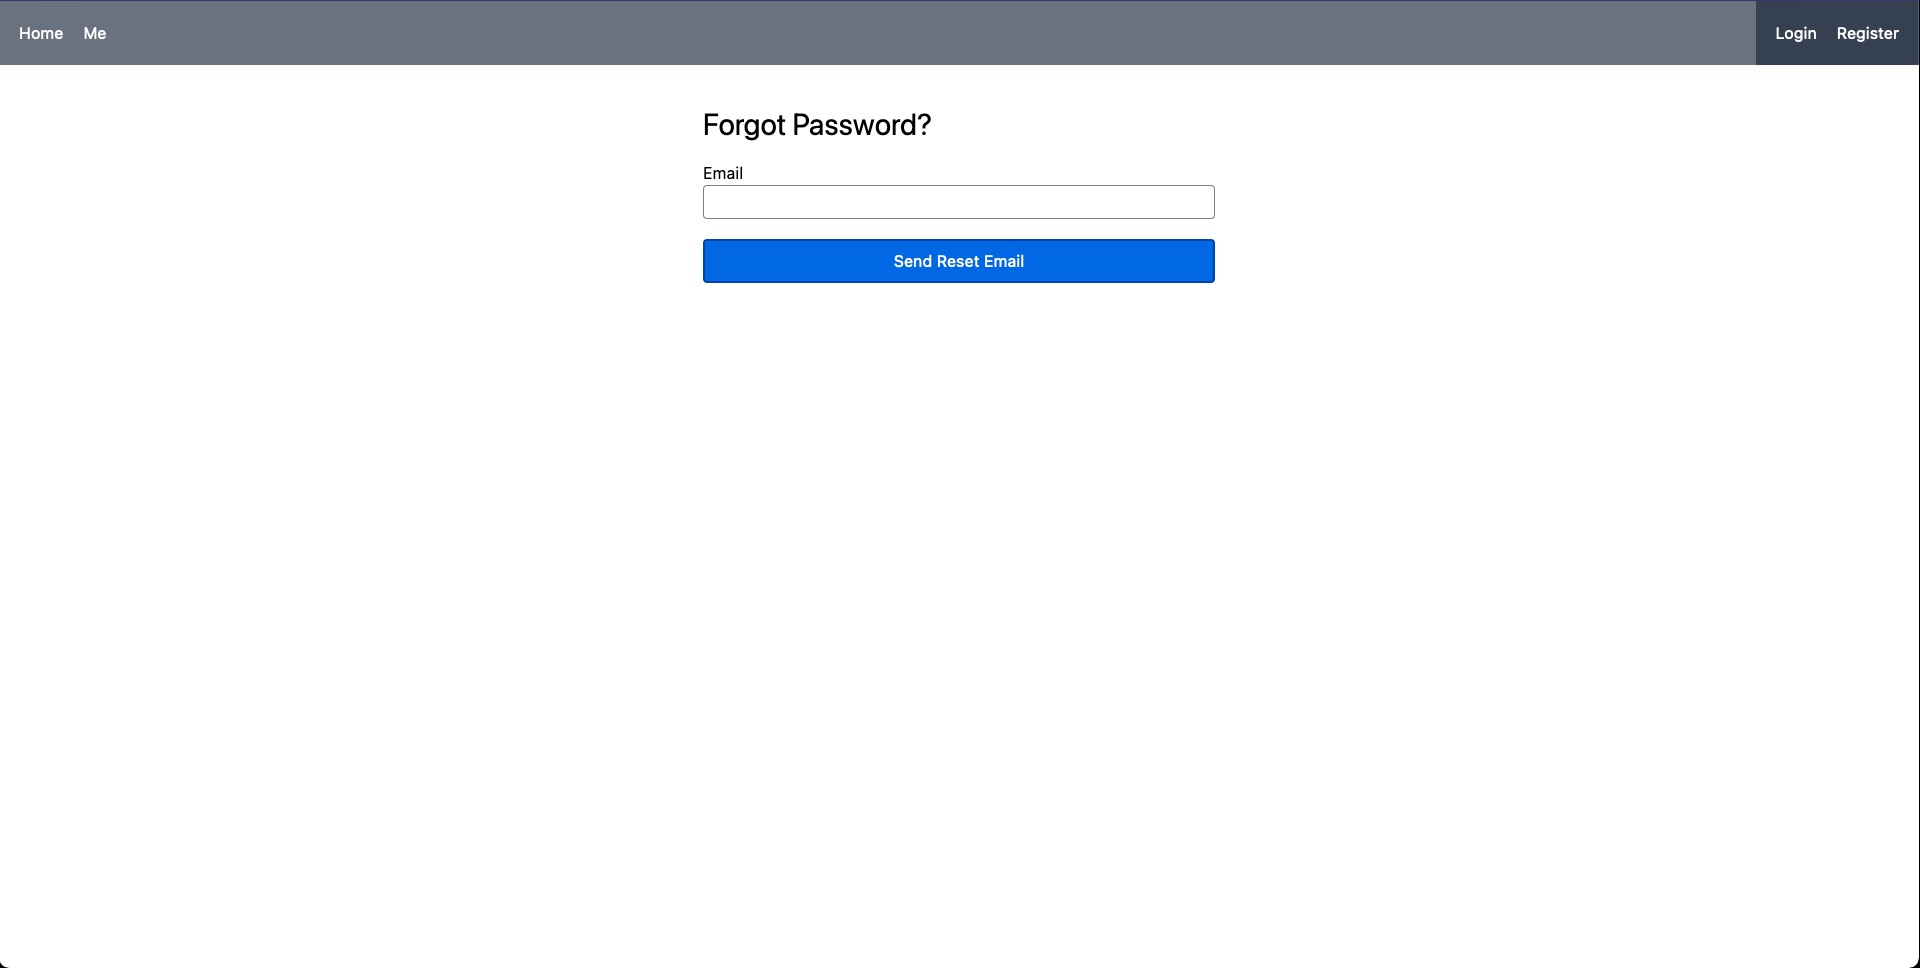
ForgotPassword.vue
Since we implemented a Forgot Password link above, let's also scaffold out that page.
In the template, we just need a form with a single email field in order to collect the email that we should send the reset link to.
<script>...</script>
<template>
  <form class="max-w-lg m-auto" @submit.prevent="handlePasswordReset()">
    <h1 class="text-3xl mb-5">Forgot Password?</h1>
    <label>Email <input v-model="email" type="email" /></label>
    <button>Send Reset Email</button>
  </form>
</template>
In the script section, we'll create an email reactive ref to keep up with the email input in the form and define a function that calls the AuthUser composable sendPasswordRestEmail function on submit of the form.
<script setup>
import useAuthUser from "@/composables/UseAuthUser";
import { ref } from "vue";

// use necessary composables
const { sendPasswordRestEmail } = useAuthUser();

// keep up with email
const email = ref("");

// function to call on submit of the form
// triggers sending the reset email to the user
const handlePasswordReset = async () => {
  await sendPasswordRestEmail(email.value);
  alert(Password reset email sent to: ${email.value});
};
</script>
Lastly, we'll register the route.
// router/index.js
const routes = [
    //...
    {
    name: "ForgotPassword",
    path: "/forgotPassword",
    component: () => import("@/pages/ForgotPassword.vue"),
  },
]
Now clicking on the "Forgot Password?" link on the login page will take you here.
Me.vue
The last page we'll need is a profile page to show the user's secret information after they login. We'll call it /me.
// router/index.js
const routes = [
    //...
    {
    name: "Me",
    path: "/me",
    component: () => import("@/pages/Me.vue"),
  },
]
We'll also add route middleware to let our program know that this should be a protected route that only authenticated users can access.
{
  name: "Me",
    meta: {
        requiresAuth: true,
    },
    //...
},
Then in order for this middleware to actually do anything we'll need to implement it like so.
const router = createRouter({
  history: createWebHistory(),
  routes,
});

router.beforeEach((to) => {

    // here we check it the user is logged in
    // if they aren't and the route requries auth we redirect to the login page
  const { isLoggedIn } = useAuthUser();
  if (!isLoggedIn() && to.meta.requiresAuth) {
    return { name: "Login" };
  }
});

export default router;
The page itself will be a simple message greeting the user.
<script setup>
import useAuthUser from "@/composables/UseAuthUser";
const { user } = useAuthUser();
</script>

<template>
  <div v-if="user">
        <!--user_metadata is the key supabase nests all arbitrary meta data under-->
    <div>Hello {{ user.user_metadata.name }}</div>
  </div>
</template>
We won't try to view this page just yet, as we haven't implemented the login yet.
Use Supabase Auth SDK
Now that the pages and the AuthUser composable are in place, we can start filling in the meat of the AuthUser composable functions with calls to the Supabase SDK.
The first thing we'll need to do is access our Supabase client. We can do that by importing the UseSupabase composable and deconstructing the supabase client from it.
import useSupabase from "@/composables/UseSupabase";
export default function useAuthUser() {
    const { supabase } = useSupabase();
    //...
}
Now we can go through our empty functions and fill them out one by one.
login()
In order to login with Supabase we need to call supabase.auth.signIn. We can also await the response and if there is an error throw a new error otherwise return the logged in user.
const login = async ({ email, password }) => {
    const { user, error } = await supabase.auth.signIn({ email, password });
    if (error) throw error;
    return user;
};
loginWithSocialProvider()
loginWithSocialProvider is just as simple. All that's needed is to pass the provider to the signIn method.
const loginWithSocialProvider = async (token) => {
    const { user, error } = await supabase.auth.signIn({ provider });
    if (error) throw error;
    return user;
};
logout()
Now, in order to logout we need to call the Supabase signOut method. There is nothing to return from logout as the user is no longer available.
const logout = async () => {
  const { error } = await supabase.auth.signOut();
  if (error) throw error;
};
isLoggedIn()
For the isLoggedIn function we'll just check if the reactive ref user has a value or not.
const isLoggedIn = () => {
    return !!user.value;
};
If you're thinking that we never set this value when logging the user in, you're absolutely right but we're going to utilize another little supabase method to help us out with that in just a minute.
register()
The register function will look almost like the login function taking in the email and password. However, it will also need to accept the other user information (ie. the meta data). Also, we'll redirect back to the profile page along with some query variable that contains some handy info.
const register = async ({ email, password, ...meta }) => {
  const { user, error } = await supabase.auth.signUp(
    { email, password },
    {
            //arbitrary meta data is passed as the second argument under a data key
            // to the Supabase signUp method
            data: meta,
            // the to redirect to after the user confirms their email
            // window.location wouldn't be available if we were rendering server side
            // but since we're all on the client it will work fine
      redirectTo: ${window.location.origin}/me?fromEmail=registrationConfirmation",
        }
  );
  if (error) throw error;
  return user;
};
Notice this cool little trick where we spread meta: ...meta. This allows us to provide the meta data at the same level in the object we pass into the function when calling it but access it separately inside the function.
// for example
register({email: '[email protected]', password: 'password123', name: 'Daniel Kelly', favoriteFood: 'Spaghetti'})
// meta will be {name: 'Daniel Kelly', favoriteFood: 'Spaghetti'}
update()
While we haven't actually provided an interface to update the user, we can go ahead and implement the function as Supabase makes it so simple.
const update = async (data) => {
    const { user, error } = await supabase.auth.update(data);
    if (error) throw error;
    return user;
};
sendPasswordResetEmail()
The last function to implement is sendPasswordResetEmail. Once again, supabase has a simple solution.
const sendPasswordRestEmail = async (email) => {
    const { user, error } = await supabase.auth.api.resetPasswordForEmail(email);
    if (error) throw error;
    return user;
};
Watch for the Auth State to Change
At this point, we're almost ready to start using our interface but there's still one more crucial step we need to perform. We need to know when the user logs in or logs out and update the reactive ref in the AuthUser composable accordingly.
Your first thought might be to do this within the login and logout methods and this would work some of the time. However, what if the user is logged out due to their session expiring? Or what if the user is updated or deleted on the Supabase side? For both instances our login and logout methods would never be called.
To account for this supabase provides a function called onAuthStateChange.
We can call this function in our supabase composable and have it listen to all the changes in the auth state and then set our user reactive ref accordingly.
// UseSupabase.js
import { createClient } from "@supabase/supabase-js";
import useAuthUser from "@/composables/UseAuthUser";

// config
const supabaseUrl = "";
const supabaseKey = "";

// setup client
const supabase = createClient(supabaseUrl, supabaseKey);

// ⬇ setup auth state listener ⬇
supabase.auth.onAuthStateChange((event, session) => {
    // the "event" is a string indicating what trigger the state change (ie. SIGN_IN, SIGN_OUT, etc)
    // the session contains info about the current session most importanly the user dat
  const { user } = useAuthUser();

    // if the user exists in the session we're logged in
    // and we can set our user reactive ref
  user.value = session?.user || null;
});

// expose supabase client
export default function useSupabase() {
  return { supabase };
}
I've chosen to do this in UseSupabase.js outside of the function call so that it is only called once and so that it is organized with the other Supabase setup code.
Testing Things Out
Now comes the moment of truth. We should have most everything working. (Though you'll see in a moment, we'll need a couple more tweaks). Navigate to the register page in your browser and sign up.
After that you should be successfully redirected to EmailConfirmation page with your email address showing in the message.
Also if you check your inbox you'll get email just as expected.
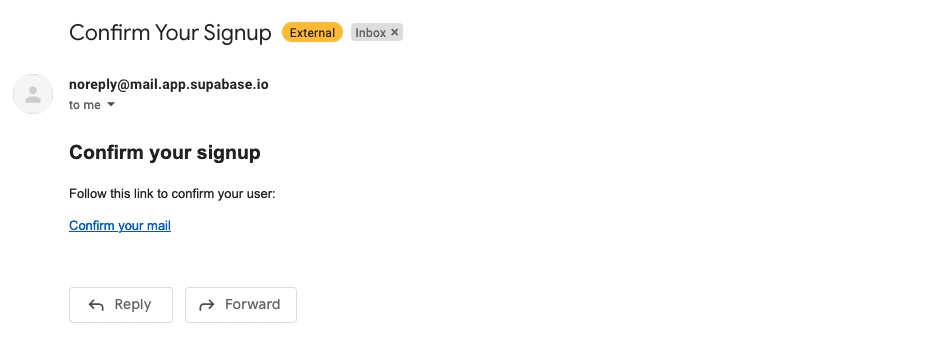
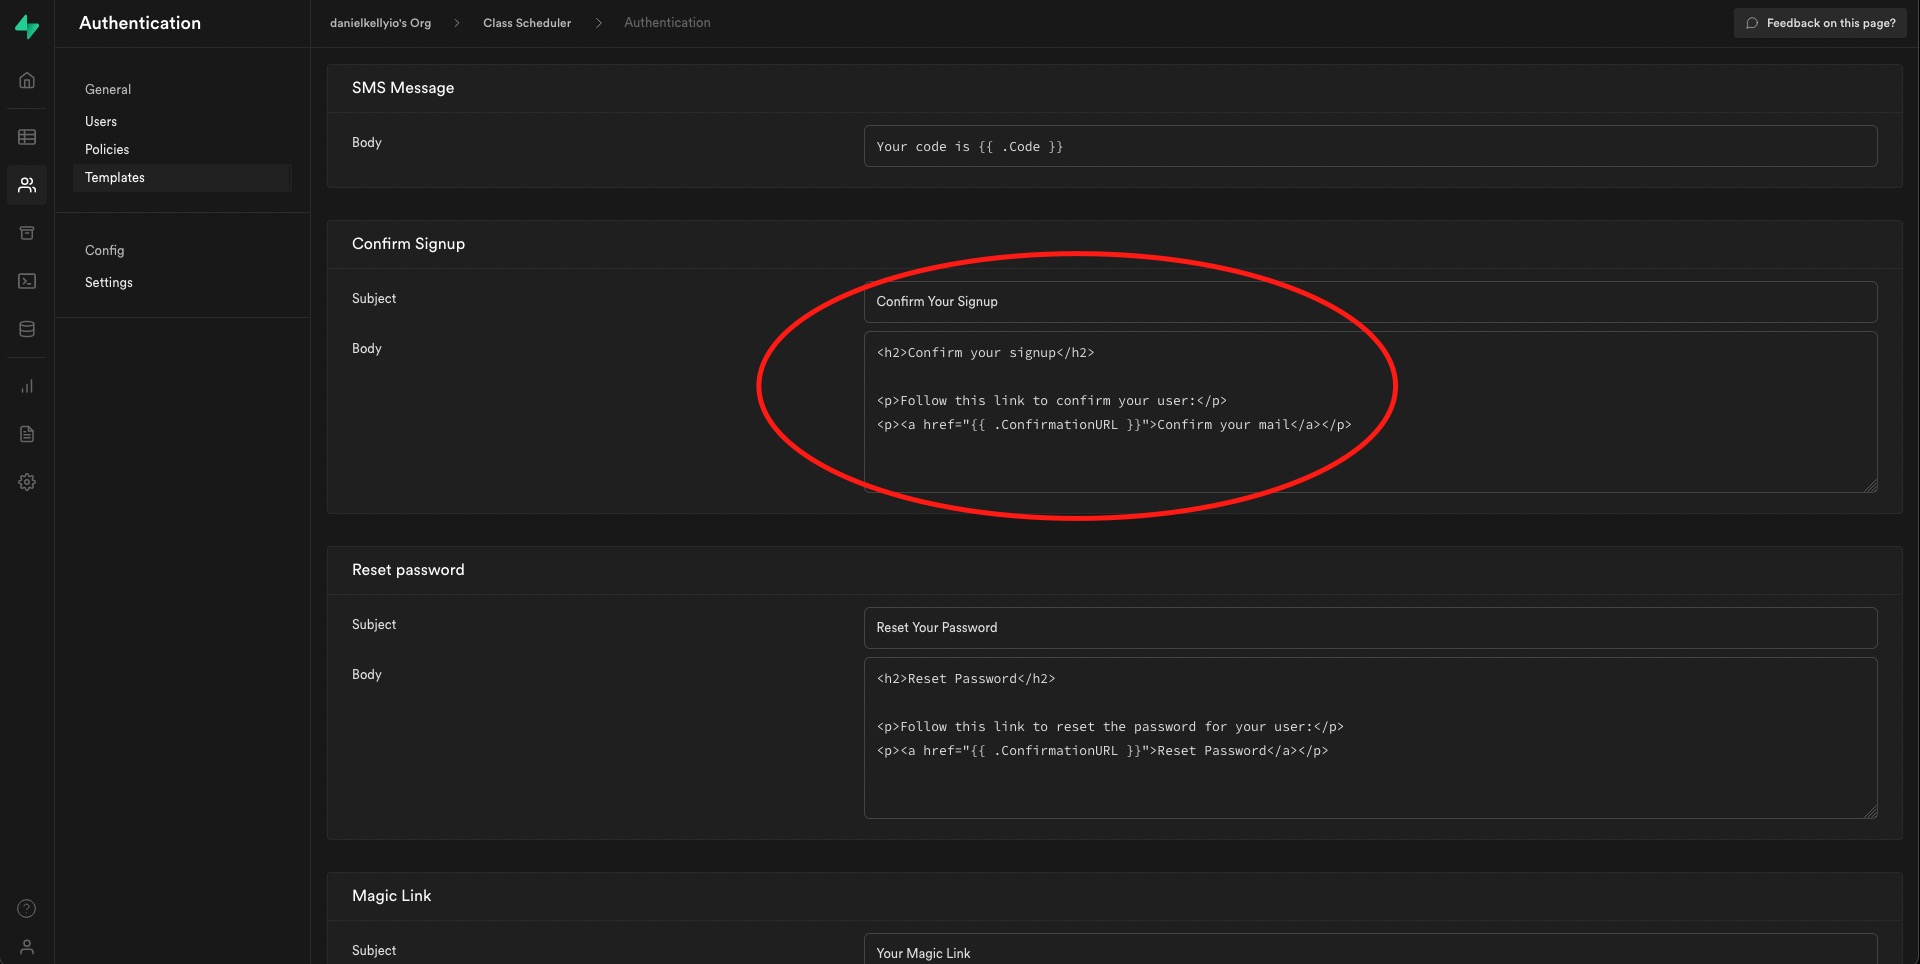
As a side note, if you'd like to customize what this email looks like, you can do so in the Supabase dashboard under Authentication > Templates.
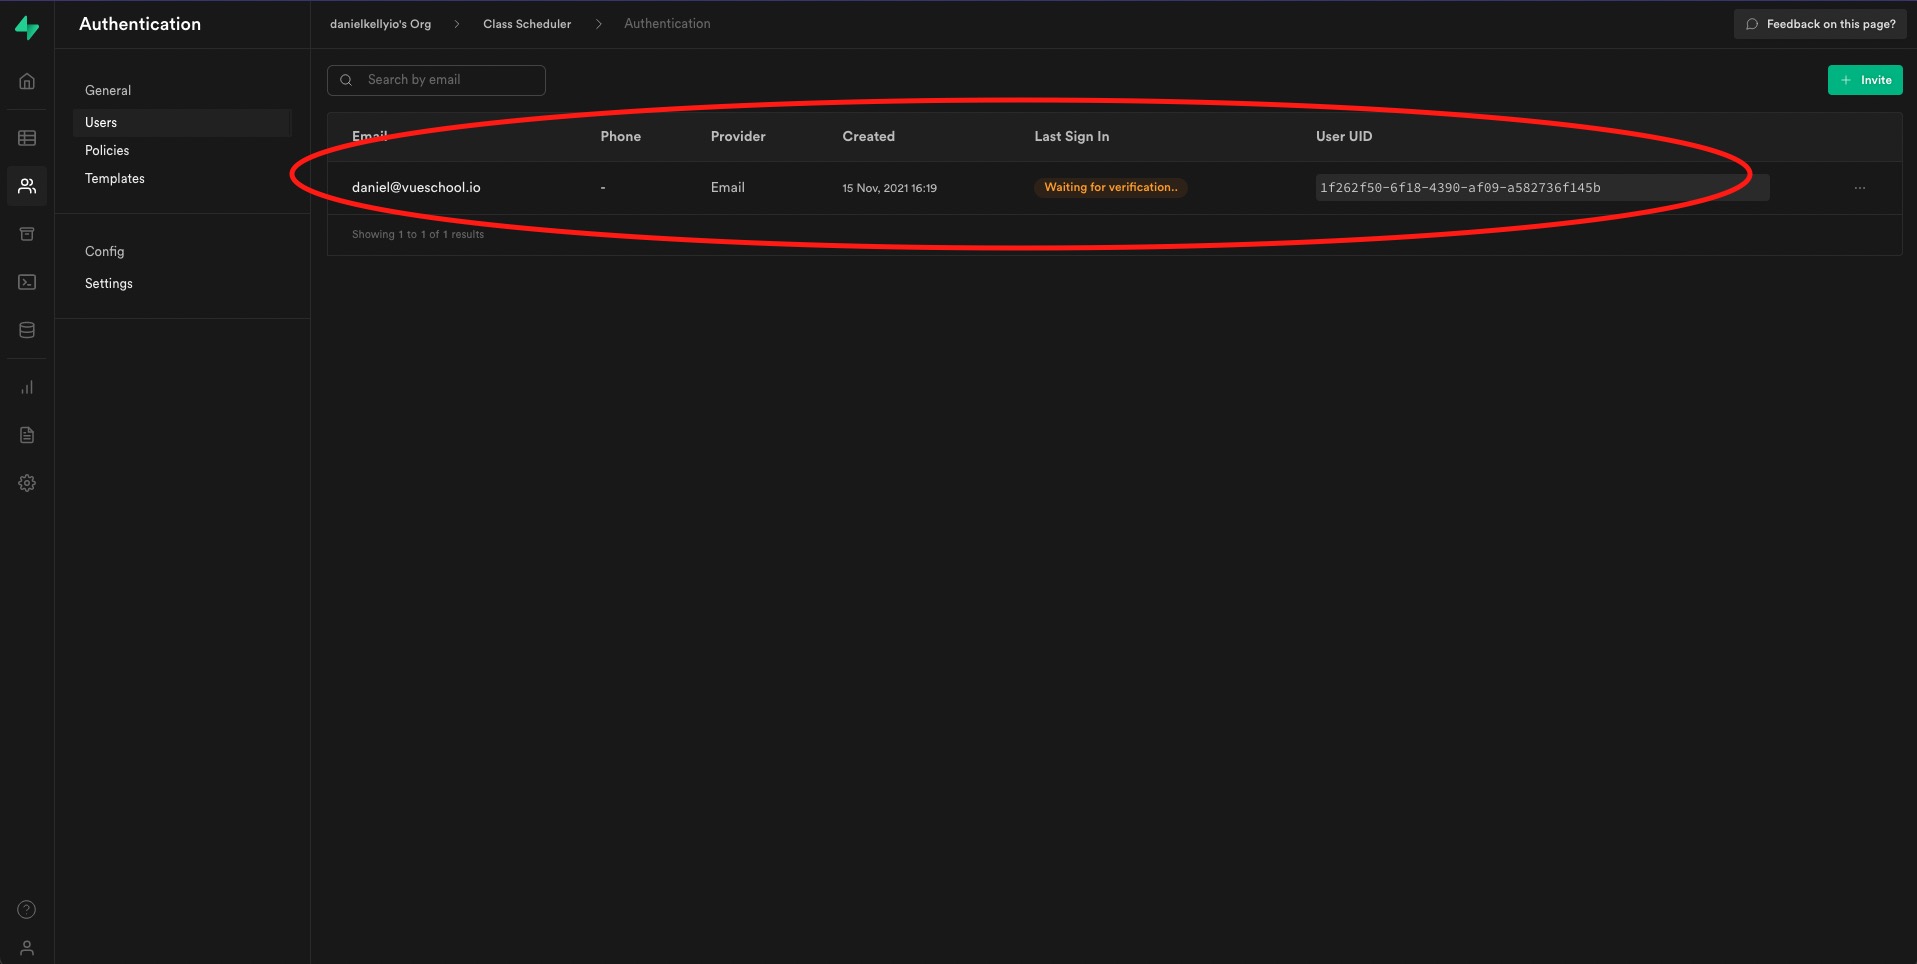
Also if you look under Authentication > Users you'll be able to see your newly registered user with the status of Waiting for Verication!
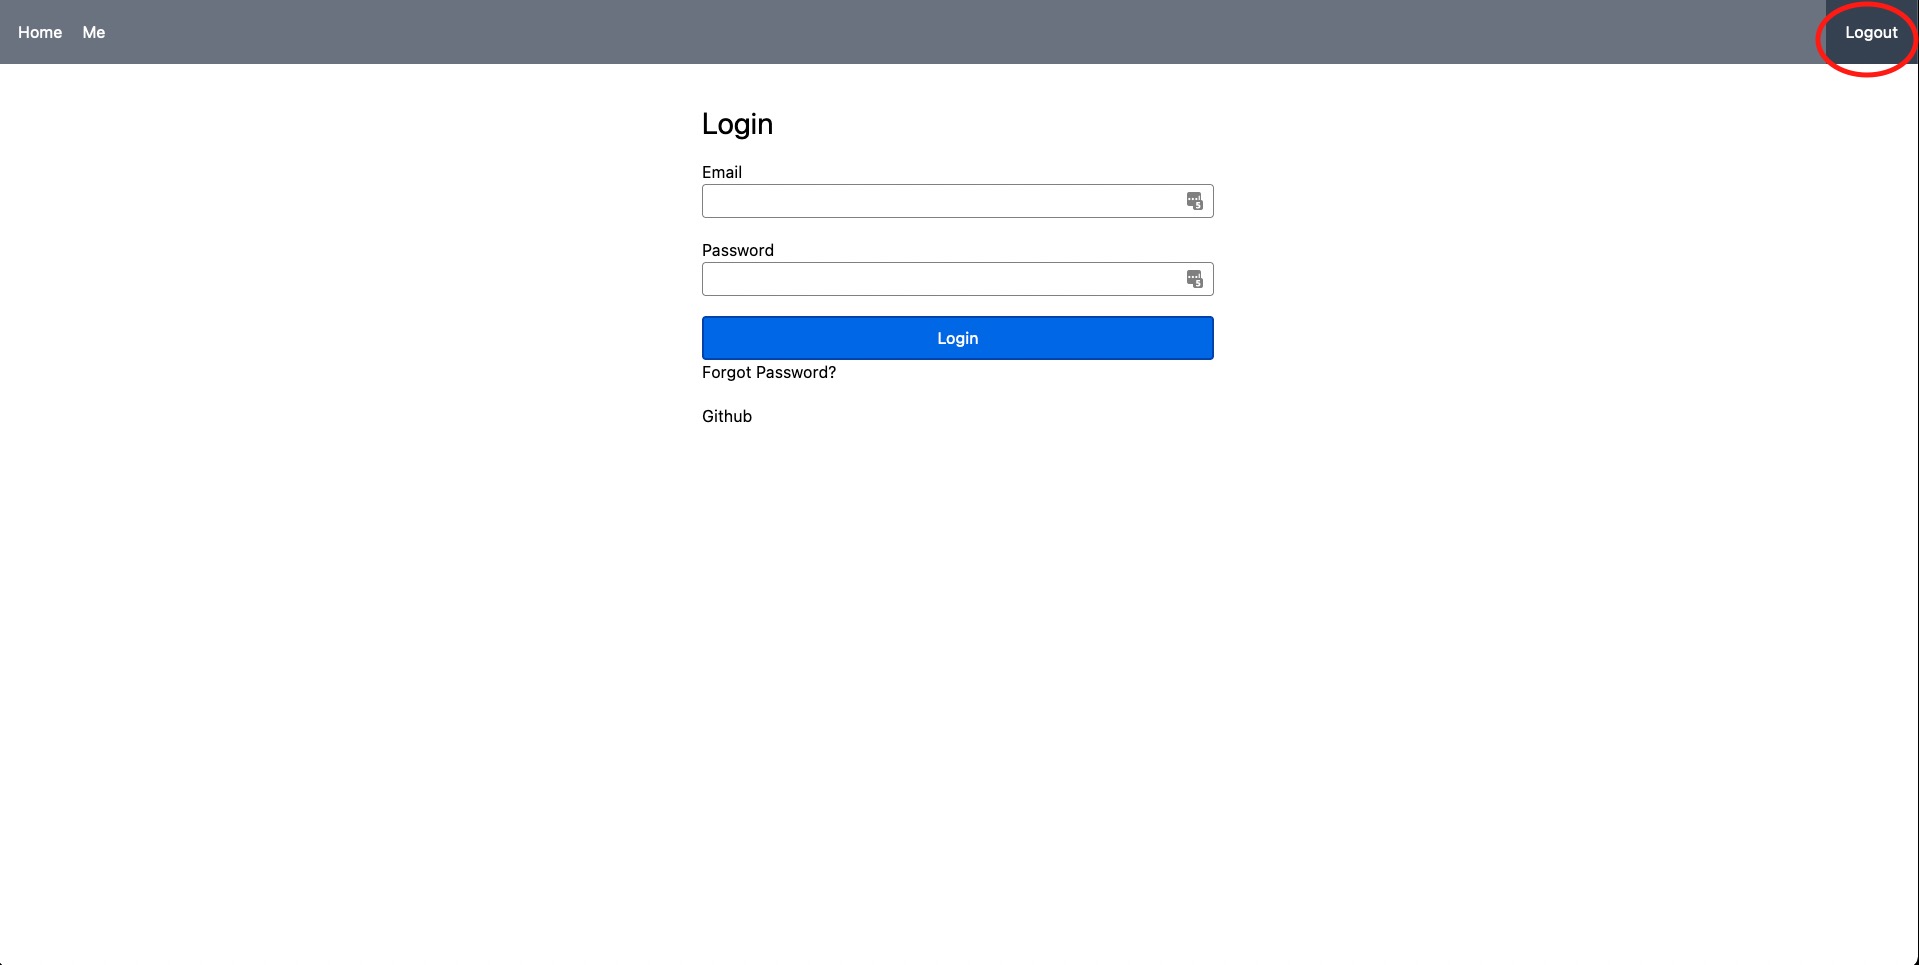
Great, now go ahead and click that link in your email. Oh man! We're redirected back to the login page... that's not right. However notice, the link in the top right of the header does say "Logout"
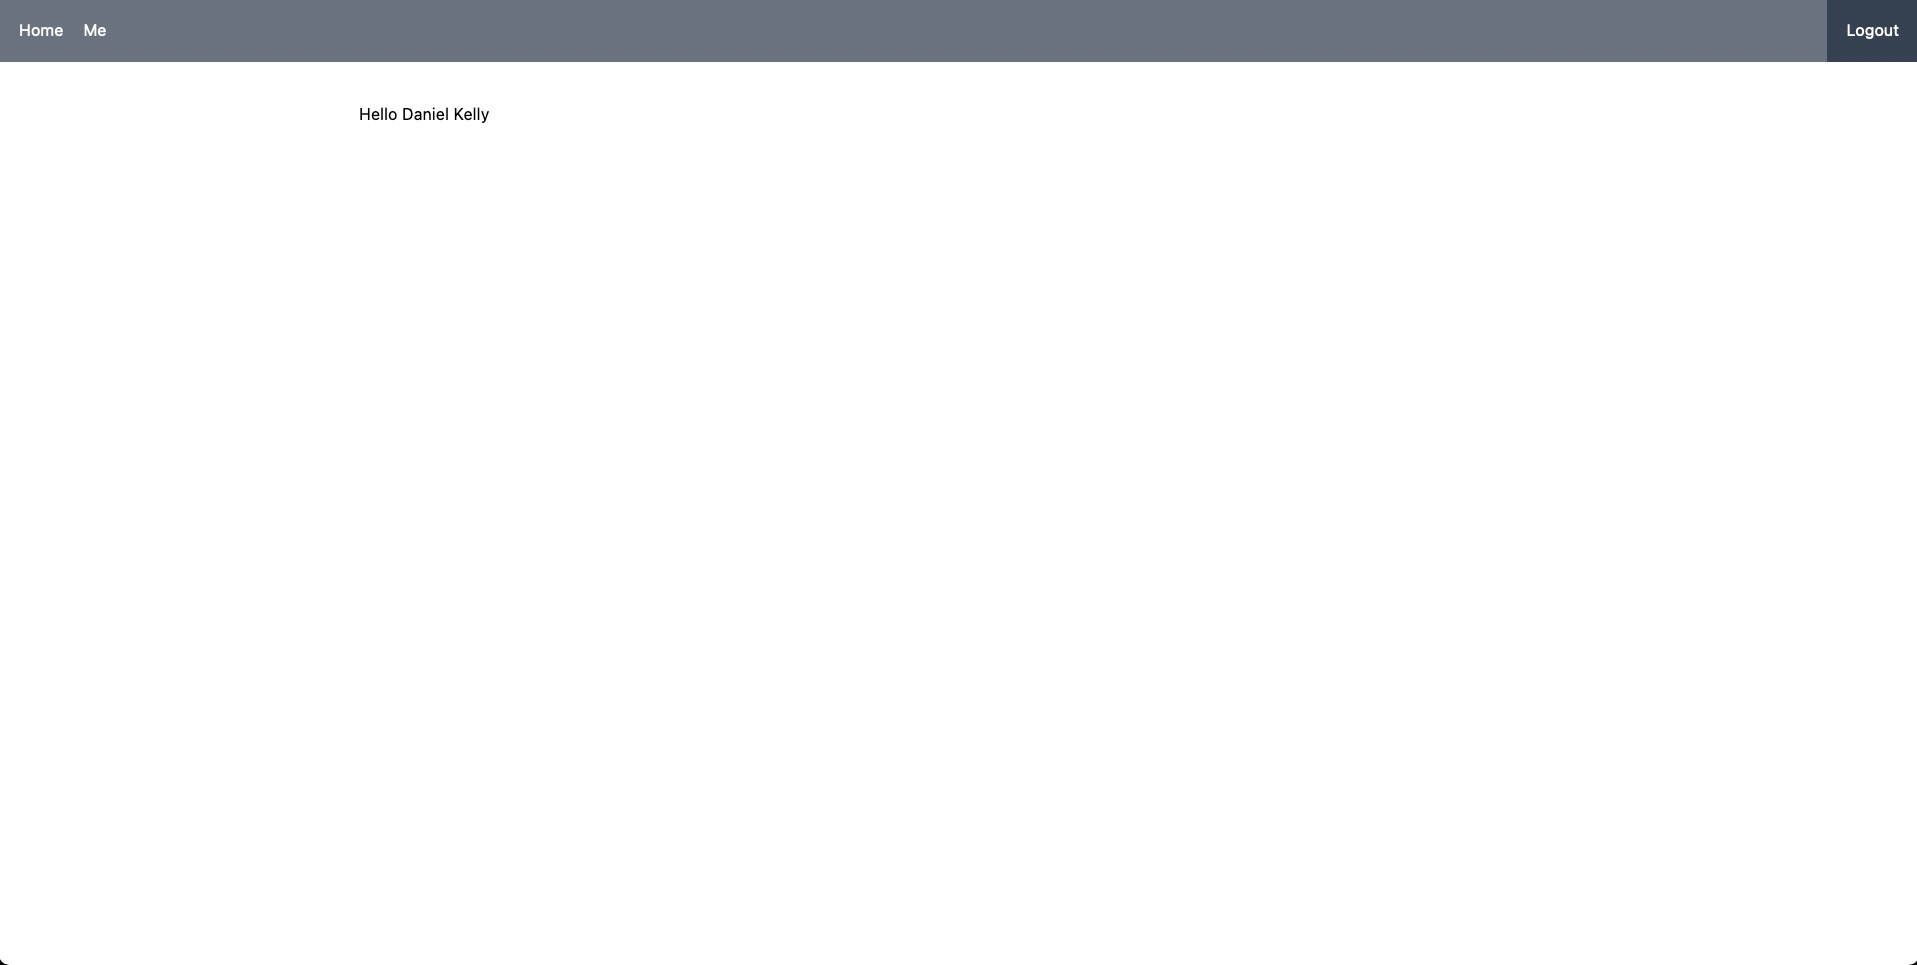
And if we were to click over to the me page it would let us access it and would correctly display the name we provided in the Registration form.
The problem, is that, for that split second when we hit the page and our middleware is running we aren't quite logged in yet, and thus the authStateChange hasn't yet occured and set our user reactive ref yet.
Let's make an exception in our middleware to go ahead and let the navigation pass if the query variable fromEmail exists since we know for sure that coming from the confirmation email, the user will be logged in momentarily.
router.beforeEach((to) => {
  const { isLoggedIn } = useAuthUser();
  if (
    !isLoggedIn() &&
    to.meta.requiresAuth &&
    !Object.keys(to.query).includes("fromEmail")
  ) {
    return { name: "Login" };
  }
});
Also note, this is not a security issue. If someone just randomly included fromEmail in the query string without being logged in, since the user doesn't exist, nothing will show up anyway and no information about the user will be received from Supabase.
Logging Out
Everything should now be working except the Logout link. We can make that work by defining the logout route and adding a route guard directly to it.
{
    name: "Logout",
    path: "/logout",
    beforeEnter: async () => {
      const { logout } = useAuthUser();
      await logout();
      return { name: "Home" };
    },
  },
After logging out, you can try registering again if you'd like, with a different email to confirm our fix above worked for navigating directly to the profile page. Also when logged out, checkout the login page. You should be able to successfully login with an existing user as well!
Homework
Lastly, if you use the Forgot Password link, Supabase will indeed send you the email to reset your password, however you'll still need to implement the form. I dare say you can dig into this using what you've learned from the article so far and utilize the update method on the AuthUser composable.
Conclusion
Supabase is a new and upcoming alternative to Firebase. It has a number of alluring features such as being open source, using PostgreSQL for the database, and supplying popular services such as data storage, auth, and file storage. Authenticating your Vue.js 3 application with their auth service is fairly straightforward due to their simple auth api.
If you'd like to see the complete code discussed in this article you can checkout the Github repo.
Once auth is complete, you can start making requests to your Supabase instances and creating rules to limit which users have access to what data.
So go forth and make authentically supa apps 🤪!
Start learning Vue.js for free

Latest Vue School Articles

Crafting a Custom Component Library with Vue and Daisy UI

What Makes a Good (Vue) Component Library? A Checklist
Our goal is to be the number one source of Vue.js knowledge for all skill levels. We offer the knowledge of our industry leaders through awesome video courses for a ridiculously low price.
More than 120.000 users have already joined us. You are welcome too!
© All rights reserved. Made with ❤️ by BitterBrains, Inc.